2.2 Deploying Filr Appliances
NOTE:The information in this section illustrates a VMware deployment. The same basic steps apply to other supported hypervisors. For specific deployment instructions, refer to the Filr 2.0: Installation and Configuration Guide.
After you have obtained and extracted the appliance software, you need to deploy it on your host server, as illustrated in Figure 2-4 and Figure 2-5 and as explained in the tables that follow them. For more specific information about the different deployment models, see Planning the Deployment Type
in the Filr 2.0: Administration Guide.
2.2.1 Small Filr Deployment Overview
NOTE:After initial VM preparation is completed, deploying on Hyper-V and Xen is comparable to the VMware steps illustrated below.
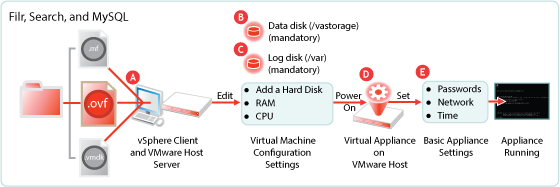
Figure 2-4 A Small Deployment of Filr on VMware
|
Letter |
Details |
|---|---|

|
Using the vSphere client, access the VMware host server and deploy the .ovf template file. Specify the hostname and IP address. If possible, the system determines the mask and gateway, and automatically populates those fields. The network interface is bridged by default. Make sure this setting matches the network configuration in your VMware environment. |

|
A second disk is needed for the following reasons:
You might want to also change the RAM allocation and the number of CPUs. |

|
A third disk is needed for storing log files, which prevents the system disk from running out of space. |

|
Start the appliance. |

|
Specify the appliance’s basic configuration, which includes administrative users’ passwords, IP address settings, and the time zone and NTP time source. These settings are common to all Novell appliances. |
2.2.2 Large Filr Deployment Overview
NOTE:After initial VM preparation is completed, deploying on the other hypervisors is comparable to the VMware steps illustrated below.
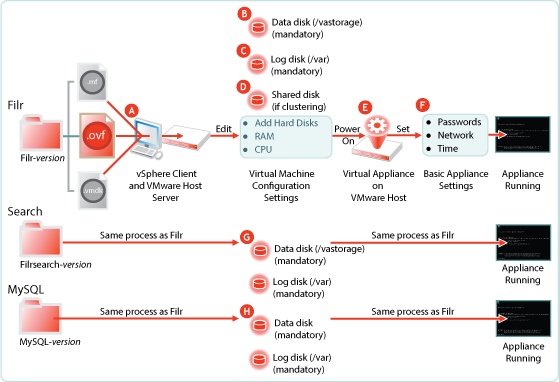
Figure 2-5 A Large Deployment of Filr
|
Letter |
Details |
|---|---|
|
|
Using the vSphere client, access the VMware host server and deploy the .ovf template file. Specify the hostname and IP address. If possible, the system determines the mask and gateway, and automatically populates those fields. The network interface is bridged by default. Make sure this setting matches the network configuration in your VMware environment. |
|
|
A second disk is needed for the following reasons:
You might want to also change the RAM allocation and the number of CPUs. |
|
|
A third disk is needed for storing log files, which prevents the system disk from running out of space. |
|
|
If you are clustering the Filr VA, add a shared CIFS or NFS disk to all of the Filr VAs in the cluster to use. This only applies to the Filr VA, not to the Search or MySQL appliances. |
|
|
Start the appliance. |

|
Specify the appliance’s basic configuration, which includes administrative users’ passwords, IP address settings, and the time zone and NTP time source. These settings are common to all Novell appliances. |

|
If you are installing separate appliances, you need to deploy at least one and preferably two search appliances as well. The process is very similar to a Filr VA deployment, except that the search appliances don’t use shared storage. |

|
Installing separate appliances also requires configuring a MySQL or MS SQL database. Deploying the MySQL appliance that comes with Filr is very similar to the process for Filr and the search appliances. If you already have a MySQL or MS SQL database in your organization, you can use it instead of the MySQL appliance that comes with Filr. |