5.3 Configuring and Managing Net Folder Servers
5.3.1 Configuring Net Folder Servers
Net Folder Servers represent a physical OES or Windows file server. Net Folder Servers are connections to specific volumes (on OES servers) and shares (on Windows servers). You can set up multiple connections to each server as needed.
You can set up each Net Folder Server to synchronize on a schedule that you specify.
-
Log in to the Filr site as the Filr administrator.
-
Launch a web browser.
-
Specify one of the following URLs, depending on whether or not you are using a secure SSL connection:
http://filr_hostname:8443
https://filr_hostname:8443
Replace filr_hostname with the hostname or fully qualified domain name of the Filr server that you have set up in DNS.
Depending on how you have configured your Filr system, you may not be required to enter the port number in the URL, and if you are using NetIQ Access Manager, the Filr login screen is not used.
-
-
Click the link in the upper right corner of the page, then click the icon
 .
.
-
Under , click .
The Manage Net Folder Servers page is displayed.
-
(Conditional) If the LDAP synchronization process for importing users contains at least one user who has a Home folder associated with them, a Net Folder Server is ready to be configured immediately after running the LDAP synchronization process. (For more information about LDAP synchronization in Filr, see Section 14.1, Synchronizing Users and Groups from an LDAP Directory.)
In the column, click the LDAP server name that you synchronized during the LDAP synchronization process, then skip to Step 6.
-
(Conditional) If the LDAP synchronization process for importing users does not contain at least one user who has a Home folder associated with them, you need to manually add a new Net Folder Server. Or, you can run the LDAP synchronization, as described in Section 14.1, Synchronizing Users and Groups from an LDAP Directory.
To manually add a new Net Folder Server, click , then continue with Step 6.
-
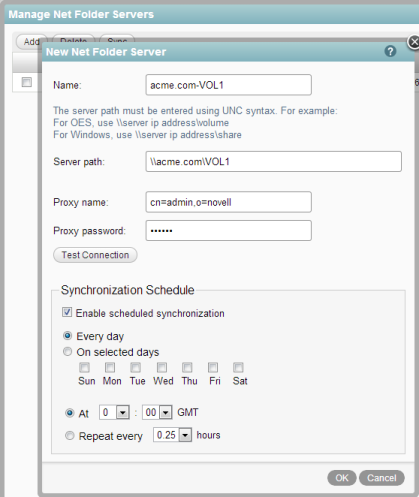
Whether you are adding a new Net Folder Server or configuring one that is synchronized through LDAP, you now need to configure it or finish configuring it. Specify the following information:
Name: Specify a name for this Net Folder Server
This is already populated if the search context of your LDAP sync contains an OES or Windows server.
Server path: The path to the OES or Windows server.
This is already populated if the LDAP synchronization process for importing users contains at least one user who has a Home folder associated with them.
The server path must be entered using UNC syntax. For example, for OES, use \\server_DNS\volume. For Windows, use \\server_DNS\share.
You can use DNS or IP address in the and fields. DNS must be properly configured on the virtual appliance in order for it to work.
Proxy name and password: Specify the fully qualified, comma-delimited name and password for the proxy user used to access the OES or Windows server.
IMPORTANT:Before you specify a proxy name and password for the Net Folder server, ensure that you review the information in Section 5.1.2, Planning the Net Folder Server Proxy User.
Test connection: Click this button to make sure the path is accurate and that the credentials are valid, then click after the test succeeds.
Sometimes proxy users with the incorrect context pass this test. Ensure that the context for your proxy user is correct, as described in Expected Name Format for Windows, OES, and NetWare File Servers.
Synchronization Schedule: Specify the schedule for when you want the synchronization between the file system server and Filr to occur. This becomes the default schedule for each Net Folder associated with this server.
Synchronizations can be scheduled only if you have configured the Net Folder Server to use Full Synchronization as the synchronization method (as described in Section 5.1.4, Planning the Synchronization Method). When setting the synchronization schedule, be aware that the schedule that you choose can greatly affect system performance.
Before you set a synchronization schedule, review the information in Section 5.1.5, Planning the Synchronization Schedule.
-
Click > .
-
For Home folders to be displayed in the My Files area for each user, ensure that you have completed the steps in Section 4.0, Setting Up Personal Storage.
5.3.2 Managing Net Folder Servers
After Net Folder Servers already exist in your Filr system, you can manage them as described in this section.
Modifying a Net Folder Server
-
Log in to the Filr site as the Filr administrator.
-
Launch a web browser.
-
Specify one of the following URLs, depending on whether or not you are using a secure SSL connection:
http://filr_hostname:8443
https://filr_hostname:8443
Replace filr_hostname with the hostname or fully qualified domain name of the Filr server that you have set up in DNS.
Depending on how you have configured your Filr system, you may not be required to enter the port number in the URL, and if you are using NetIQ Access Manager, the Filr login screen is not used.
-
-
Click the link in the upper right corner of the page, then click the icon
.
-
Under , click .
The Manage Net Folder Servers page is displayed.
-
Click the name of the Net Folder Server that you want to modify.
-
Make the desired modifications, then click .
Synchronizing a Net Folder Server
When you create a Net Folder Server, you can enable a synchronization schedule, as described in Section 5.3.1, Configuring Net Folder Servers.
To manually synchronize the Net Folder:
-
Log in to the Filr site as the Filr administrator.
-
Launch a web browser.
-
Specify one of the following URLs, depending on whether or not you are using a secure SSL connection:
http://filr_hostname:8443
https://filr_hostname:8443
Replace filr_hostname with the hostname or fully qualified domain name of the Filr server that you have set up in DNS.
Depending on how you have configured your Filr system, you may not be required to enter the port number in the URL, and if you are using NetIQ Access Manager, the Filr login screen is not used.
-
-
Click the link in the upper right corner of the page, then click the icon
.
-
Under , click .
The Manage Net Folder Servers page is displayed.
-
Select the Net Folder Server that you want to manually synchronize, then click .
Deleting a Net Folder Server
NOTE:Before you can delete a Net Folder Server, you must first delete any Net Folders that are associated with the Net Folder Server.
To delete a Net Folder Server after all Net Folders associated with the Net Folder Server have been deleted:
-
Log in to the Filr site as the Filr administrator.
-
Launch a web browser.
-
Specify one of the following URLs, depending on whether or not you are using a secure SSL connection:
http://filr_hostname:8443
https://filr_hostname:8443
Replace filr_hostname with the hostname or fully qualified domain name of the Filr server that you have set up in DNS.
Depending on how you have configured your Filr system, you may not be required to enter the port number in the URL, and if you are using NetIQ Access Manager, the Filr login screen is not used.
-
-
Click the link in the upper right corner of the page, then click the icon
.
-
Under , click .
The Manage Net Folder Servers page is displayed.
-
Select the Net Folder Server that you want to delete, then click .