3.3 Connecting to the Wireless Router
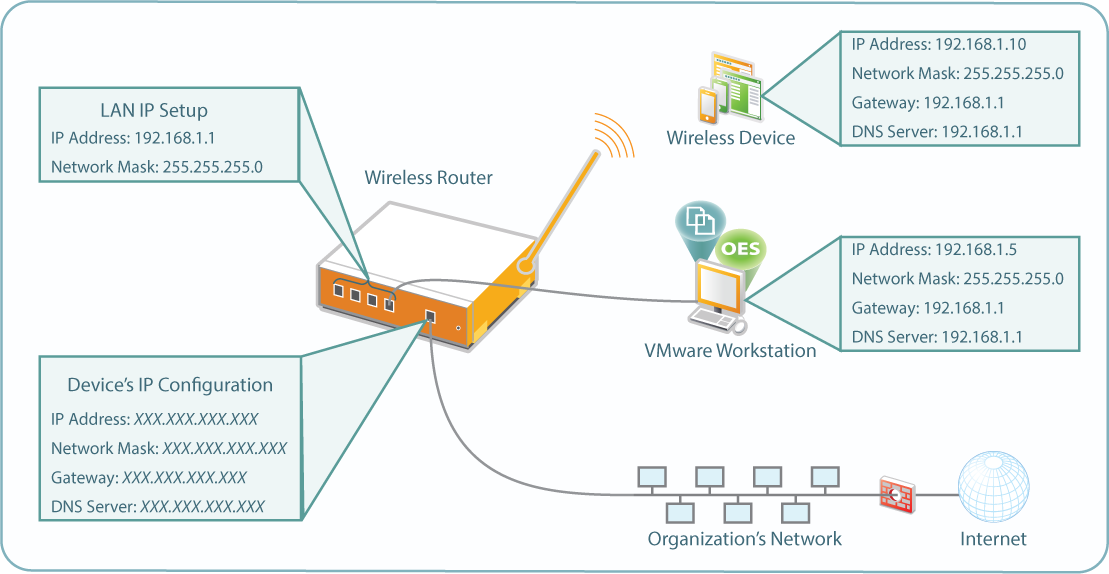
When you have completed the instructions in this section, your wireless router configuration should resemble Figure 3-1.
Figure 3-1 Wireless Router Setup
IMPORTANT:The instructions in this section assume that you are connecting your wireless router to the Internet through your organization’s network. Most wireless routers have DHCP services active by default. To avoid problems with your organization’s DHCP service, you need to disable DHCP before connecting the router to the network.
Of course, having DHCP disabled necessitates that each device connecting to the router use a static IP address.
Set up your wireless router, and connect to it by doing the following:
-
Disconnect the VMware workstation from your organization’s network, and connect it to one of the LAN ports on the wireless router.
IMPORTANT:Do not connect the router to the Internet at this point.
-
Start the router.
-
Using the instructions for your router, access the administration console and do the following:
-
Set the router to obtain its IP address through a DHCP service.
If DHCP is not available, configure it with a static IP address, network mask, gateway, and so on, for your network.
-
Set the router to communicate with devices that are attached to it by ensuring that its LAN IP setup uses IP address 192.168.1.1 and network mask 255.255.255.0.
-
Ensure that the router is not set to act as a DHCP server.
-
For the wireless configuration, assign an easily identifiable SSID, such as Filr_Lab.
-
If possible, disable wireless security to make it simpler to connect through a wireless connection.
-
Save the settings.
IMPORTANT:If your router’s LAN IP address configuration changed, then remember to use 192.168.1.1, rather than the previous address, when connecting to the router’s management console.
-
-
Set the workstation’s network adapter that is connected to the wireless router, with the following IP address information:
IP address
192.168.1.5
Network Mask
255.255.255.0
Default Gateway
192.168.1.1
DNS Server Addresses
192.168.1.1
For example, on Windows 7, access the workstation’s Control Panel. Then in the Network Sharing Center, set the Local Area Connection adapter with the address information.
-
Connect the wireless router to your organization’s network.
-
Configure the mobile device with the following Static IP address information:
IP address
192.168.1.10
Network Mask
255.255.255.0
Default Gateway
192.168.1.1
DNS Server Addresses
192.168.1.1
For example, on an iPad, access the panel, choose choose the network with the SSID name you set in Step 3.d, choose the blue arrow for the network, choose the tab, then specify the address information.
-
Open a browser on the workstation and the mobile device, and ensure that you can connect to the Internet through them, then continue with the next section.