28.1 Designing an Authorization Policy
When creating an Authorization policy, you need to configure one or more rules. Each rule consists of two parts: (1) one or more conditions the user must meet and (2) the action to perform when the user meets the conditions or doesn’t meet the conditions. The action can be to either allow or deny access to the resource. This section describes how to use the following elements when creating a policy:
28.1.1 Controlling Access with a Deny Rule and a Negative Condition
To deny access to the correct set of users, you need to know the characteristics of the users you don’t want accessing the resource, as well as the characteristics of the users you want accessing the resource.
Some very simple policies can be created using a Deny action. For example, suppose you have an application that you only want managers to access. If you have set up a role that assigns all managers to the Manager role, you can use this characteristic for an Authorization policy. Such a rule would be similar to the following:
Figure 28-1 Simple Rule
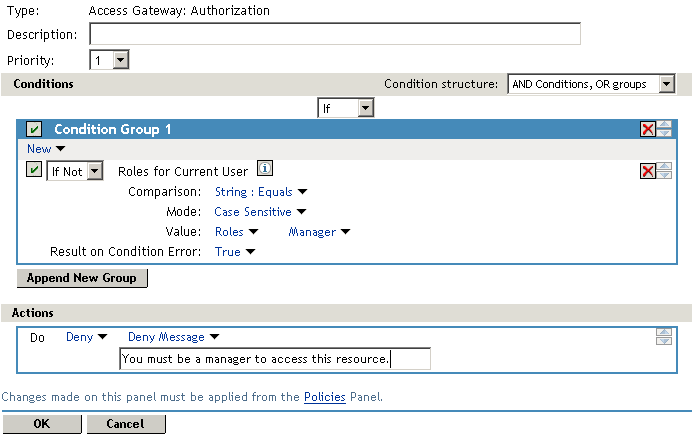
This rule evaluates the user, and if the user does not belong to the Manager role, the user matches the condition. The action for matching the condition is to deny access. The managers, who belong to the Manager role, do not match the condition and the Deny action is not applied to them.
The option is set to True. You don’t want an error to cause the policy to assume that the user is a manager. If an error occurs, you want the policy to assume that the user is not a manager, or in other words, matches the condition, and you want the Deny action applied.
28.1.2 Configuring the Result on Condition Error Option
The option allows you to specify what the condition returns when the comparison of the two values returns an error rather than the results of the comparison. Select either or . You need to analyze the logic of your policy carefully, because if you set up this option incorrectly, error conditions can allow access to a resource. Consider the following:
-
If your rule is a Permit rule and you do not want the action applied when an error occurs, select for this option.
-
If your rule is a Deny rule with an condition and you want the action applied when an error occurs, select .
28.1.3 Many Rules or Many Conditions
You can design your policy to have many rules with a single condition and action, or you can design your policy to have fewer rules, with each rule containing many conditions.
For example, suppose you have a resource that you don’t want users accessing on Monday, Wednesday, and Friday between 1:00 a.m. and 2:00 a.m. You could set up three rules, one for each day, or you could set up one rule with three conditions. If all the conditions have the same action (for example, deny access with the same reason), it is simpler to put them in the same rule. However, if you have a customized message to return for each day, you need to put them in separate rules.
Each rule contains the following:
-
Zero or more conditions. A condition specifies how the request data is evaluated for a True or False match. Conditions are evaluated in the order in which they are listed.
-
One or more condition groups. Conditions are placed in condition groups, which gives you the flexibility of creating a policy that allows the user to match the conditions in one group but not the conditions in the other condition groups. Or you can set up the condition groups to require that the user matches at least one condition in each condition group.
-
An action, which grants access, denies access, or redirects the users.
Conditions, conditions groups, and the interaction among them allow you to create very simple rules (if A, then grant access) to very complex rules (if A, B, and C, but not D and E, then grant access).
28.1.4 Controlling Access with Multiple Conditions
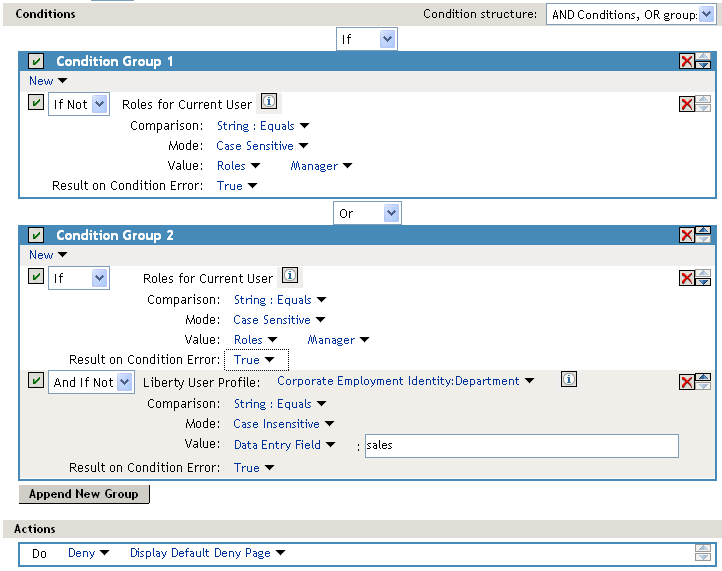
A policy requires multiple conditions when you have more than one required condition for granting access. For example, suppose you can easily identity your managers because they have all been assigned the role of Manager, and you have a resource that only the sales managers should access. Such a policy requires two conditions for granting access: the Manager role and membership in the sales department. For a Deny rule, the rule needs two condition groups:
-
The first condition group matches all users who are not managers. This causes the Deny action to be applied.
-
The second condition group matches the users who are managers but don’t belong to the sales department. Because they match both conditions, the Deny action is applied. For these two condition groups to work with this logic, the is set to .
The users who are managers and who belong to the sales department do not match either condition group. The Deny action is not applied, and they are allowed access.
Such a rule would look similar to the following:
Figure 28-2 A Rule with Two Condition Groups
This second condition group could be implemented as the second rule of the policy. If so, it should be set as a lower priority than the first rule. Because most systems would have more users than managers, the user rule would be used more frequently, so it should come first.
28.1.5 Using Permit Rules with a Deny Rule
You can also create policies that contain one or more Permit rules and then as the lowest priority rule in the policy, a Deny rule with no conditions. In such a policy, as soon as an allow match is processed, the rest of the rules are not processed and the user is granted access to the resource. The Deny rule is only processed if the user does not match one of the allow rules, and because all users match a rule with no conditions, the user is denied access to the resource. The first rule in such a policy for the sales application would look similar to the following.
Figure 28-3 Rule 1 Granting Access
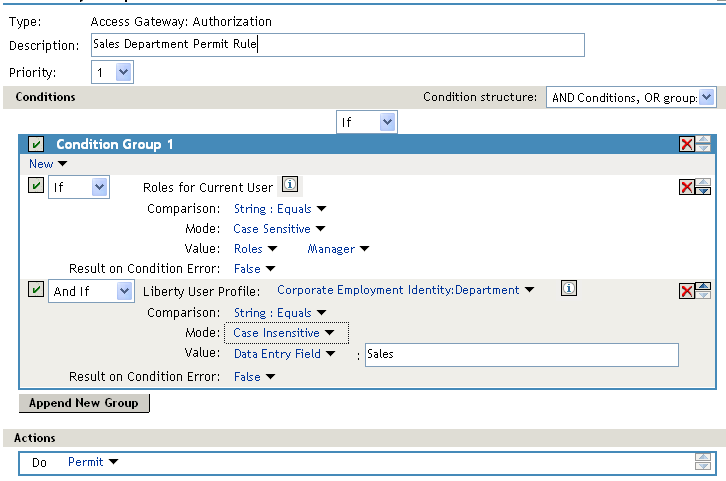
The conditions in Rule 1 are ANDed, which requires the user to match both conditions before they are granted access to the resource. The priority is set to 1, so this rule is the first rule that the Access Gateway processes. The J2EE authorization policies use the same logic.
The second rule would look similar to the following.
Figure 28-4 Rule 2 Denying Access
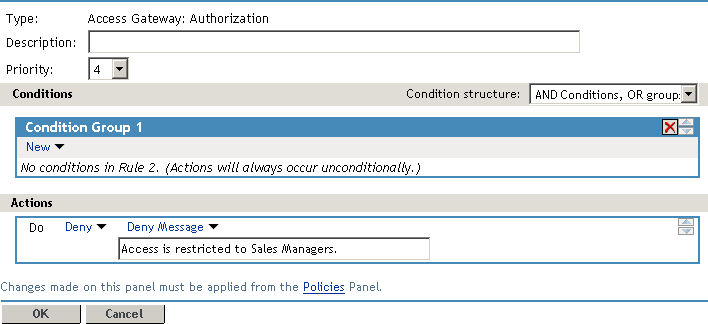
Because this rule has no conditions, any user who does not match the first rule does match this rule and is denied access. The priority of this rule is set lower than the Permit rule so that the Permit rule is processed first.
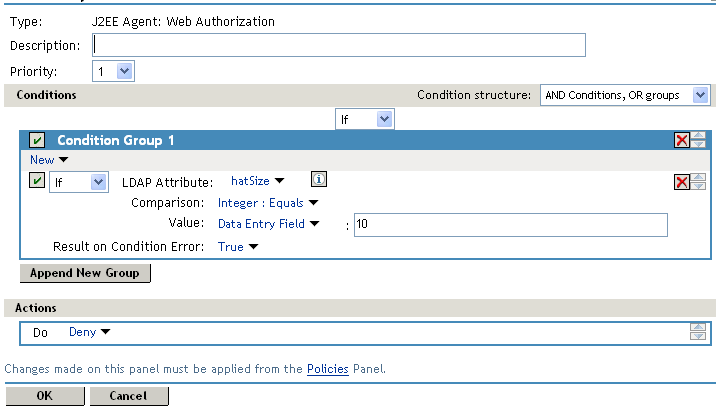
28.1.6 Using Deny Rules with a General Permit Rule
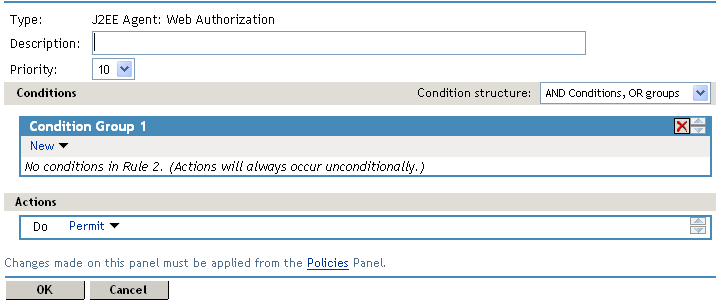
You can also create policies that contain one or more Deny rules and then as the lowest priority rule in the policy, a Permit rule with no conditions. In such a policy, as soon as a Deny rule matches a user, the rest of the rules are not processed and the user is denied access to the resource. The Permit rule is only processed if the user does not match one of the Deny rules. Because all users match a rule with no conditions, the user is allowed access to the resource.
The key to creating this type of policy is making sure all the Deny rules match the users you do not want accessing the resource and making sure that the option is set correctly.
For example, suppose one of the Deny rules uses an LDAP attribute for the condition and that the attribute is a hatSize attribute. Some of your users do not have a hatSize attribute, so when they access the resource, the comparison generates an error. If option is set to False, the action (Deny) is not applied, and the next rule in the policy is processed. If that rule is the general Permit rule, then they are allowed access to the resource because they experienced an error. To prevent this behavior, you need to set the option to True, so that the Deny action is applied. Your rule then denies access to everyone whose hatSize attribute matches the specified value and everyone who does not have the attribute.
The Deny rule for such a policy would look similar to the following:
Figure 28-5 Deny Rule Configured for Error Conditions
For most people, Deny rules are harder to write than Permit rules. You not only need to carefully configure the option, you must also carefully consider the consequences of the condition not matching a user. When a user doesn’t match the condition, the Action is not applied and the next rule in the policy is evaluated. For example, suppose the URL condition is set to the compare the following value:
http://sales.provo.novell.com/meetings/?
If the URL in the request is http://sales.provo.novell.com/meetings/january, the user does not match the condition, because the ? applies only to the files in the meetings directory and not to the subdirectories. The Action is not applied, and the next rule or policy is evaluated. Consider the following possibilities:
-
If you want the condition to match all files and subdirectories, you need to change the ? wildcard to the * wildcard.
-
If you want the condition to allow access to the files in the /meetings directory but deny access to the subdirectories, you need to negate the condition so it evaluates as follows: if the URL is not a request for the /meetings/? directory, deny access. If you select this type of condition, you need to set the option to True. If the comparison returns an error and there is the possibility that the request is for a subdirectory, you want the user to be denied access.
The general Permit rule for a Deny policy would look similar to the following:
Figure 28-6 General Permit Rule
NOTE:This type of policy is not recommended for WebSphere applications protected by the J2EE Agent. WebSphere, even when the user is logged in, always first uses the anonymous user to access resources and switches to the actual username only when the anonymous user is denied. If the policy uses conditions that require information that is available only if the user is authenticated, this type of policy produces unexpected results.
28.1.7 Public Policies
You can create public authorization policies, which are policies that apply to everyone, by leaving the section empty. In the section, you specify either to deny or to permit access to the resource. Then you assign the policy to the protected resource.
28.1.8 General Design Principles
When designing a policy, remember the following principles:
-
Logged-in users are allowed access to a protected resource unless the policy denies access.
-
Priority determines the order in which rules are applied.
-
The Conditions section of the rule must evaluate to True in order for the Action section to be applied. If the Condition section evaluates to False, the Action section is ignored and the policy moves to the next rule. If another rule does not exist, the user is granted access to the resource.
-
Rules are only processed until a user matches the conditions in a rule and its action is applied. If a user matches the first rule in a policy, that action is applied, and the rest of the rules in the policy are ignored.
-
If two rules have the same priority, Deny rules are applied before Permit rules.
-
After you have designed your policy, created it, and assigned it to a resource, you need to test the policy. You need to log in as the type of user who should be granted access, as the type of user who should not be granted access, and as user who generates an error on condition evaluation.
28.1.9 Assigning Policies to Resources
For information on how to assign the policy to a resource, see the following:
-
For an Access Gateway policy, see Section 13.4.3, Assigning an Authorization Policy to a Protected Resource.
-
For a Web Authorization policy, see
Assigning a Web Authorization Policy to the Resource
in the Novell Access Manager 3.0 SP4 Agent Guide. -
For a Enterprise JavaBean Authorization policy, see
Assigning an Enterprise JavaBeans Authorization Policy to a Resource
in the Novell Access Manager 3.0 SP4 Agent Guide.