9.7 Configuring Common Access Settings for a Trusted Provider
Common access settings for a trusted provider include specifying how to display the provider on the Identity Server’s login page, and specifying security settings for communication.
9.7.1 Configuring Display and Access Settings
You can configure how you want to display the provider on the Identity Server’s login page. The fields that are displayed on this page vary depending on the protocol and provider type you selected for configuration.
-
In the Administration Console, click > > > > > .
-
Click > .

-
Fill in the following fields:
Display name: The display name seen by the end user for this trusted provider. The default name is the name you entered when creating the trusted provider.
Icon URL: The URL of the icon to display for this trusted provider. If you add an icon, the system displays the icon as the link, rather than the text in the field.
Login URL: (Displayed for a SAML 1.1 trusted identity provider) The URL required by the identity provider to authenticate the user from the service provider.
For Liberty and SAML 2.0, a single-sign on URL is automatically generated and can be displayed on the service provider’s login page as a link to the identity provider. For SAML 1.1, you must specify an Intersite Transfer Service URL in the field. For more information, see Specifying the Intersite Transfer Service URL for the Login URL Option.
Destination URL: (Displayed for a SAML 1.1 trusted service provider) This setting is not currently used and can be left blank.
Advertise on Login page: Displays the identity provider’s link on the Login page when the user logs directly into the User Portal (...nidp/app).
-
Click .
-
Click on the Trusted Providers page.
-
Click on the Servers page.
9.7.2 Configuring Communication Security Settings
You can configure the security settings to control direct communication between the Identity Server and a trusted provider across the SOAP back channel. These methods apply to the trusted identity provider and are similar between Liberty and SAML.
-
In the Administration Console, click > > > > > .
-
Click > .

-
Fill in the following fields:
Encrypt assertions: (SAML 2.0 security only). Adds a level of security by encrypting assertions so that they cannot be meaningfully interpreted at an intermediate entity.
Encrypt name identifiers: (SAML 2.0 identity provider security). Adds a level of security by encrypting name identifiers so that they cannot be meaningfully interpreted at an intermediate entity.
The following settings specify how to validate messages received from trusted providers over the SOAP back channel.
Message Signing: Specifies no security but rather relies upon message signing using a digital signature.
Mutual SSL: Specifies that this trusted provider provides a digital certificate (mutual SSL) when it sends a SOAP message.
SSL communication requires only the client to trust the server. For mutual SSL, the server must also trust the client. For the client to trust the server, the server’s certificate authority (CA) certificate must be imported into the client trust store. For the server to trust the client, the client’s certificate authority (CA) certificate must be imported into the server trust store.
Basic Authentication: Standard header-based authentication. This method assumes that a name and password for authentication are sent and received over the SOAP back channel.
Send: The name and password to be sent for authentication to the trusted partner. The partner expects this password for all SOAP back-channel requests, which means that the name and password must be agreed upon.
Verify: The name and password used to verify data that the trusted provider sends.
-
Click .
-
Click on the Trusted Providers page.
-
Click on the Servers page.
9.7.3 The Intersite Transfer Service
Understanding the Intersite Transfer Service URL
The Intersite Transfer Service is used by an identity provider to cause authentication to occur at a service provider that it trusts. The URLs for accessing the Intersite Transfer Service are different for each supported protocol (Liberty, SAML 1.1, and SAML 2.0). The Novell Access Manager identity and service provider components use the following format of the Intersite Transfer Service URL:
-
SAML 1.1: <identity_provider_base_URL>/saml/idpsend? PID=<service_provider_base_URL>/nidp/saml/metadata& TARGET=<final_destination_URL>
-
SAML 2.0: <identity_provider_base_URL>/saml2/idpsend? PID=<service_provider_base_URL>/nidp/saml2/metadata& TARGET=<final_destination_URL>
-
Liberty: <identity_provider_base_URL>/idff/idpsend? PID=<service_provider_base_URL>/nidp/idff/metadata& TARGET=<final_destination_URL>
The <identity_provider_base_URL> is the Base URL of the identity provider that is providing authentication, followed by the path to the protocol application being used for federation. Notice that the path is different for each protocol. The <service_provider_base_URL> is the Base URL of the service provider, followed by the path to the protocol metadata. Notice that the path is different for each protocol. The scheme (http or https) in the PID must match what is configured for the Base URL for the service provider.
The <final_destination_URL> is the URL to which the browser is redirected following a successful authentication at the identity provider. If this target URL contains parameters (for example, TARGET=https://login.provo.novell.com:8443/nidp/app?function_id=22166&Resp_Id=55321 &Resp_App_Id=810&security_id=0), it must be URL encoded to prevent the URL from being truncated.
Examples:
-
SAML 1.1: https://idp.sitea.novell.com:8443/nidp/saml/idpsend?PID=https://idp.siteb.novell.com:8443/nidp/saml/metadata&TARGET=https://eng.provo.novell.com/saml1/myapp
-
SAML 2.0: https://idp.sitea.novell.com:8443/nidp/saml2/idpsend?PID=https://idp.siteb.novell.com:8443/nidp/saml2/metadata&TARGET=https://eng.provo.novell.com/saml2/myapp
-
Liberty: https://idp.sitea.novell.com:8443/nidp/idff/idpsend?PID=https://idp.siteb.novell.com:8443/nidp/idff/metadata&TARGET=https://eng.provo.novell.com/liberty/myapp
The Intersite Transfer Service URLs of third-party identity and service provider implementations are different than those shown above for the Novell providers. Check the third party documentation for the URL information.
Using Intersite Transfer Service Links on Web Pages
The Intersite Transfer Service URL can be used on a Web page that provides links to various protected resources requiring authentication with a specific identity provider and a specific protocol. Links on this Web page are configured with the URL of the Intersite Transfer Service of the identity provider to be used for authentication. Clicking these links directs the user to the appropriate identity provider for authentication. Following successful authentication, the identity provider sends a SAML assertion to the service provider. The service provider uses the SAML assertion to verify authentication, and then redirects the user to the destination URL as specified in the TARGET portion of the Intersite Transfer Service URL.
Below are sample links that might be included on a Web page. These links demonstrate the use of SAML 1.1, SAML 2.0, and Liberty formats for the Intersite Transfer Service URL:
SAML 1.1: <a href="https://idp.sitea.novell.com:8443/nidp/saml/idpsend?PID=https://idp.siteb.novell.com:8443/nidp/saml/metadata&TARGET=https://eng.provo.novell.com/saml1/myapp">SAML1 example</a> <br> <br>
SAML 2.0: <a href="https://idp.sitea.novell.com:8443/nidp/saml2/idpsend?PID=https://idp.siteb.novell.com:8443/nidp/saml2/metadata&TARGET=https://eng.provo.novell.com/saml2/myapp">SAML2 example</a> <br> <br>
Liberty: <a href="https://idp.sitea.cit.novell.com:8443/nidp/idff/idpsend?PID=https://idp.siteb.novell.com:8443/nidp/idff/metadata&TARGET=https://eng.provo.novell.com/liberty/myapp">Liberty example</a> <br> <br>
Figure 9-3 illustrates a network configuration that could use these sample links.
Figure 9-3 Using the Intersite Transfer Service URL
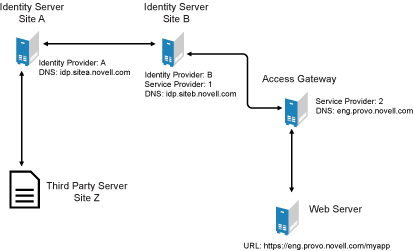
In this example, Site Z places links on its Web page using the Intersite Transfer Service URL of Site A. These links trigger authentication at Site A. If successful, Site A sends an assertion to Site B. Site B verifies the authentication and redirects the user the myapp application that it is protecting.
Specifying the Intersite Transfer Service URL for the Login URL Option
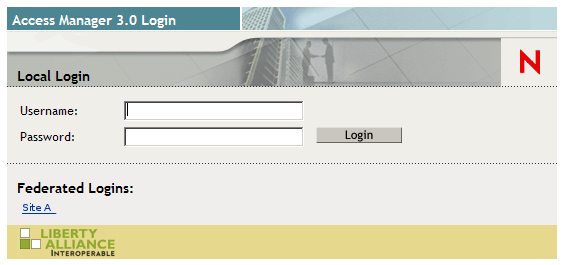
The Liberty and SAML 2.0 protocols allow the Identity Server to create single sign-on links on the Login page for the User Portal (... /nidp/app) when you select the option (see Section 9.7.1, Configuring Display and Access Settings). The link on the Login page looks similar to the following:
Figure 9-4 Federated Links on the Login Page
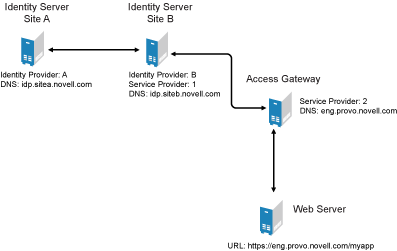
The SAML 1.1 protocol does not support a single sign-on URL. In order for a link to appear on the Login page, you must specify a Intersite Transfer Service URL in the option. Figure 9-5 illustrates a possible configuration that requires the Intersite Transfer Service for the SAML 1.1 protocol.
Figure 9-5 Federated Identity Configuration
If you want a link to appear on the login page that allows the user to log in to Site A (as shown in Figure 9-4), you need to specify a value for the option.
Using the DNS names from Figure 9-5, the complete value for the option is as follows:
https://idp.sitea.novell.com:8443/nidp/saml/idpsend?PID=https://idp.siteb.novell.com:8443/nidp/saml/metadata&TARGET=https://idp.siteb.novell.com:8443/nidp/app
The following happens when this link is invoked:
-
The browser performs a Get to the identity provider (Site A).
-
If the identity provider (Site A) trusts the service provider (Site B), the identity provider prompts the user for authentication information and builds an assertion.
-
The identity provider (Site A) sends the user to the service provider (Site B) using the POST or Artifact method.
-
The service provider (Site B) consumes the assertion and sends the user to the TARGET URL (the user portal on Site B).