17.4 Managing a Cluster of Access Gateways
Most of the configuration tasks are the same for a single Access Gateway and a cluster of Access Gateways. (For information on how to create a cluster of Access Gateways, see Clustering Access Gateways
in the Novell Access Manager 3.0 SP4 Setup Guide.) This section describes the tasks that are specific to managing the servers of an existing cluster:
For information about monitoring the health or statistics of a cluster, see Section VII, Monitoring Access Manager Components.
17.4.1 Managing the Servers in the Cluster
To view the servers that are currently members of clusters:
-
In the Administration Console, click > .
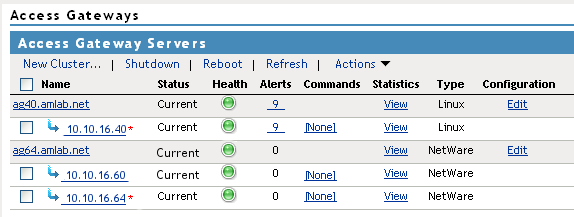
The members of a cluster are listed under the cluster name. The asterisk marks the server that is the primary cluster server.
-
To add a server to a cluster, select the server, then click > > .
-
To remove a server from a cluster, select the server, then click > .
Usually when you delete a server from a cluster, you have discovered that traffic is lighter than anticipated and that it can be handled with fewer machines while another cluster is experiencing higher traffic and can benefit from having another cluster member. When the server is removed, its configuration object maintains all the configuration settings from the cluster. When it is added to a new cluster, its configuration object is updated with the configuration settings of the new cluster. If your clusters are behind an L4 switch, you need to reconfigure the switch so that the server is assigned to the correct cluster.
When a server is removed from a cluster, its embedded service provider is stopped. If you are not going to assign it to another cluster, you need to reconfigured the server so that it is protecting resources other than the ones it did in the cluster. When you apply the changes by clicking , the embedded service provider is restarted.
-
To modify which server is the primary cluster server, see Section 17.4.2, Changing the Primary Cluster Server.
-
To view detailed information about a server in the group, click the name of the server.
-
To view detailed health information about a server, click the health icon of the server. For more information, see Section 34.3, Monitoring the Health of an Access Gateway.
-
Click .
17.4.2 Changing the Primary Cluster Server
If the current primary cluster server is down and will be down for an extended period of time, you should select another server to be the primary cluster server
-
In the Administration Console, click > > > .

-
In the drop-down list, select the name of a server, then click .
-
To update the Identity Server, click > .
17.4.3 Applying Changes to Cluster Members
When you are configuring services of the Access Gateway, the button saves the change to browser cache except on the Configuration page. The Configuration page ( > > ) provides a summary of the changes you have made. The column allows you to cancel changes to individual services. When you click , the changes are saved to the configuration datastore and you no longer have the option to cancel changes to individual services.
When servers are in a cluster, you might want to update only one server in the cluster and verify that the changes are behaving as expected. If this is your plan, we highly recommend that you save the proposed changes to the configuration datastore so the changes are not lost. If your session times out or you log out, any configuration changes that are saved to browser cache are flushed. These changes cannot be applied to other members of the cluster because they are no longer available. To prevent this from happening, save the changes to the configuration datastore.
After testing the configuration on one server, you can then apply the saved changes to the other servers in the cluster, either individually (with the link) or as group (with the link).
If you discover that the configuration change is not behaving the way you want it to, you can revert back to the previous applied configuration by doing the following:
-
Remove the server that you have applied the configuration changes from the cluster.
-
Access the Configuration page for the cluster, then click .
The servers in the cluster revert to the last applied configuration.
-
Add the removed server to the cluster.
The server is configured to use the same configuration as the other cluster members.
When you make the following configuration changes, the option is the only option available and your site is unavailable while the update occurs:
-
The Identity Server configuration that is used for authentication is changed ( > > then select a different value for the option).
-
A different reverse proxy is selected to be used for authentication ( > > , then select a different value for the option).
-
The protocol or port of the authenticating reverse proxy is modified ( > > > , then change the SSL options or the port options).
-
The published DNS name of the authentication proxy service is modified ( > > > > , then modify the option).