21.3 Configuring Load Balancing and Fault Tolerance
SSL VPN enables configuration of server failover groups, which enable load balancing and fault tolerance. These groups ensure that when a server goes down, the other servers can service the clients. The following sections describe procedure to configure load balancing and fault tolerance for SSL VPN.
21.3.1 Configuring Load Balancing Through the Access Gateway
You can install and run the SSL VPN self-monitoring and failover scripts on each SSL VPN server in order to provide automatic monitoring and failover support for the SSL VPN servers that are behind either a NetWare® Access Gateway or a Linux Access Gateway.
When the health status of an SSL VPN server is bad, these scripts modify the IPTables entries on that server to stop the Access Gateway from sending connection requests to that particular SSL VPN server. When the SSL VPN server health status returns to normal, the scripts remove the IPTables entries and allow the Access Gateway to communicate with the SSL VPN server. You must do the following to configure load balancing and fault tolerance through access gateway:
Configuring the Access Gateway
-
In the Administration Console, click .
-
Add all the SSL VPN servers that are part of the failover group as origin Web servers to the proxy service that you have defined.
-
Click .
-
Select in the field.
-
Select .
-
Save your changes and update the Access Gateway.
Installing the Scripts
-
Download the tar file containing Scripts for SSL VPN Automatic Monitoring and Failover from the Additional Resources section in the Novell Access Manager documentation page. The tar file contains sslvpn-heartbeat.sh and sslvpn-heartbeat.
-
Copy the sslvpn-heartbeat.sh script to the /opt/novell/sslvpn/bin directory in each of the SSL VPN servers.
-
Copy the sslvpn-heartbeat file to the /etc/init.d/directory.
-
Enter the following commands to change sslvpn-heartbeat.sh and sslvpn-heartbeat into executable files:
chmod +x sslvpn-heartbeat.sh
chmod +x sslvpn-heartbeat
-
Enter the following command to run the script every time the Access Gateway is started:
insserv /etc/init.d/sslvpn-heartbeat
Testing the Scripts
-
Enter the following command to stop the SSL VPN server:
/etc/init.d/novell-sslvpn stop
-
Enter the following command to verify if the scripts have blocked port 8080:
iptables -L
The following lines are displayed if port 8080 is blocked:
Chain    sslvpn-heartbeat-chain (1 reference)
target    prot opt source      destination
REJECT    tcp  --  anywhere      anywhere    tcp
dpt:http-alt reject-with icmp-port-unreachable
-
In the Administration Console, click . The following message is displayed if the SSL VPN server is down:
The HTTP Reverse Proxy service <reverse proxy name> might not be functioning properly. Few of the Web servers being accelerated are unreachable <sslvpn server IP Address>:8080
Click to get the latest health status of the Access Gateway.
-
Connect to SSL VPN. Verify that your connection was sent to the SSL VPN that is running and not to the one that is marked as down by the Access Gateway.
-
Enter the following command to start the SSL VPN server:
/etc/init.d/novell-sslvpn start
-
Enter the following command to verify if the script has removed the block on port 8080:
iptables -L
The following lines are displayed if the block on port 8080 is removed:
Chain sslvpn-heartbeat-chain (1 references)
target    prot opt source      destination
-
In the Administration Console, click , then check that the SSL VPN server is up.
Click to get the latest health status of the Access Gateway.
-
Connect to SSL VPN. Verify if your connection was sent to the SSL VPN server that was restarted. It might require several attempts before you can connect to the desired Access Gateway.
-
Repeat Step 1 to Step 8 to verify if the SSL VPN health scripts are working on all the SSL VPN servers.
21.3.2 Configuring Load Balancing Through Servlets
The SSL VPN server has load balancing capabilities so that more than one SSL VPN server can handle client connections. You can configure load balancing and fault tolerance on these servers by using the config.txt file.
However, it is a passive fault tolerance because if a server goes down, all the client connections to that server are disconnected. When these clients try to reconnect, they are redirected to other servers in the failover group.
You can configure servers in the failover group receive connection. This way, client connections are distributed among the servers of the failover group, thereby balancing the load. You can also configure the servers in such a way that all the client connections are received by one server and when that server goes down, all the connections are redirected to the next server.
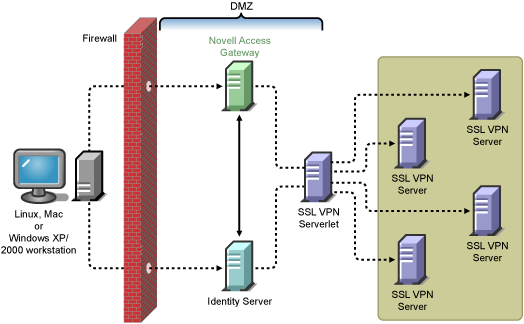
Figure 21-1 Load Balancing SSL VPN servers
Download and install the SSL VPN servlet RPM on a separate machine. Modify the config.txt file as follows:
-
Open config.txt which is located in the following path:
/var/opt/novell/tomcat4/webapps/sslvpn/WEB-INF/
-
The first line of config.txt contains the IP address and port number of the default server in the following format:
ServerIP=IPaddress:Port=Port number
NOTE:Add the IP address and port number of the servers in the same format in the next line. You can add a maximum of four servers to the failover group.
-
To enable load balancing among servers, set RoundRobinCluster=true
If you set the option to false, only fault tolerance is enabled and load balancing is not enabled, because all the client connections are received by one server and when that server goes down, all the connections are redirected to the next server
-
Save and close the file.
-
Restart the server by entering the following command:
/etc/init.d/novell-tomcat4 restart
-
Restart all the SSL VPN servers by entering the following command:
/etc/init.d/novell-sslvpn restart