37.5 Converting a Secondary Console into a Primary Console
In order for a Secondary Administration Console to be converted into a Primary Administration Console, a recent backup of the Administration Console must be available. For information on how to perform a backup, see Section 2.2, Backing up the Administration Console. A backup is necessary in order to restore the certificate authority (CA).
If the failed server holds a master replica of any partition, you must use ndsrepair to designate a new master replica on a different server in the replica list.
WARNING:Perform these steps only if the Primary Administration Console cannot be restored.
This conversion includes the following tasks:
37.5.1 Shutting Down the Server
If your Primary Administration Console is running, you must log in as administrator and shut down the server.
-
At the terminal, enter ps aux | grep ndsd.
-
Take note of the process ID (PID) in the second column.
-
Enter kill -9 <PID>.
For example, kill -9 19124.
-
Repeat the preceding steps, using tomcat instead of ndsd in the command.
37.5.2 Changing the Master Replica
Changing the master replica to reside on the new Primary Administration Console makes the Primary Administration Console into the Certificate Authority for Access Manager.
WARNING:If you use DSRepair with -a or -Ad, some of the advanced options can cause damage to your tree. Before you perform this procedure, refer to the Novell Support Web site, Solution 2938493.
-
At the console of one of the servers that shared a replica with the failed server, navigate to the /opt/novell/eDirectory/bin directory.
-
Run DSRepair with the following options:
./ndsrepair -P -Ad
-
Select the one available replica.
-
Select .
-
Run ndsrepair -P -Ad again.
-
Select the one available replica.
-
Select .
-
Select the name of the failed primary server.
-
Select .
37.5.3 Restoring CA Certificates
-
Copy your most recent Administration Console backup scripts to your new Primary Administration Console.
-
Change to the /opt/novell/devman/bin directory.
-
Enter the following command:
sh aminst-certs.sh -
When prompted to log in, specify the DN name of the admin of the Administration Console. For example, admin.novell.
37.5.4 Deleting Objects from the eDirectory Configuration Store
Several objects representing the failed Primary Administration Console in the configuration store must be deleted.
-
Log in to the new Administration Console, then click > > .
-
In the section, select the old Primary Administration Console, then click .
37.5.5 Performing Component-Specific Procedures
If you have installed the following components, perform the cleanup steps for the component:
Third Administration Console
If you installed a third Administration Console used for failover, you must manually perform the following steps on that server:
-
Edit the vcdn.conf file in the /opt/novell/devman/share/conf/ directory.
In the file look for the line that is similar to the following:
<vcdnPrimaryAddress>10.1.1.1</vcdnPrimaryAddress>
In this line, 10.1.1.1 represents the failed Primary Administration Console IP address. You must change this IP address to the IP address of the new Primary Administration Console.
-
Restart the Administration Console by entering the following command from the command line interface:
/etc/init.d/novell-tomcat4 restart
Linux Access Gateways
For each Linux Access Gateway imported into the Administration Console, you must edit the config.xml file and the settings.properities file on the Access Gateway and edit the current config and working config XML documents in the configuration store on the new Primary Administration Console.
-
At the Linux Access Gateway, log in as the root user.
-
Open a terminal window and shut down all services by entering the following commands:
/etc/init.d/novell-jcc stop
/etc/init.d/novell-tomcat4 stop
/etc/init.d/novell-vmc stop
-
If you are running SSL VPN, enter the following command to stop SSL VPN:
/etc/init.d/novell-sslvpn stop
-
Edit the config.xml file by entering
vi /var/novell/cfgdb/.current/config.xml
-
Enter /Remote, then press Enter.
In the IPv4Address field, change the IP address from the failed Administration Console to the new Primary Administration Console address.
-
(Conditional) If your audit server was on the Primary Administration Console, enter /NsureAuditSetting, then press Enter.
In the IPv4Address field, change the IP address from the failed Administration Console to the new Primary Administration Console address.
-
Enter :wq! to save and exit.
-
-
Edit the settings.properties file by entering
vi /opt/novell/devman/jcc/conf/settings.properties
-
Change the IP address in the remotemgmtip list from the IP address of the failed Administration Console to the address of the new Primary Administration Console.
-
Enter :wq! to save and exit.
-
-
At the new Primary Administration Console, log in and edit the CurrentConfig object of the Linux Access Gateway.
You can use an LDAP browser for these steps.
-
In the Roles and Task view, click > .
-
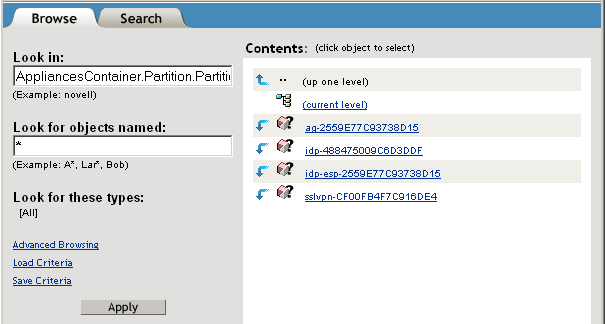
Click the Object Selector icon, then expand the following containers: novell > accessManagerContainer > VCDN_Root > PartitionsContainer > Partition > AppliancesContainer.
A list of devices appears. Access Gateways have an ag prefix.
-
Expand an Access Gateway container, then select the CurrentConfig object.
-
On the Modify Object page, click .
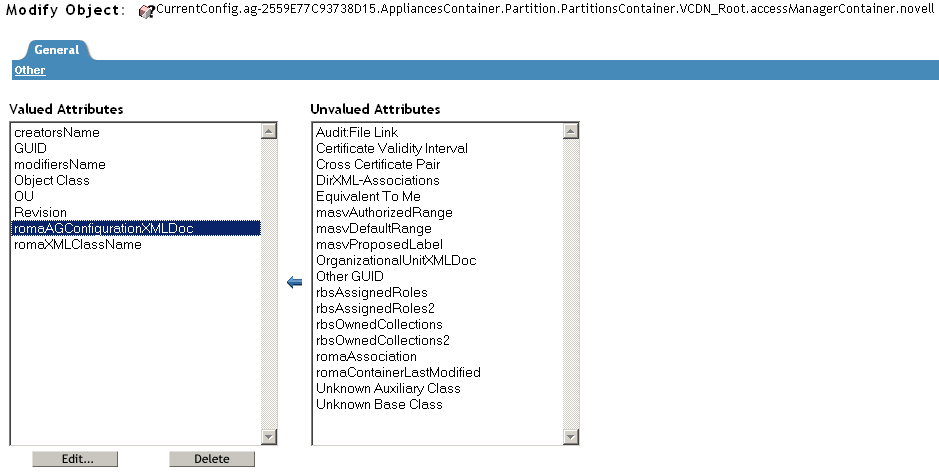
-
Select the romaAGConfigurationXMLDoc attribute, then click .
-
Copy the contents of the attribute to a text editor.
-
(Conditional) To verify which Linux Access Gateway you are changing, search for the <Local> element.
The IP address should match the IP address of the Linux Access Gateway that you are configuring for the new Primary Administration Console.
If you have a mix of NetWare® and Linux Access Gateways, and you have selected a NetWare Access Gateway, go back to Step 6.a and select a different Access Gateway container to expand.
-
Search for the <Remote> element.
-
Change the IP address of the <Remote> element so that it matches the IP address of the new Primary Administration Console.
-
Copy the modified document in the text editor to the text box in the Edit Attribute page, then click .
-
Click , then .
-
-
At the new Primary Administration Console, edit the WorkingConfig object of the Linux Access Gateway.
You can use an LDAP browser for these steps.
-
In the Roles and Task view, click > .
-
Click the Object Selector icon.
iManager remembers the last object you selected to modify.
If you need to browse to the Access Gateway object, expand the following containers: novell > accessManagerContainer > VCDN_Root > PartitionsContainer > Partition > AppliancesContainer.
A list of devices appears. Expand the Access Gateway container.
-
Select the WorkingConfig object.
-
On the Modify Object page, click .
-
Select the romaAGConfigurationXMLDoc attribute, then click .
-
Copy the contents of the attribute to a text editor.
-
Search for the <Remote> element.
-
Change the IP address of the <Remote> element so that it matches the IP address of the new Primary Administration Console.
-
Copy the modified document in the text editor to the text box in the Edit Attribute page, then click .
-
Click , then .
-
-
At the Linux Access Gateway, start all services by entering the following commands:
/etc/init.d/novell-jcc start
/etc/init.d/novell-tomcat4 start
/etc/init.d/novell-vmc start
/etc/init.d/novell-sslvpn start
-
(Conditional) Repeat this process for each Linux Access Gateway that has been imported into the Administration Console.
Identity Server
For each Identity Server imported into the Administration Console, you must perform the following steps:
-
Log in as the root user.
-
Open a terminal window and shut down all services by entering the following command:
/etc/init.d/novell-jcc stop
/etc/init.d/novell-tomcat4 stop
-
Edit the settings.properties file by entering
vi /opt/novell/devman/jcc/conf/settings.properties
-
Change the IP address in the remotemgmtip list from the IP address of the failed Administration Console to the address of the new Primary Administration Console.
-
Enter :wq! to save and exit.
-
Start the services by entering the following commands:
/etc/init.d/novell-jcc start
/etc/init.d/novell-tomcat4 start
Linux J2EE Agents
For each Linux J2EE agent imported into the Administration Console, you must perform the following steps:
-
Log in as the root user.
-
Open a terminal window and shut down all services by entering
/etc/init.d/novell-jcc stop
-
Edit the settings.properties file by entering:
vi /opt/novell/devman/jcc/conf/settings.properties
-
Change the IP address in the remotemgmtip list from the IP address of the failed Administration Console to the address of the new Primary Administration Console.
-
Enter :wq! to save and exit.
-
Start the services by entering
/etc/init.d/novell-jcc start
Windows J2EE Agents
For each Windows J2EE agent imported into the Administration Console, you must perform the following steps:
-
Log in as a user with administration rights.
-
In the Control Panel, click > .
-
Select the JCCServer, then click .
-
In a text editor, open the settings.properties file in the C:\Program Files\Novell\devman\jcc\conf directory
-
Change the IP address in the remotemgmtip list from the IP address of the failed Administration Console to the address of the new Primary Administration Console.
-
Save your changes and exit.
-
In the Control Panel, click >
-
Select the JCCServer, then click .
SSL VPN
For each SSL VPN component imported into the Administration Console, you must edit the config.xml file and the settings.properties file on the SSL VPN server and edit the current config and working config XML documents in the configuration store on the new Primary Administration Console.
-
At the SSL VPN machine, log in as the root user.
-
Open a terminal window and shut down all services by entering the following commands:
/etc/init.d/novell-jcc stop
/etc/init.d/novell-tomcat4 stop
/etc/init.d/novell-sslvpn stop
-
Edit the config.xml file by entering
vi /etc/opt/novell/sslvpn/config.xml
-
Enter /DeviceManagerAddress, then press Enter.
-
Change the IP address to that of the new Primary Administration Console.
-
Enter :wq! to save and exit.
-
-
Edit the settings.properties file by entering:
vi /opt/novell/devman/jcc/conf/settings.properties
-
Change the IP address in the remotemgmtip list from the IP address of the failed Administration Console to the address of the new Primary Administration Console.
-
Enter :wq! to save and exit.
-
-
At the new Primary Administration Console, log in and edit the CurrentConfig object of the SSL VPN.
You can use an LDAP browser for these steps.
-
In the Roles and Task view, click > .
-
Click the Object Selector icon, then expand the following containers: novell > accessManagerContainer > VCDN_Root > PartitionsContainer > Partition > AppliancesContainer.
A list of devices appears. SSL VPN devices have an sslvpn prefix.
-
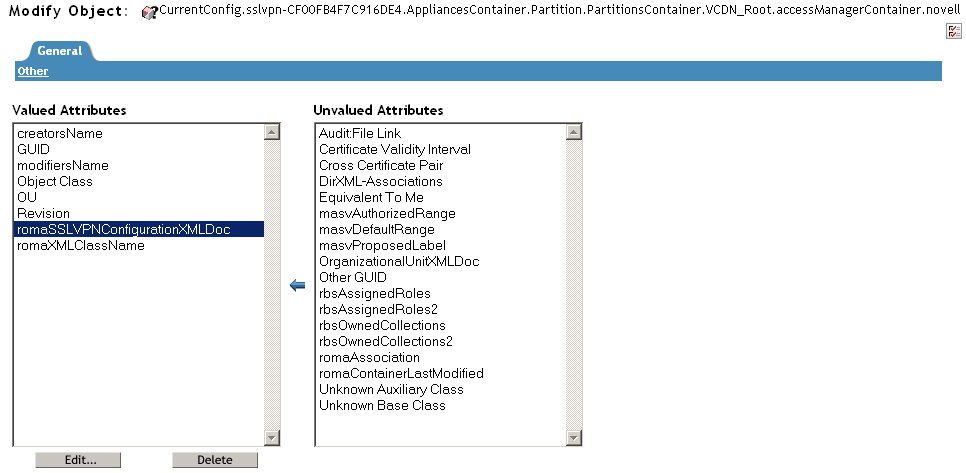
Expand an SSL VPN container, then select the CurrentConfig object.
-
On the Modify Object page, click .
-
Select the romaSSLVPNConfigurationXMLDoc attribute, then click .
-
Copy the contents of the attribute to a text editor.
-
Search for the <DeviceManagerAddress> element.
-
Change the IP address of the <DeviceManagerAddress> element so that it matches the IP address of the new primary Administration Console.
-
Copy the modified document in the text editor to the text box in the Edit Attribute page, then click .
-
Click , then .
-
-
At the new Primary Administration Console, edit the WorkingConfig object of the SSL VPN container.
You can use an LDAP browser for these steps.
-
In the Roles and Task view, click > .
-
Click the Object Selector icon.
iManager remembers the last object you selected to modify.
If you need to browse to the SSL VPN object, expand the following containers: novell > accessManagerContainer > VCDN_Root > PartitionsContainer > Partition > AppliancesContainer.
A list of devices appears. Expand the SSL VPN container.
-
Select the WorkingConfig object.
-
On the Modify Object page, click .
-
Select the romaSSLVPNConfigurationXMLDoc attribute, then click .
-
Copy the contents of the attribute to a text editor.
-
Search for the <DeviceManagerAddress> element.
-
Change the IP address of the <DeviceManagerAddress> element so that it matches the IP address of the new Primary Administration Console.
-
Copy the modified document in the text editor to the text box in the Edit Attribute page, then click .
-
Click , then .
-
-
At the SSL VPN machine, start all services by typing the following commands:
/etc/init.d/novell-jcc start
/etc/init.d/novell-tomcat4 start
/etc/init.d/novell-sslvpn start
-
(Conditional) If the SSLVPN is no longer functioning, restart the Linux server by entering reboot.
-
(Conditional) Repeat this process for each SSL VPN server that has been imported into the Administration Console.
NetWare Access Gateways
For each NetWare Access Gateway imported into the Administration Console, you must perform the following steps:
-
Enter debug mode on the server by entering debug and using the password proxydebug.
-
Go to the NetWare prompt by pressing Ctrl+Esc if you are using the keyboard. If you are remote via SSH, press Ctrl+Z, then select screen 1.
-
Enter java -show, and note the process ID next to JCCServerImpl.
-
Enter java -kill###, where ### represents the process ID.
-
Edit the ecc.cfg file by entering
edit sys:\etc\proxy\ecc.cfg
Find the section labeled [jccsettings] and change the IP address of the line labeled serveraddress to the new Primary Administration Console.
-
Edit the settings.properties file by entering
edit sys:\jcc\conf\settings.properties
Change the IP address in the remotemgmtip list from the IP address of the failed Administration Console to the address of the new Primary Administration Console.
-
Restart the server by entering appboot at the NetWare prompt.
37.5.6 Enabling Backup on the New Primary Administration Console
You need to modify the defbkparm.sh file before performing a backup on the new Primary Administration Console.
-
On the new Primary Administration Console, change to the /opt/novell/devman/bin directory.
-
Open the defbkparm.sh file and find the following lines:
EDIR TREE=<tree_name>
EDIR CA=<CA name>
These lines contain values using the hostname of the Administration Console you are on.
-
Modify these lines to use the hostname of the failed Administration Console.
When you install the Primary Administration Console, the EDIR TREE parameter is set to the hostname of the server with _tree appended to it. The EDIR CA parameter is set to the hostname of the server with _tree CA appended to it.
If the failed Administration Console had amlab as its hostname, you would change these lines to have the following values:
EDIR TREE="amlab_tree"
EDIR CA="amlab_tree CA"
-
Save you changes.