36.2 Monitoring Access Gateway Alerts
The Access Gateway has been programmed to issue events to various types of systems (such as a Novell® Audit server or a Syslog server) so that the administrator can be informed when significant changes occur that modify how the Access Gateway is performing. For information about auditing and audit events, see Section 31.0, Enabling Auditing. This section describes how to use the following types of alerts:
36.2.1 Reviewing Java Alerts
The Alerts page allows you to view information about current Java alerts and to clear them. An alert is generated whenever the Access Gateway detects a condition that prevents it from performing normal system services.
-
In the Administration Console, click > > > .

-
To acknowledge an alert, select the check box for the alert, then click . When you acknowledge an alert, you clear the alert from the list.
-
Click .
-
(Optional) To verify that the problem has been solved, click > > > .
The NetWare® Access Gateway currently sends the following severe alerts when it is not functioning correctly:
36.2.2 Configuring Access Gateway Alerts
The configuration steps for Access Gateway Alerts are platform-specific, although both platforms support similar options. To set up notification for these types of alerts, see the following sections:
NetWare Access Gateway Alerts
For a NetWare® Access Gateway, the option allows you to send notification of generated system alerts to a Syslog server, to a list of e-mail recipients, or to both.
-
In the Administration Console, click > > > .

-
Enable the Syslog services by configuring the following fields:
Enable Syslog: Selecting this option enables syslog alerts. You must also configure a Syslog server and select some alerts. (See Step 3 and Step 5.)
Port: Specifies the port where the Syslog server listens for Syslog messages. The default value for the UDP port is 514. Make sure this port value matches the port configuration of your Syslog server.
Identifier: Specifies a string that identifies the Access Gateway as the generator of the alert.
-
If you enabled Syslog services, configure a Syslog server.
-
Click under the .
-
Specify the DNS name or IP address of the Syslog server and click .
-
-
To enable e-mail notification, select .
You must also set up an e-mail server and a list of recipients and select some alerts before any alert notifications are sent
-
Click under the section and specify the DNS name or IP address of your e-mail server.
Repeat this step if you have more than one e-mail server.
-
Click to activate all servers in the list, or click the box by individual servers to select only some servers in the list.
-
Click under the section and specify the e-mail address of the user you want to receive alert notifications.
Repeat this step to add others to the list.
-
Click to activate notification for all users in the list, or click the box by individual users to select only some users in the list.
-
-
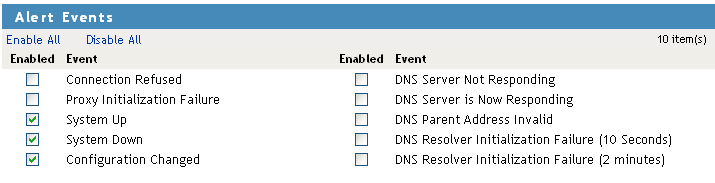
Select the alerts for notification.

Select All: Select this option for all alerts. Otherwise, select one or more of the following:
-
To save your modifications, click twice.
-
On the Access Gateways page, click .
Linux Access Gateway Alerts
For a Linux Access Gateway, this option allows you to send notification of generated system alerts to a Syslog server, to SNMP, to a system controller, to a log file, or to a list of e-mail recipients.
-
In the Administration Console, click > > > .

-
To add a new profile, click .
-
Specify a name for the profile, then click .
-
Click the new profile to configure alert events.
-
To select the alerts for notification, select one or more of the following:
-
To send alerts to all destinations, click . Otherwise, select the action for each destination.
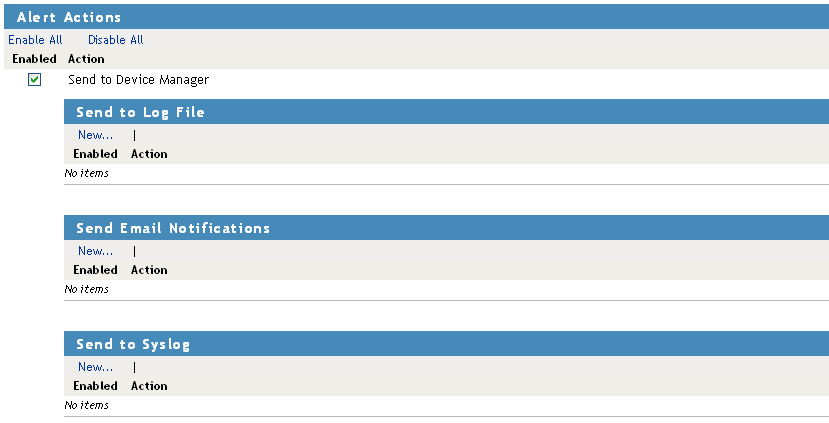
-
To send alerts to the Administration Console select the check box.
-
To send alerts to a log file, click , then specify a name for the log profile.
-
Configure the following Log File details:
-
Log File Name: Specify a name for the log file and a path where the file should be stored.
-
Max File Size: Specify a maximum size in KB for the log file. The size can be from 50 to 100000 KB. Specify 0 to indicate that there is no maximum file size.
-
-
Click .
-
-
To enable e-mail notification click , then specify a name for the e-mail profile.
-
Configure the following e-mail details:
-
E-mail Recipients: Specify the e-mail address of the recipient, then click . You can add multiple e-mail addresses. Click to delete any of the e-mail addresses, then click in the confirmation dialog box.
-
Mail Exchange Servers: Specify the IP address or the DNS name of the mail exchange server. Click to delete any of the mail exchange servers addresses, then click in the confirmation dialog box.
-
-
Click .
-
-
To enable syslog alerts click , then specify a name for the Syslog profile.
-
Configure the following syslog details:
-
Facility Name: Specify a facility name for the Syslog server. It can be any name from local0 to local7. If you specify local0 as your facility name, the alerts are stored at \var\logs\ics_dyn.log. The Linux Access Gateway uses local0 for normal logging information. Therefore, it is not recommended to specify local0 as your facility name.
-
-
Click .
-
To delete a syslog profile, click . Click in the confirmation dialog box.
-
-
To delete an Alert Profile, select the profile, then click . Click in the confirmation dialog box.
-
To save your modifications, click twice.
-
On the page, click .
Access Gateway Cluster Alerts
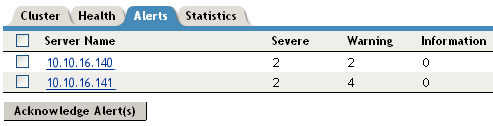
To view information about current alerts for all members of a cluster:
-
In the Administration Console, click > > > .
-
Analyze the data displayed in the table.
-
To acknowledge all alerts for an Access Gateway, select the check box for the Access Gateway, then click . When you acknowledge an alert, you clear the alert from the list.
-
To view information about a particular alert, click the server name. For information about a specific alert, see Section 36.2.1, Reviewing Java Alerts.
36.2.3 Enabling SNMP
(NetWare only) The SNMP page allows you configure the Access Gateway with basic SNMP information so the Access Gateway can communicate with your SNMP management workstations.
This SNMP implementation follows the ISO SNMP version 1 standard outlined in RFC 1067: A Simple Network Management Protocol.
When SNMP-enabled components of Access Gateway start, they register with the system. When the system receives a request for a specific SNMP parameter, it knows which component to contact to obtain the information.
The Access Gateway has an ichain.mib file in the sys:\etc\proxy\data directory. To see a list of standard SNMP parameters, use the FTP get command to retrieve this file, then compile it for use with your SNMP management software.
If you specify a trap community name and specify an SNMP management workstation on the SNMP page, all alerts you select in the Legacy Alerts page (see NetWare Access Gateway Alerts) are automatically sent as SNMP traps even if you have not configured syslog or e-mail alert notification on the Legacy Alerts page.
To set up SNMP:
-
In the Administration Console, click > > > .

-
Configure the following:
Monitor State: Specifies whether the community has Read access to monitor the Access Gateway. If it does, you need to specify the community name. Community names must contain only ASCII characters and must not have spaces.
Control State: Specifies whether the community has Write access to the control states of the Access Gateway. If it does, you need to specify the community name. Community names must contain only ASCII characters and must not have spaces.
Trap State: Specifies whether traps are sent. If they are sent, you can specify a community (location, IP octets, or other identifier) from which traps are sent to the management stations you designate. Community names must contain only ASCII characters and must not have spaces. You can also specify a for management of the Access Gateway through SNMP.
-
Add an SNMP server.
-
In the S section, click .
-
Specify the IP address of the SNMP server, then click .
-
Repeat to add additional servers.
-
-
(Optional) Configure appliance information.
The fields allow you to enter additional information about the Access Gateway. You can describe the Access Gateway hardware and its location, and provide the name of the person responsible for the Access Gateway.
-
To save your modifications, click twice, then on the Access Gateways page, click .