8.9 Configuring Kerberos for Authentication
Kerberos is an authentication method that allows users to log in to an Active Directory domain. This authentication method provides them with a token, which an Identity Server can be configured to use as a contract. This provides single sign-on for the user between Active Directory and the Identity Server.
Kerberos authentication is achieved using SPNEGO with GSS-API (JGSS). SPNEGO (RFC 2478 - Simple and Protected GSSAPI Negotiation implementation in Microsoft* Windows 2000/XP/2k3) is a GSSAPI mechanism for extending a Kerberos based single-sign-on environment to Web transactions and services. It lets peers determine which GSSAPI mechanisms are shared and lets them select one and establish a security context with it. SPNEGO's most visible use is in Microsoft's HTTP Negotiate authentication mechanism.
The Kerberos module for Access Manager is implemented as additional out-of-the-box authentication mechanism to securely negotiate and authenticate HTTP requests for protected resources. This makes it possible to seamlessly authenticate (single-sign-on) to the Identity Server from enterprise-wide Microsoft Windows Domain Logon.
In situations where the system cannot use the Kerberos configuration, such as if the browser is trying to authenticate from outside of a firewall and fails, the fallback authentication methods are NTLM (which Access Manager does not use), then HTTPS basic authentication. This can cause the system to prompt users twice for authentication. (To disable this in Windows Explorer, click > > > , then scroll down to . Enable .)
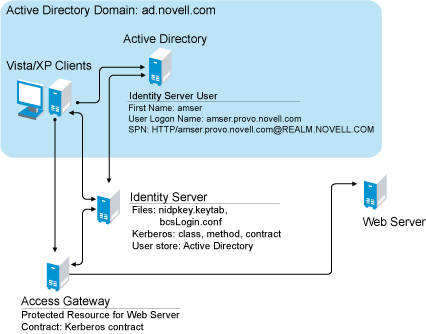
This section explains how to configure Active Directory, the Identity Server, and the Access Gateway for Kerberos authentication to a protected Web server. Figure 8-5 illustrates this configuration.
Figure 8-5 Example Kerberos Configuration
Kerberos requires the following configuration tasks:
8.9.1 Prerequisites
Kerberos authentication is supported for the following configuration:
-
Clients must be running Windows XP with Internet Explorer 7. Some minimal testing has been done with Internet Explorer 6. To make Kerberos work with Internet Explorer 6, you need to enable integrated Windows authentication. For information on how to enable this feature, see “Authentication Uses NTLM instead of Kerberos”.
The Windows Vista* client has had only cursory testing. If you have problems with the Vista client, please report these problems to Novell.
-
Active Directory must be configured to contain entries for both the users and their machines. The Kerberos configuration was tested with Active Directory running on Windows 2003 Enterprise Server SP2. The configuration has not been tested with Active Directory running Windows 2008 Server.
-
Your Access Manager components must be running Access Manager 3.0 SP2 or later. The configuration was tested using the Linux Access Gateway. The NetWare Access Gateway was not used in the configuration, and therefore not tested for Kerberos compatibility.
-
Active Directory and the Identity Server must be configured to use a Network Time Protocol server. If time is not synchronized, authentication fails.
-
Both TCP and UDP need to be enabled. Kerberos defaults to TCP but only after failing on UDP (for example with packet-size limitations). This is a limitation with the underlying JGSS layer which cannot use TCP as the only transport protocol.
8.9.2 Configuring Active Directory
You must create a new user in Active Directory for the Identity Server, set up this user account to be a service principal, create a keytab file, and add the Identity Server to the Forward Lookup Zone. These tasks are described in the following sections:
Installing the spn and the ktpass Utilities
When you install Windows 2003 and Active Directory, the spn and ktpass utilities are not installed in a default installation. You need both of these utilities to configure the Identity Server for Kerberos authentication.
-
Insert the Windows 2003 CD into the CD drive.
-
To install the utilities, run \SUPPORT\TOOLS\SUPTOOLS.MSI on the CD.
The utilities are installed in C:\Program Files\Support Tools.
Creating and Configuring the User Account for the Identity Server
-
In on your Windows 2003 server, select the option.
-
Select to create a new user.
-
Fill in the following fields:
First name: Specify the hostname of the Identity Server. This is the username. For the example configuration, this is amser.
User logon name: Specify HTTP/<Identity_Server_Base_URL>. For this example configuration, your Identity Server has a base URL of amser.provo.novell.com, and you would specify the following for the :
HTTP/amser.provo.novell.com
The realm is displayed next to the .
User logon name (pre Windows 2000): Specify the hostname of the Identity Server. The default value must be modified. For the example configuration, this is amser.
-
Click , and configure the password and its options:
Password: Specify a password for this user
Confirm password: Enter the same password.
User must change password at next logon: Deselect this option.
Password never expires: Select this option.
-
Click , then .
This creates the Identity Server user. You need to remember the values you assigned to this user for and .
-
Right-click the user you just created, then select .
-
Click the tab, then in , select .
Configuring the Keytab File explains how to create a keytab file. If you ever change the encryption type for the Identity Server user, you need to reset the password for the user and regenerate the keytab file.
-
Click , then .
-
Change the password of the user.
After setting up the account to use DES encryption, the password needs to be reset.
-
To set the servicePrincipalName (spn) attribute on this user, open a command window and enter the following command:
setspn -A HTTP/<userLogonName> <userName>
For this configuration example, you would enter the following command:
setspn -A HTTP/amser.provo.novell.com@REALM.NOVELL.COM amser
This adds the servicePrincipalName attribute to the user specified with the value specified in the -A parameter.
-
(Optional) Verify that the user has the required servicePrincipalName attribute with a valid value. Enter the following command:
setspn -L <userName>
For this configuration example, you would enter the following command:
setspn -L amser
Configuring the Keytab File
The keytab file contains the secret encryption key that is used to decrypt the Kerberos ticket. You need to generate the keytab file and copy it to the Identity Server.
-
On the Active Directory server, open a command window and enter a ktpass command with the following parameters:
ktpass /out value /princ value /mapuser value /pass value /crypto value /DesOnly
The command parameters require the following values:
For this configuration example, you would enter the following command to create a keytab file named nidpkey:
ktpass /out nidpkey.keytab /princ HTTP/amser.provo.novell.com@AD.NOVELL.COM
/mapuser amser@AD.NOVELL.COM /pass novell /crypto DES-CBC-MD5 /DesOnly
-
Copy the keytab file to the Identity Server.
Copy the file to the default location on the Identity Server:
SLES 10: /opt/novell/java/jre/lib/security
SLES 9: /usr/lib/java/jre/lib/security
-
If the cluster contains multiple Identity Servers, copy the keytab file to each member of the cluster.
Adding the Identity Server to the Forward Lookup Zone
-
In Manage Your Server on your Windows 2003 server, click.
-
Click .
-
Click the Active Directory domain.
-
In the right pane, right click, and select .
-
Fill in the following fields:
Name: Specify the hostname of the Identity Server.
IP Address: Specify the IP address of the Identity Server.
-
Click .
8.9.3 Configuring the Identity Server
You need to configure the Identity Server to use the Active Directory server as a user store, configure a Kerberos authentication class, method, and contract, create a configuration file, enable logging to verify the configuration, then restart tomcat. These instructions assume that you have installed and configured an Identity Server cluster configuration. If you have not, see the Novell Access Manager 3.0 Installation Guide and the Novell Access Manager 3.0 Setup Guide.
This section covers the following tasks:
Creating the bcsLogin Configuration File
-
Open a text editor.
-
Enter the following lines. The file cannot contain any white space, only end of line characters. Two lines (principal and keyTab) need to specify unique information for your configuration. The principal line needs to specify the service principle name for the Identity Server. The keyTab line needs to specify the location of the keytab file. The following file uses the values of the example configuration for the principal and keyTab lines. The keyTab and ticketCache lines use the default path for SLES 10. For SLES 9, you need to use /usr/lib/java/jre/lib/security for the path.
other { com.sun.security.auth.module.Krb5LoginModule required debug="true" useTicketCache="true" ticketCache="/opt/novell/java/jre/lib/security/spnegoTicket.cache" doNotPrompt="true" principal="HTTP/amser.provo.novell.com@AD.NOVELL.COM" useKeyTab="true" keyTab="/opt/novell/java/jre/lib/security/nidpkey.keytab" storeKey="true"; }; -
Save this file with a name of bcsLogin.conf.
-
Copy this file to the location specified in the field of Step 4 in Creating the Authentication Class, Method, and Contract.
-
Restart Tomcat. In a command window on the Identity Server, enter the following command.
/etc/init.d/novell-tomcat4 restart
Whenever you make changes to the bcsLogin.conf file, you need to restart Tomcat.
-
If the cluster contains multiple Identity Servers, copy the bcsLogin.conf file to each member of the cluster, then restart Tomcat on that member.
Enable Logging of Kerberos Transactions
Enabling logging is not required, but it is highly recommended. If Kerberos authentication does not function after you have finished the configuration tasks, the first step in solving the problem is to look at the catalina.out file.
-
In the Administration Console, click > > > .
-
Enable the and options.
-
In the section, set to .
-
In the section, select .
-
Select and as .
-
Click , then update the Identity Server.
Configuring the Identity Server for Active Directory
You need to either configure your Identity Server to use Active Directory as a user store or verify your existing configuration for your Active Directory user store.
-
In the Administration Console, click > > .
-
Click .
-
View your installed user stores.
If you have already configured your Identity Server to use the Active Directory server, click its name.
If you haven’t configured a user store for the Active Directory server, click .
-
For a new user store, fill in the following fields. For an existing Active Directory user store, verify the values.
Name: Specify a name of the user store for reference.
Admin name: Specify the name of the administrator of the Active Directory server. Administrator-level rights are required for setting up a user store. This ensures read/write access to all objects used by Access Manager.
Admin password and Confirm password: Specify the password for the administrator of the Active Directory server and confirm the password.
Directory Type: Select .
Search Contexts: For a new user store, click and specify the context of the administrator of the Active Directory server. For an existing user store, verify that you have an entry for the context of the administrator and add one if it is missing.
-
(Conditional) For a new Active Directory user store, add a replica. In the section, click .
-
Fill in the following fields:
Name: Specify a name of the replica for reference. This can be the name of your Active Directory server.
IP Address: Specify the IP address of the Active Directory server and the port you want the Identity Server to use when communicating with the Active Directory server.
-
Configure the other fields to fit your security model.
-
Click .
-
-
(Optional) Specify values for the other configuration options.
-
To save your changes, click or .
-
Continue with Creating the Authentication Class, Method, and Contract.
Creating the Authentication Class, Method, and Contract
-
In the Local page, click > .
-
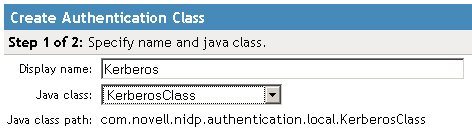
Fill in the following fields:
Display name: Specify a name that you can use to identify this class.
Java class: Select .
The field displays the name of the KerberosClass.
-
Click
-
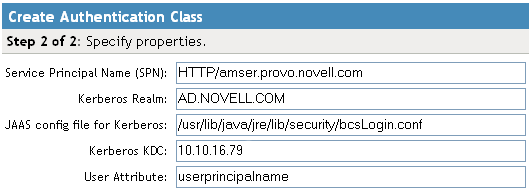
Fill in the following fields:
Service Principal Name (SPN): Specify the value of the servicePrincipalName attribute of the Identity Server user. For this example configuration, this is HTTP/amser.provo.novell.com.
Kerberos Realm: Specify the name of the Kerberos realm. The default value for this realm is the domain name of the Active Directory server, entered in all capitals. The value in this field is case sensitive. For this example configuration, this is AD.NOVELL.COM.
JAAS config file for Kerberos: Verify the default path. This should be the same path to which you copied the keytab file (see Step 2 in Configuring the Keytab File) and end with the name of the configuration file, bcsLogin.conf.
If you have not created this configuration file, see Creating the bcsLogin Configuration File.
Kerberos KDC: Specify the IP address of the Active Directory server.
User Attribute: Specify the name of the Active Directory attribute that combines the cn of the user with the DNS domain name to form its value. It is an alternate name for user login. Accept the default value unless you have set up a different attribute.
-
Click .
-
In the Local page, click >
-
Fill in the following fields:
Display name: Specify a name that you can use to identify this method.
Class: Select the class that you created for Kerberos.
User stores: Move the Active Directory user store to the list of User stores. If you have only one installed user store, <Default User Store> can be used. If you have multiple user stores, the Active Directory user store must be in this list (or if it is configured to be the default user store, <Default User Store> must be in this list).
NOTE:The testing procedure to verify Kerberos authentication is dependent upon having the Active Directory user store configured as the default user store. See Step 12.
You do not need to configure properties for this method.
-
Click .
-
In the Local page, click >
-
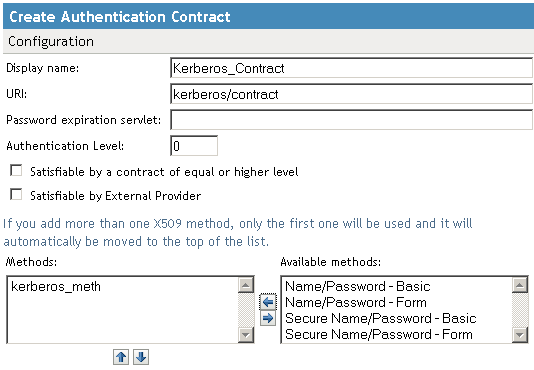
Fill in the following fields:
Display name: Specify a name that you can use to identify this method.
URI: Specify a value that uniquely identifies the contract from all other contracts.
The URI cannot begin with a slash, and it must uniquely identity the contract. For example: kerberos/contract
Methods: From the list of , move your Kerberos method to the list.
You do not need to configure the other contract options.
-
Click .
-
(Optional) To use the procedure that verifies the authentication configuration, you need to make the Active Directory user store the default user store. In the Local page, click .
-
Fill in the following fields:
User Store: Select the name of your Active Directory user store.
Authentication Contract: Select the name of your Kerberos contract.
-
Click .
This allows you to log in directly to the Identity Server using the Kerberos contract. If you have already logged in to the Active Directory domain on the Windows machine, single sign-on is enabled and you are not prompted to log in to the Identity Server.
-
-
On the Identity Servers page, click .
Wait until the Health icon turns green. Click to update the page.
-
If you have Access Gateways or J2EE Agents that you want to configure to use the Kerberos contract, update these devices so that the Kerberos contract is available.
-
Continue with Creating the bcsLogin Configuration File.
Verifying the Kerberos Configuration
To view the catalina.out file of the Identity Server.
-
In the Administration Console, click > g.
-
Click .
-
In the Identity Servers section, click the link to the catalina.out file.
-
Open the file in a text editor.
-
Search for Kerberos and verify that a subsequent line contains a Commit Succeeded phrase. For the configuration example, the lines look similar to the following:
principal's key obtained from the keytab
principal is HTTP/amser.provo.novell.com@AD.NOVELL.COM
Added server's keyKerberos Principal HTTP/amser.provo.novell.com@AD.NOVELL.COMKey Version 3key EncryptionKey: keyType=3 keyBytes (hex dump)=0000: CB 0E 91 FB 7A 4C 64 FE

[Krb5LoginModule] added Krb5Principal HTTP/amser.provo.novell.com@AD.NOVELL.COM to Subject
Commit Succeeded
-
If the file does not contain any lines similar to these, verify that you have enabled logging. See Enable Logging of Kerberos Transactions.
-
If the commit did not succeed, search backwards in the file and verify the following values:
-
Service Principal Name
-
Name of keytab file
For the example configuration, the file would contains lines with text similar to the following:
Principal is HTTP/amser.provo.novell.com

KeyTab is /usr/lib/java/jre/lib/security/nidpkey.keytab
-
-
If you make any modifications to the configuration, either in the Administration Console or to the bcsLogin file, restart Tomcat on the Identity Server.
8.9.4 Configuring the Clients
-
Add the computers of the users to the Active Directory domain.
For instructions, see your Active Directory documentation.
-
Log in to the Active Directory domain, rather than the machine.
-
Configure the Web browser to trust the Identity Server:
-
For Internet Explorer version 7, click > > > > > . (For Internet Explorer version 6, click > > > > .)
In the text box, enter the Base URL for the Identity Server, then click .
In the configuration example, this is http://amser.provo.novell.com.
Click .
-
For Firefox, in the URL field, specify about:config. In the field, specify . Double click network.negotiate-auth.trusted-uris.
This preference lists the sites that are permitted to engage in SPNEGO Authentication with the browser. Enter a comma-delimited list of trusted domains or URLs.
For this example configuration, you would add http://amser.provo.novell.com to the list.
If the deployed SPNEGO solution is using the advanced Kerberos feature of Credential Delegation, double click network.negotiate-auth.delegation-uris. This preference lists the sites for which the browser can delegate user authorization to the server. Enter a comma-delimited list of trusted domains or URLs.
For this example configuration, you would add http://amser.provo.novell.com to the list.
-
-
Click . The configuration appears as updated.
Restart your Firefox browser to activate this configuration.
-
In the URL field, enter the base URL of the Identity Server with port and application. For this example configuration:
http://amser.provo.novell.com:8080/nidp
The Identity Server should authenticate the user without prompting the user for authentication information. If a problem occurs, check for the following configuration errors:
-
Verify the default user store and contract. See Step 12.
-
View the catalina.out file and verify the configuration. See Verifying the Kerberos Configuration.
-
If you make any modifications to the configuration, either in the Administration Console or to the bcsLogin file, restart Tomcat on the Identity Server.
-
To verify whether a Kerberos ticket is being sent to the client, download the Kerbtray Tool and run it on the client workstation.
-
Enable Kerberos event logging. See How to enable Kerberos event logging.
-
Make sure all components have their time synchronized.
-
8.9.5 Configuring the Access Gateway for Kerberos Authentication
If you have set up a Web server that you want to require Kerberos authentication for access, you can set up a protected resource for this Web server as you would for any other Web server, and select the name of your Kerberos contract for the contract. For instructions, see Section 13.4, Configuring Protected Resources.
When using Kerberos for authentication, the LDAP credentials are not available. If you need LDAP credentials to provide single sign-on to some resources, see Access Management Authentication Class Extension to Retrieve Password for Single Sign-on for a possible solution.