7.2 Setting Up the Web Server
7.2.1 Installing the Apache Web Server and PHP Components
The following instructions are for SUSE® Linux Enterprise Server (SLES)10.x.
IMPORTANT:If you have installed your Identity Server on SLES 9.x, you need to make modifications to the following instructions. To install software with Yast, you click > . SLES 9.x uses PHP4 modules instead of PHP 5 modules.
-
Download and install the Apache 2 and PHP 5 modules:
-
On your SLES 10.x server, click the icon, provide your root password if requested, then click .
-
In the YaST left navigation window, click the icon, then click .
The YaST software Search screen should open.
-
In the field, type Apache2, then click .
All available Apache 2 software packages are listed.
-
If they are not already selected, select the following Apache 2 check boxes:
apache2: Specifies the Apache 2.0 Web server.
apache2-mod_php5: Specifies the PHP5 module for Apache 2.0.
apache2-prefork: Specifies the Apache 2 prefork multi-processing module.
apache2-worker: Specifies the Apache 2 worker multi-processing module.
-
Click to identify and resolve any dependency issues.
-
Click , then click .
YaST should install the selected Apache server components.
-
To install the required PHP server components, answer to the prompt to install additional software.
-
In the Search field, type php, then click .
All available PHP software packages are listed.
-
If they are not already installed, select the following PHP check boxes:
apache2-mod_php5: Installs the PHP 5 module for Apache 2.0.
php5: Installs the PHP 5 core files.
-
If you need to install the packages, click to identify and resolve any dependency issues. If the packages are already installed, click Cancel and continue with Step 2.
-
Click , then click .
YaST should install the selected PHP server components.
-
-
Configure SUSE to start the Apache server during boot up:
-
In the YaST left navigation window, click > .
-
In the HTTP Server Wizard, enable the option, then click .
-
7.2.2 Installing Digital Airlines Components
The Digital Airlines example package contains the following components:
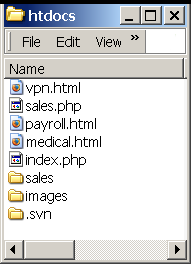
Figure 7-3 Directory Structure of Digital Airlines Sample Components
-
vpn.html: Specifies the GUI interface page for initiating a VPN session.
-
sales.php: Contains the sales PHP database files associated with the example.
-
payroll.html: Specifies the GUI interface page for initiating a payroll session.
-
medical.html: Specifies the GUI interface page for initiating a VPN session.
-
index.php: Contains the welcome HTML index file for establishing secure authentication.
-
sales: Specifies subdirectory that can be configured to require basic authentication.
-
images: Contains all image files associated with the example.
-
.svn: Contains the associated Subversion* files necessary for revision control.
In this example configuration, you use the Access Gateway to protect the Digital Airlines Web site, which is installed on your Identity Server. This section describes where your example Digital Airlines components are located and how to add them to your Identity Server.
-
Download the Digital Airlines Sample Pages from the Additional Resources section in the Novell Documentation site
-
Extract htdocs.tar.gz to a root directory of the Web server. For an Apache 2 Web server on SLES 9.x or 10.x, extract the files to the following directory:
/srv/www/htdocs/
-
Determine the DNS name and IP address of the SUSE Linux server on which your example files are installed:
-
Log in to the YaST Control Center as the root user.
-
Click > , then write down the IP address and hostname of your server:
IP Address: __________________________
Hostname: __________________________
As required later in the installation (see Step 8), you must provide the host name and server configuration information to establish the network connection between the Web server you are protecting (the server where your Web service components are located) and the Access Gateway.
-
-
Continue with Section 7.2.3, Configuring Name Resolution.
7.2.3 Configuring Name Resolution
The Identity Server needs to resolve the DNS name of the Access Gateway, the Access Gateway needs to resolve the DNS name of the Identity Server, and the client that is accessing the Digital Airlines site needs to be able to resolve the names of both the Access Gateway and the Identity Server.
You can either set up your DNS server to resolve the DNS name of the Identity Server and the Access Gateway to the correct IP address, or you need to modify the hosts file on the various machines to perform the resolution.
Client: The hosts file of the client machine needs to contain entries for the Identity Server and the Access Gateway.
Identity Server: The hosts file on the Identity Server needs to contain an entry for the Access Gateway.
Access Gateway: The hosts file on the Access Gateway needs to contain an entry for the Identity Server.
Each platform has its own location for the host file.
|
Platform |
Location |
|---|---|
|
Windows |
C:\WINDOWS\SYSTEM32\DRIVERS\ETC\HOSTS |
|
Linux |
/etc/hosts |
|
NetWare |
sys:/etc/hosts |
Continue with Section 7.3, Configuring Public Access to Digital Airlines.