8.2 Logging Events to the MySQL Database
After you have created a MySQL database for the Novell Audit server and you have installed the driver, you can configure the Novell Audit Secure Logging Server so that it writes events to the MySQL server.
8.2.1 Creating the MySQL Log Channel
-
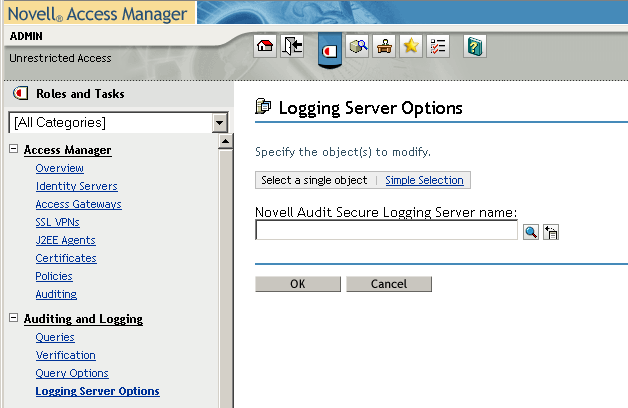
In the Administration Console, click > .
-
Use the icon to find the Logging Services object and expand it.
-
Click the Logging Server object that has the hostname of your Administration Console prepended to it, for example Jwilson1 Logging Server.Logging Services.
-
Click .
-
On the Logging Server Options page, click the tab.
-
Select , then click > .
-
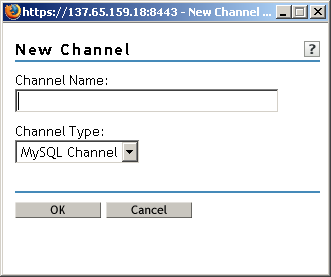
Fill in the following:
Channel Name: Specify .
Channel Type: Select .
-
Click .
-
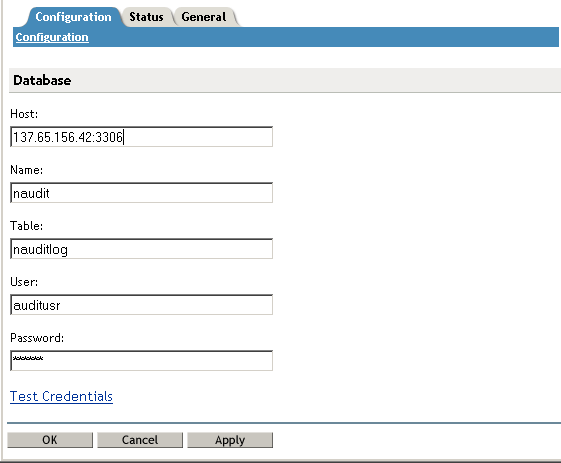
On the Configuration page, fill in the following:
Host: Specify the IP address of your MySQL server with a port of 3306. For example: .
Port 3306 is the default port for the MySQL 5.0 server. If you have configured your server to use a different port, enter it instead. If you are using a different version of MySQL, verify the port required by the JDBC driver.
Name: Specify .
Table: Specify .
User: Specify.
Password: Specify .
-
Click , then enter the following in the field:
com.mysql.jdbc.Driver
-
Click .
You should receive a Database test connection was successful message. If you do not receive this message, verify your configuration information.
-
Click .
-
Continue with Section 8.2.2, Configuring the Audit Server to Log Events to the MySQL Log Channel.
8.2.2 Configuring the Audit Server to Log Events to the MySQL Log Channel
-
On the Logging Server Options page, click the tab, then click .
-
In the field, click the icon, expand the Channels object, then select the object.
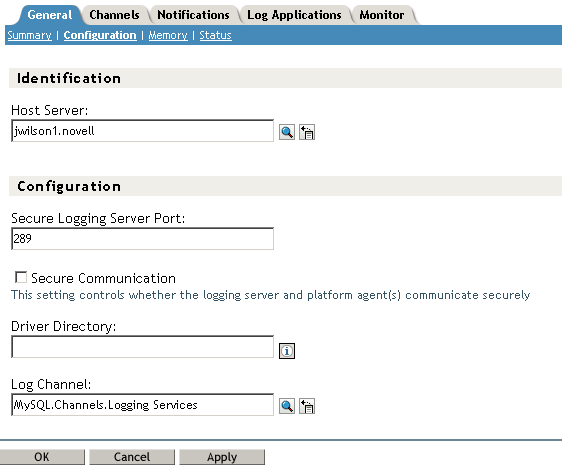
The field should now contain as its value.
-
To save the changes, click .
-
Click .
-
To update the audit server with this new channel, complete the following steps from a terminal window on your Administration Console:
-
Stop the audit server by using the following command:
/etc/init.d/novell-naudit stop
-
Start the audit server by using the following command:
/etc/init.d/novell-naudit start -d
Starting the audit server causes the nauditlog table in the MySQL database to be created. The start -d option causes the console to appear. Leave it running for now so you can see when events start occurring.
If you close the console by pressing Ctrl+C, you close the console and stop the audit server. You need the audit server to be running for the rest of these instructions to work.
-
-
Verify that the table was created in the database by using the following steps:
-
Log in to your MySQL server.
-
Change to the naudit database by using the following command:
use naudit;
-
To display the tables in the database, use the following command:
show tables;
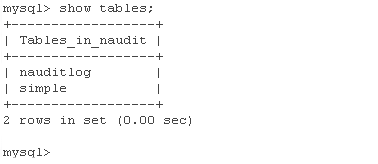
The table should be in the list. If it is not, repeat Step 5.
-
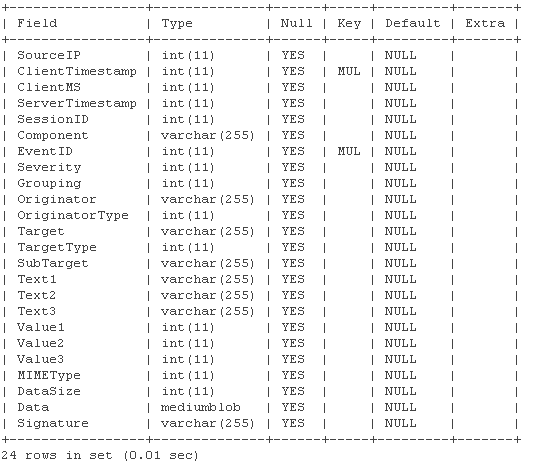
To view the columns in the table, use the following command:
describe nauditlog;
The table should have 24 rows.
-
-
Continue with Section 8.2.3, Configuring Access Manager Components to Log Audit Events.
8.2.3 Configuring Access Manager Components to Log Audit Events
The database is ready to receive events, and the Novell Audit Secure Logging Server is ready to send events to the database. The next step is to configure Access Manager to send events to the server, which channels them to the database. For more information about these events, see Enabling Auditing
in the Novell Access Manager 3.0 SP4 Administration Guide.
-
To enable general Access Manager events, complete the following steps:
-
In the Administration Console, click > .
-
In the Management Console Audit Events section, select the option.
-
Click .
-
-
To enable Identity Server events, complete the following steps.
-
In the Administration Console, click > > > .
-
Scroll to the Novell Audit Logging section, then select .
-
For events, select either the option or at least the following: , , , .
-
Click .
-
On the Identity Servers page, click > .
-
-
To enable Access Gateway event, complete the following steps:
-
In the Administration Console, click > > .
-
For events, select either the option or at least the following: , , and .
-
Click twice.
-
On the Access Gateways page, click > .
-
-
Generate a few events by logging in to Access Manager and accessing a resource.
The audit event configuration changes to the Identity Server and the Access Gateway generated a few events, but logging in and accessing a resource generates a few more.
-
To verify that events are being logged in the nauditlog table, complete the following steps:
-
Log in to your MySQL server.
-
Change to the naudit database by using the following command:
use naudit;
-
To display two columns of data, use the following command:
select EventID, Originator from nauditlog;
-
-
Continue with Section 8.3, Configuring Queries.