10.3 Migrating Components
This section describes the tasks you must complete to migrate iChain resources to Access Manager:
10.3.1 Setting Up the Hardware and Installing the Software
For details on hardware requirements and possible software configurations, see Installation Requirements.
For installation instructions, see the following:
If you have firewalls installed that separate any of the Access Manager components from each other, you need to open the required ports so that the components can communicate with each other. If you have a firewall between a component and the Administration Console, the component cannot auto import into the console unless you have opened the ports that allow this communication. For firewall information, see Setting Up Firewalls
in the Novell Access Manager 3.0 SP4 Setup Guide.
If you are new to Access Manager, we suggest you set up a basic configuration before starting your migration strategy. See Setting Up a Basic Access Manager Configuration
in the Novell Access Manager 3.0 SP4 Setup Guide.
If you are going to use SSL, these steps also assume that you have either created the required certificates or imported your third-party certificates.
-
For information on how to configure Access Manager for SSL using certificates created by the the Access Manager CA, see
Enabling SSL Communication
in the Novell Access Manager 3.0 SP4 Setup Guide. -
For information on how to use certificates generated by external CAs, see
Replacing Identity Server SSL Certificates
andConfiguring the Access Gateway for SSL
in the Novell Access Manager 3.0 SP4 Administration Guide.
10.3.2 Using an L4 Switch
When you use an L4 switch to cluster Identity Servers or Access Gateways or both, you need to configure it for each cluster. The base URL of the Identity Server configuration should be the DNS name you have configured the L4 switch to use for the Identity Server cluster. The Access Gateway should be configured to use the DNS name you have configured the L4 switch to use for the Access Gateway cluster. If you configure the Access Gateway to use multiple published DNS names, these DNS names must also resolve to the L4 switch, and the L4 switch must be configured to use them for the Access Gateway cluster.
In addition to this basic setup, see the following sections for configuration tips:
10.3.3 Configuring the Identity Server for Authentication
Before migrating resources, you need to configure the Identity Server to use the same LDAP user stores that iChain is using and configure the authentication profiles that you use for your iChain accelerators. The following sections describe these procedures:
Migrating Your Authentication Profiles
You need to migrate authentication profiles that you set up in iChain. If you only set up one LDAP profile for secure name and password, this method is set up by default and you can continue with Migrating the User Store Configuration. If you set up multiple LDAP profiles, Radius (tokens), mutual SSL (X509 certificates), or NMAS, you need to migrate these profiles.
iChain supports the ORing of profiles; a user can authenticate using one of two methods. The Identity Server does not support ORing of profiles. When you examine your iChain profiles, you need to decide whether to change the ORing to ANDing or to use just one method.
LDAP Authentication Profiles
Examine your iChain LDAP profiles ( > > > >). If you created multiple iChain authentication profiles for the same LDAP store by using a different LDAP context or LDAP search base, you need to decide how you are going to migrate these profiles. Select one of the following methods:
-
You can create multiple Identity Server user stores, one for each LDAP context or search base. To create multiple user stores, repeat the procedure described in Migrating the User Store Configuration. In Step 3, specify a different LDAP context or search base for each user store.
-
You can create authorization policies that restrict access according to the context of the user. To create this type of policy, see
LDAP Context Policies
in the Novell Access Manager 3.0 SP4 Administration Guide. -
You can create Identity Server roles that match an LDAP context, then create authorization policies that restrict access based on the user’s current roles. For information on creating such a role, see
Managing Policies
in the Novell Access Manager 3.0 SP4 Administration Guide.
SSL Mutual Authentication
If you used SSL mutual authentication in iChain, you need to configure the Identity Server for this method. Examine your SSL authentication profiles in iChain ( > > > > .
To migrate this configuration to the Identity Server, see Setting Up Mutual SSL Authentication
in the Novell Access Manager 3.0 SP4 Administration Guide.
RADIUS (Token) Authentication
If you used RADIUS authentication in iChain, you need to configure a contract for this method. Examine your RADIUS authentication profile in iChain ( > > > > .
For Identity Server configuration information, see Creating a RADIUS Authentication Class
in the Novell Access Manager 3.0 SP4 Administration Guide.
Migrating the User Store Configuration
-
In the Administration Console, create an Identity Server User Store for each unique iChain LDAP Store.
-
Click > > > .
-
Specify the DN of the user and the user’s password that you want the Identity Server to use when logging into the LDAP server.
-
Select the type of directory that matches your LDAP server.
-
-
Add a replica to the user store for each LDAP server address in the iChain LDAP store configuration. In the section, click and specify the required information.
You must enter at least one IP address for your LDAP server. If the LDAP directory has been replicated to other servers, enter their IP address information.
-
Add a search context.
-
Use a scope of for an iChain LDAP search base.
-
Use a scope of for an iChain LDAP context.
-
-
To save the configuration, click .
-
If you used more than one LDAP directory in iChain, repeat these steps and create a user store for each LDAP directory.
-
Continue with Enabling the User Stores for Authentication Methods.
Enabling the User Stores for Authentication Methods
-
Click > > > .
-
Select the option.
-
Click the name of the method you want to enable.
-
Select the user stores in the list of available stores and use the left-arrow to move them to the list of user stores.
-
In the list of , use the up-arrow and the down-arrow to arrange the order in which the user stores are searched.
-
Click .
-
Repeat Step 3 through Step 6 for any other authentication methods you want to enable for login.
-
If you used custom login pages in iChain, continue with Migrating Custom Login Pages. Otherwise, continue with Section 10.3.4, Configuring System and Network Settings.
Migrating Custom Login Pages
If you used custom login pages in iChain, you need to convert the HTML login page to a JSP page, then associate the JSP page with a class or method that is used to create a contract. You then select this contract for a protected resource, and on first access to that resource, the custom login page is displayed to the user.
Custom Login Page: iChain uses HTML for its login page. Access Manager uses JSP. The default login page for Access Manager is the login.jsp file, located in the /var/opt/novell/tomcat/webapps/nidp directory. The easiest way to create a new login page is to copy this default page, rename it, then modify it to match your requirements. This page has been designed for the Basic and Protected classes.
Class or Method Properties: The authentication classes and methods support properties. The Radius and Protected classes support a JSP property. You can use other classes, but if you want to create a custom login page, you must select a class that supports the JSP property.
You add this property to either the class or to the method derived from the class. For its value you use the filename of the custom login page you created. If you set the property on the class, you need to create a method that uses the class, then a contract that uses the method.
Contract: In iChain, the custom login page was associated with an accelerator and its location was specified in the option on the Web Server Accelerator page. In Access Gateway, the login page is associated with a protected resource, which opens the possibility of having a different login page for each protected resource. You select the login page for the resource by selecting the contract.
For more information, see Creating Custom Login Pages
in the Novell Access Manager 3.0 SP4 Administration Guide.
10.3.4 Configuring System and Network Settings
To configure the Access Gateway to match the system and network settings you have set up in iChain, you can either manually look at your iChain settings or export and print the .nas file and use it as a guide.
We suggest that you set up the Access Gateway to behave in a manner similar to iChain before you begin to migrate resources. However, this is optional. If the default system and network settings in Access Gateway are acceptable, you can skip these steps until later in your migration process except for Date & Time. If you have installed the Identity Server and the Access Gateway on separate machines, authentication requests fail if time is not configured accurately and synchronized.
-
To configure the time for the Access Gateway, see Date & Time.
-
To configure the time for the Identity Server, use the YAST utility.
Network Settings
This section describes the differences between network settings for iChain and Access Gateway and the paths to access the following settings:
DNS Servers
Both products have the same options. You can add up to three DNS servers that the machine can use to resolve names. You can also configure the same advanced options that control the caching of DNS names.
Gateways
|
iChain Path |
Access Gateway Path |
|---|---|
|
Web App > Network > Gateways / Firewalls |
Access Gateways > Edit > Gateways |
Both products have the same gateway options. The NetWare Access Gateway does not support SOCKS clients. The Linux Access Gateway does.
Telnet
|
iChain Path |
Access Gateway Path |
|---|---|
|
Must be enabled from the command line: set listener telnet enable=yes |
Access Gateways > Edit > Console Access |
Telnet is inherently non-secure because everything is transmitted in clear text. If you have enabled Telnet in iChain, we recommend that you disable it in Access Gateway and use SSH instead, which supports data encryption. You enable SSH on the Console Access page of the NetWare Access Gateway. The Linux Access Gateway does not support the Telnet and SSH options.
IP Addresses
|
iChain Path |
Access Gateway Path |
|---|---|
|
Web App > Network > IP Addresses |
Access Gateways > Edit > Adapter List |
Both products allow you to add IP addresses to existing adapters and configure their subnet masks and options for speed and duplexing. The biggest difference is in how the TCP™ options are configured.
-
In iChain, the TCP options are associated with an adapter.
-
In Access Gateway, TCP Options are associated with a reverse proxy. See > > > .
System Settings
In iChain, you could configure the following settings from system settings: Timezone, Date/Time, Actions, SNMP, Import/Export, Upgrade, Alerts, and Admin ACL. The Access Gateway does not support the Import/Export option or the Admin ACL option. Access Manager does allow you to back up the complete configuration and restore it. See Backing Up and Restoring Components
in the Novell Access Manager 3.0 SP4 Administration Guide.
Both products allow you to configure the following system settings:
-
Date & Time (includes time zone)
Date & Time
|
iChain Path |
Access Gateway Path |
|---|---|
|
Web App > System > Date / Time Web App > System > Timezone |
Access Gateways > Edit > Date & Time |
Both products allow you to set the date and time, set up an NTP server, and configure the time zone. Time synchronization is critical if you have installed the Identity Server and the Access Gateway on separate machines. The authentication process, which relies on the exchange of credentials and authentication assertions, fails when the two have a time discrepancy of more than one minute. We recommend that you set up both machines to use NTP and that you verify the time zone of each.
Upgrade
|
iChain Path |
Access Gateway Path |
|---|---|
|
Web App > System > Upgrade |
Access Gateways > [Server Name] > Actions > Upgrade |
Both iChain and the NetWare Access Gateway have the same options. You can enter the URL where the upgrade files are located and then select to upgrade immediately or schedule the upgrade for a later date. You can also back up to the previous version.
The Linux Access Gateway uses a script to download the upgrade RPMs from a server and upgrade the gateway. See Section 8.3, Upgrading the Linux Access Gateway.
Actions
|
iChain Path |
Access Gateway Path |
|---|---|
|
Web App > System > Actions |
Access Gateways > [Server Name] > Actions |
Both products support actions that purge the cache and restart or shut down the machine. Most of these options are not configurable; you need to learn the new location and the new names.
Alerts
|
iChain Path |
Access Gateway Path |
|---|---|
|
Web App > System > Alerts |
Access Gateways > Edit > Legacy Alerts or Alerts |
Both products have the same options. You can configure Access Gateway to use a Syslog server, send e-mail notifications to a specified list of users, and select the same types of alerts.
SNMP
Both products have the same options. You can allow the community Read access to monitor the state of the Access Gateway, allow the community Write access to the control states of the Access Gateway, and allow traps to be sent.
10.3.5 Migrating the First Accelerator
For your first accelerator, we suggest that you select the one with the fewest configuration requirements. If possible, select one that has only a few child accelerators (path-based or domain-based multi-homing accelerators) and does not require Form Fill or have complex access control policies.
IMPORTANT:All accelerators that use the same DNS name must be migrated at the same time.
The first migration task is to create a reverse proxy on your Access Gateway machine that mirrors the accelerator on your iChain machine. In the beginning, you can set it up to require only authentication because only you will know the URL of this migrated resource. When you know that this works, you can configure its protected resources to use the more advanced access control policies.
As you are configuring the reverse proxy, one of the big differences you’ll notice between Access Gateway and iChain is the number of components. In iChain, you have a Web accelerator with protected resources. In Access Gateway, you have a reverse proxy with proxy services that have protected resources. Figure 10-5 illustrates the configuration differences between iChain and Access Gateway.
Figure 10-5 Configuration Options for iChain and Access Gateway
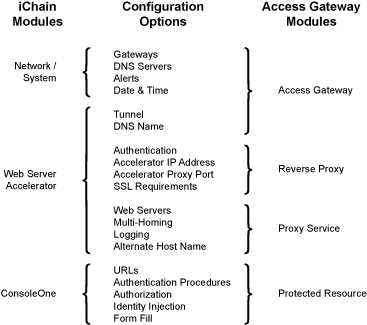
Because of these differences, migrating your iChain configuration can involve modifying the Access Gateway, reverse proxy, proxy services, and protected resource configurations. The following sections describe the required tasks:
Setting Up Certificates
To enable SSL for Access Gateway connections (from the browser to Access Gateway and from Access Gateway to the Web servers), you need to provide certificates:
-
If you are using third-party certificates in iChain, you can import these certificates into Access Gateway. You can import all the certificates at once or you can import a certificate as you migrate a specific accelerator and its children. For information on importing certificates into Access Gateway, see
Importing a Private/Public Key Pair
in the Novell Access Manager 3.0 SP4 Administration Guide. -
You can use the certificate authority in Access Gateway to create the certificates. For instructions, see
Creating Certificates
in the Novell Access Manager 3.0 SP4 Administration Guide. When you are done with the migration process, you can upgrade these certificates to a higher-grade certificate.
Migrating the Parent Accelerator
A parent accelerator is an accelerator in iChain that has a unique DNS name:
-
If you used domain-based multi-homing in iChain, the parent accelerator is the first accelerator that you created with a host name prepended to the common domain name (for example, test prepended to mycompany.com to create test.mycompany.com for the DNS name of the accelerator). The child accelerators are those that use the common domain name and prepended other host names such as sales.mycompany.com and dev.mycompany.com.
-
If you used path-based multi-homing in iChain, the parent accelerator is the accelerator that defines the DNS name (for example, www.acme.com), and the child accelerators are those that use the DNS name with an appended path (for example, www.acme.com/sales and www.acme.com/products).
To migrate a parent accelerator:
-
In the Administration Console, click > >
-
For the Trusted Identity Configuration, select the configuration you set up in Section 10.3.3, Configuring the Identity Server for Authentication.
The is empty until you create a reverse proxy. If you have multiple reverse proxies, the URL corresponds to the reverse proxy that you have selected for authentication.
-
Click , specify a display name for the reverse proxy, then click . There is no equivalent field in iChain.
-
To configure the reverse proxy communications between the browsers and the Access Gateway, fill in the following fields. (For iChain values, in the Web App click > > > ).
The TCP Listen Options cannot be configured until after you have created a proxy service.
-
To create a proxy service with the accelerator values, click and fill in the following fields:
-
Click and configure the proxy service.
-
Click and configure the following fields:
-
Click and configure the following fields. (For iChain values, click > or > in the Web App.)
-
Click > and configure the following fields:
-
Click and configure the fields.
iChain supports these same options. To view how you configured them in iChain, click > > in the Web App.
-
To apply your changes, click the link, then click > .
-
If this accelerator has child accelerators, continue with Migrating the Path-Based Multi-Homing Accelerators. If doesn’t have any child accelerators, continue with Migrating the Protected Resources.
Migrating the Path-Based Multi-Homing Accelerators
Path-based multi-homing accelerators are migrated as proxy services of the reverse proxy that specifies the DNS name.
-
In the Administration Console, click > > .
The Proxy Service List should display the name of the parent accelerator as its first proxy service.
-
Click and fill in the following fields. (For iChain values, click > > > in the Web App.)
-
Click OK and fill in the following fields:
-
Click .
-
To apply your changes, click the link, then click > .
-
Continue with Migrating the Protected Resources.
Migrating the Protected Resources
In iChain, the ISO object holds the protected resources. You use ConsoleOne to manage the ISO object. You can configure each protected resource to be public, restricted, or secure. iChain could additionally use LDAP information to authorize access.In Access Gateway, protected resources are not global like iChain; they are assigned to a specific proxy service (which is like an iChain accelerator). Novell Access Manager centralizes the authorization policies and authentication procedures, which can then be assigned to specific protected resources. These policies are greatly expanded and can do much more than the iChain policies. In addition, you do not need to change tools. You configure everything in Novell Access Manager with the Administration Console. In particular, you configure both the protected resources and the policies in the Administration Console.
Because iChain protected resources are global and associated with a DNS name, you need to migrate all the protected resources associated with a DNS name at the same time. The following sections describe how to migrate the protected resources:
Examine your iChain protected resources, and then select the appropriate migration strategy for that resource. If possible, we suggest you migrate a public resource, then a restricted resource. After you have seen the process work for these types of resources, you can migrate your secure resources. The policies that make these resources secure must be re-created in the Administration Console.
Migrating a Public Resource
A public resource is a resource that requires no login procedures or authorization policies.
To migrate these protected resources:
-
In the Administration Console, select the Access Gateway, then click > > > > .
-
Specify a display name for the resource. This can be the same name you used for the resource in iChain.
-
(Optional) Specify a description for the protected resource.
-
In the Contract field, select .
The field must be set to . This is what makes this resource a public resource.
-
Configure the URL Path List.
The default path is /*, which allows access to everything on the Web server. Modify this to match your iChain value.
-
Click twice.
-
In the , verify that the resource you created is enabled.
-
At the bottom of the page, select , then click .
-
On the Server Configuration page, click .
-
On the Access Gateways page, click > .
-
Continue with Migrating a Restricted Resource, or to test the resource you have migrated, continue with Testing the Migrated Resources.
Migrating a Restricted Resource
A restricted resource is a resource that requires a login procedure but not an authorization policy. In iChain, these are the resources you configured with ConsoleOne.
To migrate these protected resources:
-
In the Administration Console, select the Access Gateway, then click > > > > .
-
Specify a display name for the resource. This can be the same name you used for the resource in iChain.
-
(Optional) Specify a description for the protected resource.
-
Select the type of contract, which determines the information a user must supply for authentication. During installation, the following contracts and options are set up:
-
None: If you want to allow public access to the resource and not require authentication, select as the contract.
-
Any Contract: If the user has authenticated, this option allows any contract defined for the Identity Server to be valid, or if the user has not authenticated, it prompts the user to authenticate using the default contract assigned to the Identity Server configuration.
-
Name/Password - Basic: Specifies basic authentication over HTTP using a standard login pop-up screen provided by the Web browser.
-
Name/Password - Form: Specifies a form-based authentication over HTTP using the Access Manager login form.
-
Secure Name/Password - Basic: Specifies basic authentication over HTTPS using a standard login pop-up screen provided by the Web browser.
-
Secure Name/Password - Form: Specifies a form-based authentication over HTTPS using the Access Manager login form.
If you have created other contracts, they appear in the list. If the type of contract you require is not displayed in the list, see Migrating Your Authentication Profiles.
-
-
Configure the . Add the path or the paths you want protected by this contract.
-
Click twice.
-
In the , verify that the resource you created is enabled.
-
At the bottom of the page, select , then click .
-
On the Server Configuration page, click .
-
On the Access Gateways page, click > .
-
Continue with Migrating a Secure Resource, or to test the resource you have migrated, continue with Testing the Migrated Resources.
Migrating a Secure Resource
A secure resource is a resource that requires a login procedure and an authorization policy. The authorization policy can specify Form Fill parameters, information to be injected into the HTML header (called OLAC in iChain), or additional criteria the user must match to access the resource (called ACLCheck in iChain). See Section 10.3.7, Migrating Resources with Special Configurations.
Testing the Migrated Resources
-
On the workstation where you are going to test the migrated resources, edit the hosts file so that the DNS name you have migrated resolves to the IP address of the Access Gateway:
-
If you are using a Windows workstation, the hosts file is located in C:\Windows\System32\drivers\etc\hosts.
-
If you are using a Linux workstation, the hosts file is located in /etc/hosts.
-
-
From this workstation, request access to all the resources you have migrated.
If you have various login profiles for your users, log in with each profile to ensure that you have access to the correct resources.
Enabling User Access to the Migrated Resources
If you want to create a single sign-on environment, you need to create an accelerator in iChain that protects the Identity Server. See Section 10.3.6, Enabling Single Sign-On between iChain and Access Manager.
If you are going to install an L4 switch so you can create a cluster of Access Gateways, you might want to install it before allowing public access to the migrated resource. You can use the L4 switch to determine which IP address the DNS name resolves to. The public DNS server resolves the DNS name of the migrated resource to the L4 switch, and the L4 switch determines whether that DNS name is sent to iChain or to the Access Gateway.
If it is acceptable for your users to authenticate to iChain for iChain resources and to use a separate authentication to access the resources migrated to the Access Gateway, complete the following steps:
-
Change how the migrated resources are resolved:
-
If you are using an L4 switch, change the VIP for the migrated resource so that it points to the Access Gateway.
-
If you aren’t using an L4 switch, change the entry on your DNS server so that the DNS name you have migrated points to the IP address of the Access Gateway.
-
-
Monitor your users and see if they have any problems.
-
If they experience problems that you can’t fix immediately, you can change the entry on the DNS server to again point to iChain and do more testing before enabling Access Gateway authentication.
-
If your users do not experience problems, use the Web application for iChain to disable the accelerator and child accelerators that you have migrated.
-
10.3.6 Enabling Single Sign-On between iChain and Access Manager
To enable single sign-on between iChain and Access Manager, you need to create an accelerator in iChain that protects the Identity Server. You also need to create a policy that supplies the authentication information. The following steps use OLAC, which is sufficient if your back-end Web servers are using basic authentication. You can also use Form Fill. If you prefer to use Form Fill, skip Step 7 and see Using Form Fill instead of OLAC for Single Sign-On.
-
In the iChain Web application, click > > .
-
Configure the following fields:
DNS name: Set this to the DNS name specified for the domain name in the Base URL configuration for the Identity Server.
IMPORTANT:The Base URL for the Identity Server must be configured to use a domain name. If you used an IP address for the domain name when you configured the Identity Server, you must modify the Base URL configuration to use a domain name.
Alternate host name: Set this to the DNS name specified for the domain name in the Base URL configuration for the Identity Server.
Return error if host name sent by browser does not match above DNS name: Select this option.
Web server addresses: Set this to the IP address of your Identity Server.
Accelerator proxy port: Set this to the HTTP or HTTPS port value you specified in the Base URL configuration for the Identity Server. The default value is 8080 for HTTP and 8443 for HTTPS.
Enable authentication: Select this option to enable authentication between iChain and the Identity Server.
Enable Secure Exchange: Select this option to enable SSL between the browsers and iChain.
SSL listening port: Set this to the HTTPS port value you are going to use for this accelerator. The default value is 443.
-
Click and make sure the protocol (HTTP or HTTPS) and port match the Base URL protocol specified in the Base URL configuration for the Identity Server.
-
Click and set the .
Set this idle time to the same value you set the Session timeout for the Identity Server.
To verify the Identity Server value, in the Administration Console, click > > > and view the value for the field.
-
Enable , and add the LDAP profile to the list.
If you want to AND any other profiles with LDAP, add them to the list, then click .
This enables the Identity Server to use the iChain authentication credentials for Identity Server authentication. This only works if you are using an LDAP profile or an LDAP profile ANDed with another profile. For more information, see Limitations of the Forward Authentication Method.
-
To save the configuration, click .
-
In iChain ConsoleOne, create a protected resource for the Identity Server accelerator.
-
Select the ISO object and access the page.
-
Add a protected resource. For the URL, use the domain name that you specified for the Base URL of the Identity Server followed by a /*. For example if your domain name for the Identity Server is users.acme.com, you would enter
users.acme.com/*
-
Mark the protected resource as restricted.
-
Add an OLAC parameter with the following values:
- Name: ICHAIN_UID
- Data Source: ldap
- Value: cn
This enables basic authentication for single sign-on.
-
Save the configuration.
-
-
In the iChain Web application, enable OLAC. Click > , then select (OLAC).
-
On your DNS server, add an entry so that the domain name specified in the Base URL for the Identity Server resolves to the iChain accelerator IP address.
The domain name in the Base URL for the Identity Server needs to resolve to the iChain accelerator IP address until the migration is completed and iChain is removed. When iChain is removed, the domain name of the Base URL for the Identity Server needs to resolve to the IP address of the Identity Server.
-
On your Access Gateway machine, modify the hosts file (found in the etc directory). Add an entry so that the Access Gateway can directly resolve to the DNS name of the Identity Server.
This allows the Access Gateway to resolve the DNS name of the Base URL of the Identity Server.
Using Form Fill instead of OLAC for Single Sign-On
You can use Form Fill instead of OLAC to provide the authentication information. Your Form Fill policy should look similar to the following:
<urlPolicy>
   <name>Identity Provider login</name>
   <url>ncsles9.suse.de/nidp/idff/sso</url>
   <formCriteria>
      <title>Access Manager 3.0 Login</title>
   </formCriteria>
   <javaScript></javaScript>
   <scriptForPost></scriptForPost>
   <actions>
      <fill>
         <input name="Ecom_User_ID" value="~cn">
         <input name="Ecom_Password" value="~password">
     </fill>
     <post/>
   </actions>
</urlPolicy>
You need to modify the domain name (ncsles9.suse.de) of the <url> element to match the domain name of your Identity Server.
In addition to the Form Fill policy, you need a Login Failure policy. The Login Failure policy should precede the Form Fill policy in the XML file.
<urlPolicy>
   <name>IDP Failure</name>
   <url>ncsles9.suse.de/nidp/idff/sso</url>
   <formCriteria>Login failed, please try again. If you continue
      to be unable to login, please contact your system
      administrator.</formCriteria>
   <actions>
      <deleteRemembered>Identity Provider login</deleteRemembered>
      <redirect>ncsles9.suse.de/nidp/idff/sso</redirect>
   </actions>
</urlPolicy>
The <deleteRembered> element should only be used if you are using shared secrets. The value of this element is the name of the Form Fill policy (in this example, Identity Provider login). If you are using some other mechanism such as LDAP attributes instead of shared secrets, the <redirect> element should be used to redirect your users to your password management URL.
The domain name of the Identity Server (ncsles9.suse.de) needs to be replaced and match the domain name of your Identity Server in the <url> and <redirect> elements.
Limitations of the Forward Authentication Method
Enabling the option has the following limitations:
-
All authentication to the iChain accelerator for the Identity Server must be the same.
-
Single sign-on to the Identity Server is done through the Name/Password - Basic contract and no other credentials if you are using OLAC. If you are using Form Fill, other options are available.
These limitations, if your iChain resources use other authentication methods, impose the following restrictions on your migration plans.
-
Single sign-on is not possible with Token (RADIUS) authentication unless you AND it with LDAP authentication.
-
Single sign-on is not possible with X509 (SSL Mutual) authentication unless you AND it with LDAP authentication.
-
Single sign-on is not possible with multiple accelerators using dissimilar authentication configurations.
The workaround is to choose the most common authentication configuration and migrate all accelerators using that configuration. All other accelerators must be migrated at the same time that iChain is removed from the environment, or if you select to move them one at a time, there is no single sign-on for those accelerators until iChain is removed.
10.3.7 Migrating Resources with Special Configurations
The following sections describe how to configure resources that require such features as Form Fill and ACLCheck.
URLs Requiring Form Fill
There is no tool to convert the XML files for iChain Form Fill policies to Access Gateway policies. The tables below explain where the information in the iChain policy should be entered in the Access Gateway policy.
Table 10-2 Form Fill Policy Tags
Table 10-3 Form Login Failure Policy Tags
For more information, see Creating Form Fill Policies
in the Novell Access Manager 3.0 SP4 Administration Guide.
NOTE:Do not migrate your Form Fill policy for Citrix clients. The Access Gateway uses a different process for enabling single sign-on for Citrix clients. For more information, see Migrating Citrix Clients.
URLs Requiring OLAC
OLAC is called identity injection in Novell Access Manager. Information can be injected in one of several ways: authorization header, custom header (name/value pairs), custom headers with tags (tag name-value pairs), or query strings. iChain has the ability to inject constants and authentication profiles from the authenticated directory user. Access Gateway has the ability to inject these and other new types of data.
Identity injection allows you to add information to the HTML header or to the query string of the URL before the request is sent to the Web server. The Web server can use this information to create dynamic pages customized to the user or to determine whether the user should have access to the resource. The Web server determines the information that you need to inject. The following sections provide the information you need to migrate your OLAC policies to Access Manager.
Policy Comparison between iChain and Access Gateway
The following table lists the iChain feature and the equivalent Access Gateway feature.
Table 10-4 Policy Comparison
As you can see from the table, Access Gateway supports all the iChain OLAC policies. However, the table doesn’t show you all of the new types of data you can inject into the authentication header, the HTTP header, or the URL query string. You can also inject the following types of information:
-
Authentication Contract
-
Client IP
-
Credential Profile (includes both LDAP and X509 credentials)
-
LDAP Attribute
-
Liberty User Profile
-
Proxy Session Cookie
-
Roles for Current User
-
Shared Secret
-
String Constant
-
Java Data Injection Module
For more information, see Creating Identity Injection Policies
in the Novell Access Manager 3.0 SP4 Administration Guide.
Migrating a Policy for the Authorization Header
-
In the Administration Console, click > .
-
Specify a name for the policy, select as the type, then click OK.
-
(Optional) Specify a description for the injection policy. This is useful if you plan to create multiple authorization policies to be used for multiple resources.
-
In the Actions section, click , then select .
-
Configure the and fields.
The following table lists the possible iChain values and indicates the Access Gateway values you need to select.
-
Click twice, then click .
-
(Optional) To create other types of OLAC policies, see
-
To assign this policy to a protected resource, see Configuring a Resource to Use an Identity Injection Policy.
Migrating a Policy for Custom Header Variables
In iChain, an automatic X- prefix was added to all custom header variables. Some Web servers do not require the X- prefix to identify custom header variables. To accommodate these servers, Access Gateway does not add a X- prefix to the custom names. If your Web server requires the prefix, you need to add the prefix when you define the name in the Access Gateway policy.
-
In the Administration Console, click > .
-
Specify a name for the policy, select as the type, then click .
-
(Optional) Specify a description for the injection policy. This is useful if you plan to create multiple custom header policies to be used for multiple resources.
-
In the section, click , then select .
-
Fill in the following fields:
Custom Header Name: Specifies the name to be inserted into the custom header. If your Web server requires the X- prefix, make sure you include the prefix in this field.
Value: Specifies the value required by the custom header name.
-
Click twice, then click .
-
To assign this policy to a protected resource, see Configuring a Resource to Use an Identity Injection Policy.
Migrating a Policy for a Query String
Some Web servers require custom information in a query string of the URL. The option allows you to inject this information without prompting the user for it.
-
In the Administration Console, click > .
-
Specify a name for the policy, select as the type, then click OK.
-
(Optional) Specify a description for the injection policy. This is useful if you plan to create multiple custom header policies to be used for multiple resources.
-
In the section, click , then select .
-
Fill in the following fields:
Tag Name: Specify the name to be inserted into the query string of the URL.
Tag Value: Specify the value required by the tag name.
-
Click twice, then click .
-
To assign this policy to a protected resource, see Configuring a Resource to Use an Identity Injection Policy.
Configuring a Resource to Use an Identity Injection Policy
Policies are independent of resources. After a policy is created, it can be assigned to multiple protected resources.
-
In the Administration Console, select the Access Gateway, then click > > > > .
-
Specify a display name for the resource. This can be the same name you used for the resource in iChain.
-
In the field, select the type of contract you want the user to use for authentication.
-
In the , click the default path (/*) and modify it so that it references the resource you want to protect.
-
Click .
-
From the list of policies, select the policies you want to processed for this protected resource, then click .
-
To save your changes, click > .
-
On the Sever Configuration page, click OK.
-
On the Access Gateways page, click > .
URLs Requiring ACLCheck
In iChain, you set up an ACLCheck rule based on the user’s LDAP attributes, objects in the user’s dn, and group memberships, and you then assigned the rule to a protected resource. The Access Manager policies are more flexible, and each rule can be implemented in multiple ways. The following migration instructions explain how to use role policies to implement the same functionality you had with ACLCheck. Creating a role policy adds another configuration task, but it also exposes some of the power available in the Access Manager policy engine. After you have created a role and enabled it on the Identity Server, you can use the role in multiple authorization and identity injection policies.
Another option is to create an authorization policy using the LDAP attributes that you specified in the ACLCheck rule as the conditions of the authorization policy. See LDAP Context Policies
in the Novell Access Manager 3.0 SP4 Administration Guide. For other methods, see Creating Access Gateway Authorization Policies
in the Novell Access Manager 3.0 SP4 Administration Guide.
To migrate an ACLCheck rule using Access Manager roles, you first create a role policy based on the LDAP attributes you specified in the ACLCheck rule. This role policy is then used to create an authorization policy, which specifies the credentials the user requires to gain access to the resource. This authorization policy is then assigned to the protected resource.
This process is described in the following sections:
Migrating an ACLCheck Rule to a Role Policy
To use roles in migrating existing ACLCheck rules:
-
In the Administration Console, click > .
-
Specify a name for the role, select as the type, then click .
-
(Optional) Specify a description for the role.
-
In Condition Group 1, click , then select a condition.
-
For a container rule, select , then select .
-
For a group rule, select , then select .
-
For an LDAP attribute rule, select , then select the name of the attribute.
-
-
For the field, select the value the user must match to be granted the role.
For example, to create a role for all the users whose DN contained the following objects (ou=provo,ou=sales,o=novell), you would select LDAP OU, the user store, then the DN of the OU.
For an LDAP group, select , the user store, then the DN of the group.
For an LDAP attribute, select the value type that matches the attribute’s value. To specify a value, select .
-
In the Actions section, select > .
-
In the text box, specify the name for the role.
When users log in to Access Manager and if they match the conditions for the role, they are assigned the role. You can then use these role assignments for authorization. See Creating an Authorization Policy with an Allow and a Deny Rule.
-
To save the role, click twice, then click .
-
Repeat these steps to add other roles for ACLCheck rules.
-
Enable the role or roles you have created. Click > > . Select the roles you have created, click , then click .
-
Update the Identity Server configuration. Click > > .
Creating an Authorization Policy with an Allow and a Deny Rule
If you want to allow access to a resource when users meet a certain condition, and deny access to all users who do not meet that condition, one method is to create a policy with an Allow rule and a Deny rule. The policy engine in Access Gateway is flexible enough to allow many designs for a policy. The instructions in this section describe how to create a policy with an Allow rule and a Deny rule. For other ideas see Creating Access Gateway Authorization Policies
in the Novell Access Manager 3.0 SP4 Administration Guide.
In iChain, the default behavior for secure resources was to deny access unless an ACLCheck rule allowed access. The behavior is different in Access Gateway. After a user has authenticated, the default behavior is to allow access to resources. Therefore, to restrict access to a resource, you need to create a policy that allows access to the users who meet the conditions and denies access to everyone else.
The following instructions explain how to create a rule that grants access to a URL when the user matches the sales role condition and denies access when the user doesn’t match the condition.
-
In the Administration Console, click .
-
Specify a name for the policy, such as deny_all_but_sales.
-
Select from the menu, then click .

-
(Optional) Specify a description for the rule.
-
Select the Condition structure.
Select , which is the default value.
-
In , select , then .
This sets up a condition where the roles that are assigned to the user making the request are compared to the content of the field.
-
Fill in the following fields:
If/If Not: Select . This selection allows you to include or exclude certain roles. In this example, the rule is being configured to allow users with the sales role to access the resource.
Comparison: Select , then select .
Mode: Select .
Value: Select , then select .
Result on Condition Error: Select . Because this condition evaluates to False when the user doesn’t have the sales role, you want the result to be False when an error occurs during the evaluation of the condition.
-
To add a second condition to , click , then select .
-
Fill in the following fields:
If/If Not: Select . This rule is being configured to allow users with the sales role to access the requested URL. The first rule for roles is ANDed with this rule for URLs.
Comparison: Select .
Value: Select , then specify the URL in the text box. To allow access to all pages at a location, end the URL with a /*. For example:
https://www.novell.com/sales/*
Result on Condition Error: Select . Because this condition evaluates to False when the requested URL doesn’t match, you want the result to be False when an error occurs during the evaluation of the condition.
-
Under , select .
-
Click .
-
In the , click .
Rule 2 is for denying access to everyone who does not match the conditions in Rule 1.
-
Set the to be 2 or greater.
You want the Allow rule to be processed first, so it should have a priority of 1. The Deny rule needs to be processed last, so it needs a lower priority than the Allow rule.
-
Leave the empty.
-
In the section, select and either accept the default action or select one of the other actions.
-
Click twice.
-
Click on the Policies page.
-
Repeat this process for any other authorization policies you need to create for roles.
Protecting the Resource with the Authorization Policy
To apply the authorization policy to a protected resource:
-
In the Administration Console, click > > > > > > .
-
Select the authorization policy from the list, then click .
-
Click .
-
To apply your changes, click the link, then click > .
URLs Requiring HTML Rewriting
If you created custom rewriter files for iChain or modified the configuration for the internal rewriter (the sys:/etc/proxy/rewriter.cfg file), you must enter the data from these files into an Access Gateway rewriter profile. You can create such a profile for each proxy service you configure.
To access the HTML rewriting policy page in the Administration Console, click > > > > .
Table 10-5 shows where to place the information from the iChain file in the Access Gateway profile.
Table 10-5 Converting an iChain Rewriter File to an Access Gateway Profile
Migrating Citrix Clients
The Access Gateway can be configured to provide single sign-on for Citrix clients. The iChain configuration for accommodating the Citrix clients cannot be migrated, because the Access Gateway uses an entirely different process and requires a different type of Form Fill policy. See Configuring SSL VPN for Citrix Clients
in the Novell Access Manager 3.0 SP4 Administration Guide.
Migrating Protected Resources for J2EE Servers
If you have created protected resources in iChain for J2EE servers, you should use the J2EE Agent, which hooks into JACC and JAAS rather than migrating these resources to the Access Gateway as protected Web servers. The J2EE Agent allows you to protect specific Web application pages and Java Enterprise Bean interfaces and methods, and you can create a customized authorization policy for each resource.
The J2EE Agent uses the Identity Server for authentication, so single sign-on is enabled between the Access Gateway protected resources and the J2EE Agent protected resources.
For more information, see the Novell Access Manager 3.0 SP4 Agent Guide.
Migrating Protected Non-HTTP Applications
If you have created protected resources in iChain for non-HTTP applications, you should use the SSL VPN server rather than migrating these resources to the Access Gateway as protected resources.
The SSL VPN server uses the Identity Server for authentication, so single sign-on is enabled between the Access Gateway protected resources and the SSL VPN protected resources.
For more information, see SSL VPN Gateway Configuration
in the Novell Access Manager 3.0 SP4 Administration Guide.
Migrating Custom OLAC Drivers
Instead of migrating custom OLAC drivers, you can create the functionality of these drivers with Access Manager policies. For example, the LDAP OLAC driver could retrieve an LDAP attribute, such as employeeID, from eDirectory and inject the attribute and its value into the HTTP header or query string for the Web server requiring it. In Access Manager, you can accomplish all of this with an identity injection policy. For more information, see Creating Identity Injection Policies
in the Novell Access Manager 3.0 SP4 Administration Guide.
If the user values you need to inject are not stored in an LDAP directory, you can create a secret store, prompt the users to enter the required values the first time they access the Web server requiring the values, store them in the secret store, and then inject the values when the user accesses the page requiring them. For more information, see Creating and Managing Shared Secrets
, Creating Form Fill Policies
, and Creating Identity Injection Policies
in the Novell Access Manager 3.0 SP4 Administration Guide.
10.3.8 Moving Staged Components
The IP address of the Administration Console cannot be changed unless you reinstall all components that were auto-imported into the Administration Console or install a second Administration Console.
NOTE:By adding a second Administration Console with the IP address you want to use in a production environment, making it the primary Administration Console, then removing the first Administration Console, you can overcome the IP address limitation. You can then perform a reinstall on the first Administration Console and change its IP address. Rather than performing these steps, we highly recommend that you install your Administration Console using the IP address that it needs in a production environment.
The other Access Manager components, the Access Gateway, the Identity Server, J2EE Agent, and the SSL VPN server, can change the IP addresses.
Changing the Address of an Identity Server, J2EE Agent, or SSL VPN Server
-
At the console of the machine, start the YaST utility.
-
Change the static IP address. If you are physically moving the machine, shut down the machine, move the machine to its new location, and start it.
-
In the Administration Console, change the IP address of the Management IP address to match this new IP address. Select one of the following:
-
For an Identity Server, click > , then click the link.
-
For an SSL VPN, click > , then click the link.
-
For a J2EE Agent, click > , then click the link.
-
-
Specify the new address, then click to save your changes.
Changing the IP Address of an Access Gateway
If the new IP address is in the same subnet, see Changing the IP Address of the Access Gateway
in the Novell Access Manager 3.0 SP4 Administration Guide for instructions.
If the new IP address is in a different subnet:
-
In the Administration Console, click > > .
-
If the machine belongs to a group, select the Access Gateway from the list.
-
In the section, select the subnet mask that contains the old IP address.
-
Set the Subnet Mask to 0.0.0.0, then click .
-
Select the 0.0.0.0 subnet mask.
-
Select the old IP address, click , specify the new IP address, then click
This option changes all configuration instances of the old IP address to the new IP address. For example, any reverse proxies that have been assigned the old IP address as a listening address are modified to use the new IP address as the listening address.
-
To apply your changes, click the link, then click > .
The configuration changes are applied to the Access Gateway machine.
-
If you are physically moving the machine, move it before completing the rest of these steps.
-
Check the IP address that the Administration Console uses for managing the Access Gateway. Click > > .
-
If the old IP address is listed as the , select the new IP address. If your Access Gateway has multiple IP addresses, select the one that you want the Administration Console to use for communication with the Access Gateway.
The port should only be modified if there is another device on the Access Gateway that is using the default port of 1443.
-
If the name of the Access Gateway is the old IP address, modify the option.
-
Click .
The Administration Console uses the configured IP address to find the Access Gateway.
If your Access Gateway stops reporting to the Administration Console after completing these steps, you need to trigger an auto-import. See Section A.1.2, Triggering an Import Retry.
10.3.9 Removing iChain
When you have migrated all your resources to the Access Gateway and the only DNS name that resolves to the iChain machine is the DNS name for the Identity Server accelerator, you are ready to remove the iChain machine from your production environment.
-
Reconfigure your DNS server (or L4 switch) so that the DNS name of Identity Server accelerator resolves to the IP address of the Identity Server rather than to the iChain machine.
-
The Identity Server uses ports 8080 and 8443. If you have not opened these ports in your firewall, you need to configure iptables on your Identity Server. See
Translating the Identity Server Configuration Port
in the Novell Access Manager 3.0 SP4 Administration Guide. -
When the new configuration has had time to propagate through out your network, remove the network cables from the iChain machine.
-
Continue testing the configuration.
-
If everything is working as expected, physically remove the iChain machine from your network.