5.4 Using the Advanced Installation Option
An advanced installation allows you to customize the default settings. This section describes how to run the advanced installation and customize the partitions.
5.4.1 Planning Your Partition Strategy
Linux allows you to have four primary partitions per hard disk. The Linux Access Gateway requires a swap partition, a cache object store (COS) partition, and a root partition. For a machine with only one large hard disk (100 GB or larger), we recommend creating the following partitions:
Table 5-2 Partitions for One Large Hard Disk
Other configurations are possible if you know Linux and the Access Gateway.
When the machine has an array of disks, we recommend that you configure the first hard disk with the following partitions:
Table 5-3 Partitions for an Array of Disks
These partitions can be imaged on a pair of disks so that disk failover is supported. The remaining disks in the array can have one large COS partition. You can also divide them into multiple COS partitions so you can configure multiple virtual machines. The COS partitions need to be the same size for all virtual machines.
5.4.2 Starting the Installation
-
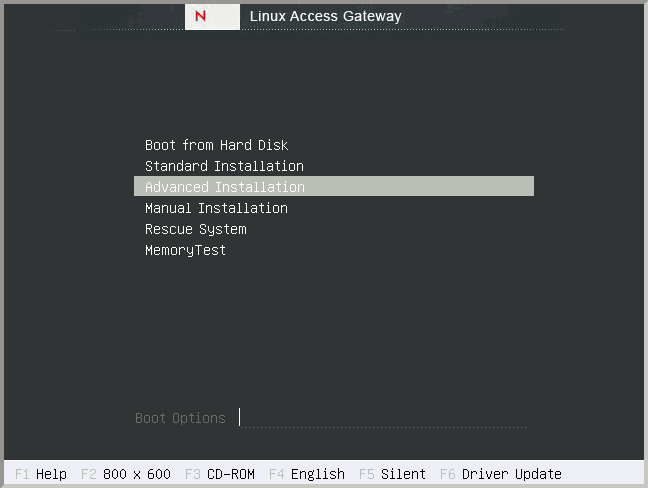
Insert the Linux Access Gateway CD into the CD drive.
The boot screen appears.
-
Use the Down-arrow key to select
-
Use the function key options to change installation settings as desired.
For more information on these function keys, see Section 5.2, Boot Screen Function Keys.
-
After you have completed any changes to the installation options, press Enter.
The Linux kernel loads, and the advanced installation starts and displays the Linux Access Gateway splash screen followed by the License Agreement section.
-
Read the agreement, then select to proceed.
-
Select on the Language selection page, then click
The current version is an English-only version.
-
(Conditional) If you are prompted to load the hardware drivers, follow the prompts.
-
(Conditional) If you have previously installed a version of Linux on the machine, make sure that is selected, then click .
The other options are not supported for this release.
The Installation Settings page appears.
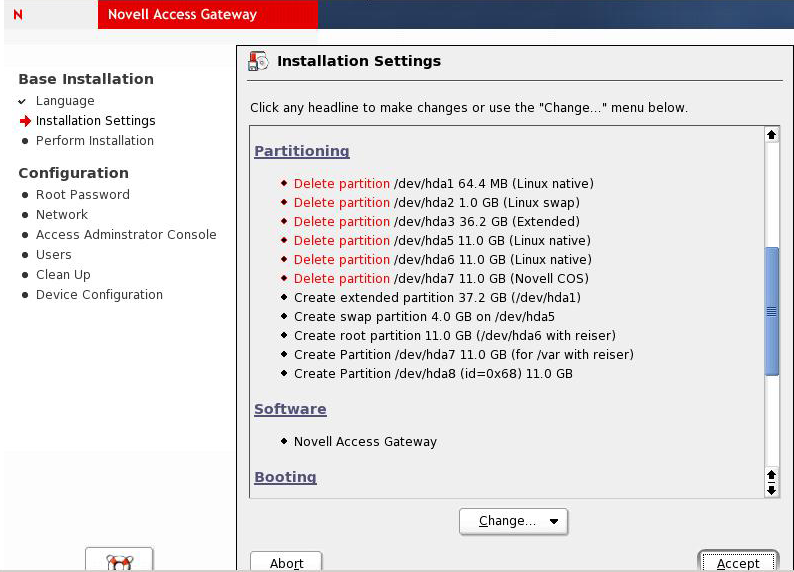
WARNING:The proposed partition overwrites the existing partitions, if any, in the disk.
Before you click on the Installation Settings page, you must complete the following tasks:
-
Create custom partitions. See Section 5.4.3, Customizing the Partitions.
-
Modify the time zone. See Section 5.4.4, Configuring Date and Time Values.
Other modifications, explained in Section 5.4.5, Customizing Optional Settings, are optional.
-
5.4.3 Customizing the Partitions
NOTE:You must format the partition after you have modified the partition size during installation.
-
To create a custom partition, click , then select .
This page lists the partition settings as currently proposed.
-
Select , then click .
The other options are not recommended.
-
Select , then click .
-
(Conditional) If the installation program discovers any existing partitions, select the hard disk, click , then confirm the deletion of the partitions.
-
For a machine with one hard disk, create a root partition that uses 25% of the disk space. The following values assume a machine with a 100 GB hard drive and 4 GB of RAM. If your machine has a different configuration, adjust the values as you create the partitions.
-
Click , select , then click .
-
Fill in the following fields:
Format: Make sure is selected.
File system: Select either or for the type.
Size: Specify +25GB for the cylinder value.
Mount Point: Select .
-
Click .
-
-
Create a swap partition that is double the size of the RAM in the machine.
-
Select the hard drive, click , select , then click .
-
Fill in the following fields:
Format: Make sure is selected.
File system: Select for the type.
Size: Specify +8GB for the cylinder value.
Mount Point: Leave the default value of .
-
Click .
-
-
Create a var partition that uses 25% of the disk space on the hard disk.
-
Select the hard drive, click , select , then click .
-
Fill in the following fields:
Format: Make sure is selected.
File system: Select either or for the type.
Size: Specify +25GB for the cylinder value.
Mount Point: Select .
-
Click .
-
-
Create a COS partition that uses the remaining space on the hard disk:
-
Select the hard drive, click , select , then click .
-
Fill in the following fields:
Format: Select .
File system ID: Select for the ID.
Size: Accept the default value for the cylinder value.
Mount Point: Make sure the has no value.
-
Click .
-
-
Click , then continue with Section 5.4.4, Configuring Date and Time Values.
-
For a machine with a disk array, create a boot partition on the first hard drive. The following values assume that the machine has 100 GB hard drives and 4 GB of RAM. If your machine has a different configuration, adjust the values as you create the partitions.
-
Select the first hard drive, click , select , then click .
-
Fill in the following fields:
Format: Make sure is selected.
File system: Select either or for the type.
Size: Specify +500MB for the cylinder value.
Mount Point: Specify .
-
Click .
-
-
Create a swap partition that is double the size of the RAM in the machine on the first hard disk.
-
Select the first hard drive, click , select , then click .
-
Fill in the following fields:
Format: Make sure is selected.
File system: Select for the type.
Size: Specify +8GB for the cylinder value.
Mount Point: Leave the default value of .
-
Click .
-
-
Create a var partition that uses 25% of the disk space on the first hard disk.
-
Select the first hard drive, click , select , then click .
-
Fill in the following fields:
Format: Make sure is selected.
File system: Select either or for the type.
Size: Specify +25GB for the cylinder value.
Mount Point: Select .
-
Click .
-
-
Create a root partition that uses the rest of the space on the first disk.
The installation program creates this partition into a COS partition.
-
Click , select , then click .
-
Fill in the following fields:
Format: Make sure is selected.
File system: Select either or for the type.
Size: Accept the default value for the cylinder value.
Mount Point: Select .
-
Click .
-
-
Create a COS partition. The partition can consume all or part of the space on the hard disk. The following values assume you are going to create two 50 GB partitions on a 100 GB hard disk.
-
Select a hard drive from the array, click , select , then click .
-
Fill in the following fields:
Format: Select .
File system ID: Select for the ID.
Size: Specify +50GB for the cylinder value.
Mount Point: Make sure the has no value.
-
Click .
-
Repeat these steps to create additional COS partitions.
-
-
Click , then continue with Section 5.4.4, Configuring Date and Time Values.
5.4.4 Configuring Date and Time Values
-
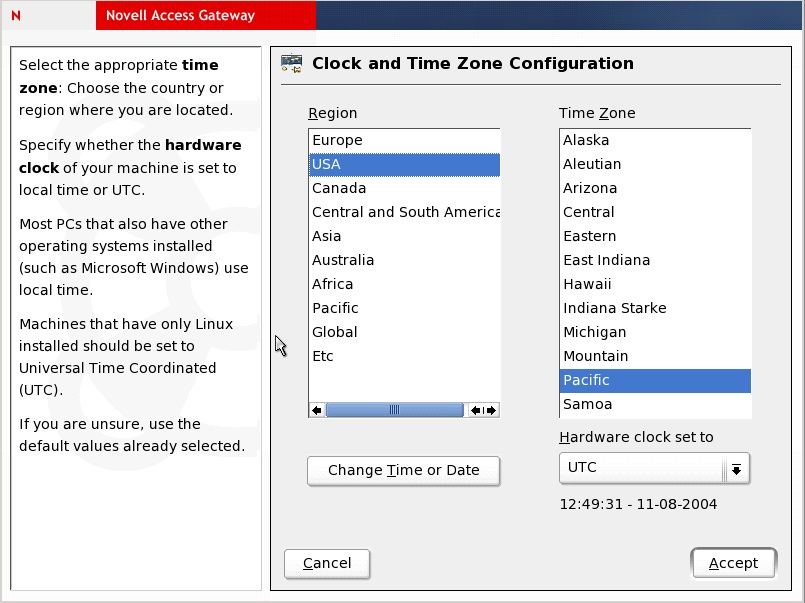
To change the time zone, click , then select .
-
Configure values for the region and time zone.
-
Use the drop-down list to select between local time and UTC.
The selection depends on how the hardware (BIOS) clock is set on your machine. If it is set to GMT, which corresponds to UTC, your system can automatically switch from standard time to daylight saving time.
-
Click to correct the current time or date.
IMPORTANT:Make sure that the time is synchronized on the Linux Access Gateway, Identity Server, and Administration Console.
-
Click
-
Continue with Section 5.4.5, Customizing Optional Settings or Section 5.4.6, Configuring Hardware and System Services.
5.4.5 Customizing Optional Settings
Use the button on the Installation Settings page to change the following settings. These changes are optional. If you do not want to change the installation settings, continue with Section 5.4.6, Configuring Hardware and System Services.
-
Click to select software packages to be installed with the Linux Access Gateway installation.
WARNING:The Linux Access Gateway is an appliance. Adding additional packages breaks your support agreement with Novell. If you encounter a problem, Novell Technical Support can require you to remove the additional packages and to reproduce the problem before receiving any help with your problem.
-
Click to detect the hardware components on your system.
The components are detected and listed in the section. You can save this information to a file or floppy disk.
-
Click to see details of the installation mode.
-
Click to see the default run level.
-
Skip the configuration option.
The installation program disables the mouse.
-
If you have not yet selected a language for installation, click , then select
-
During installation, YaST proposes a boot configuration for your system. Unless you require a custom setup, leave these settings unchanged.
For a custom setup, modify the proposal for your system by choosing either of the following options:
-
Configure the boot mechanism to rely on a special boot floppy.
Although this has the disadvantage of requiring the floppy to be in the drive when booting, it leaves an existing boot mechanism untouched. However, in most cases this should not be necessary, because YaST can configure the boot loader to boot existing operating systems.
-
Change the location of the boot mechanism on the hard disk.
To change the boot configuration proposed by YaST, select to modify the boot mechanism details.
After you finish modifying the settings, click to return to the Installation Settings page.
-
-
At the prompt, click . The changes you made to the installation settings are ignored.
IMPORTANT:Do not select the option. It overwrites the changes you have configured for Date and Time and for partitions.
-
Continue with Section 5.4.6, Configuring Hardware and System Services.
5.4.6 Configuring Hardware and System Services
-
On the Installation Settings page, click after you have finished customizing the settings.
You are prompted to start the installation.
-
Click to start the installation.
The hard disk is formatted, destroying all data, and the partitions are created. After all the packages are installed, the system reboots.
-
To clear the message about why the graphical interface cannot be started, press Enter.
The root user password screen appears.
-
Specify the password for root, re-type it, tab to , then press Enter.
The screen appears.

-
Tab to , then press Enter.
You must complete the network interface configuration. If you do not configure the network interface, the Linux Access Gateway setup fails.
The Access Gateway must not use DHCP; it must be assigned a static IP address. To configure a static IP address:
-
Tab to , then press Enter.
-
Tab to , press Enter, and fill in the following fields:
Static address setup: Select this option, which allows you to enter a static IP address.
IP address: Specify the IP address assigned to the Access Gateway.
Subnet mask: Specify the subnet mask for your network.
-
Tab to , press Enter, and fill in the following fields:
Host Name: Change the hostname to a unique name for the Access Gateway machine.
Domain Name: Change the domain name to the domain name for your network.
Name Server 1: Specify the IP address of your DNS server. If you have more than one DNS server, enter their IP addresses in the and fields. You do not need to configure a domain search.
-
Tab to , then press Enter.
-
Tab to , then press Enter.
-
Specify the gateway for your network, tab to , then press Enter.
-
Tab to , then press Enter.
-
Tab to , then press Enter.
For more information on this process, refer to the relevant parts of “Network Devices” in the Novell SUSE Linux Administration Guide.
-
-
Tab to , then press Enter. The screen appears.
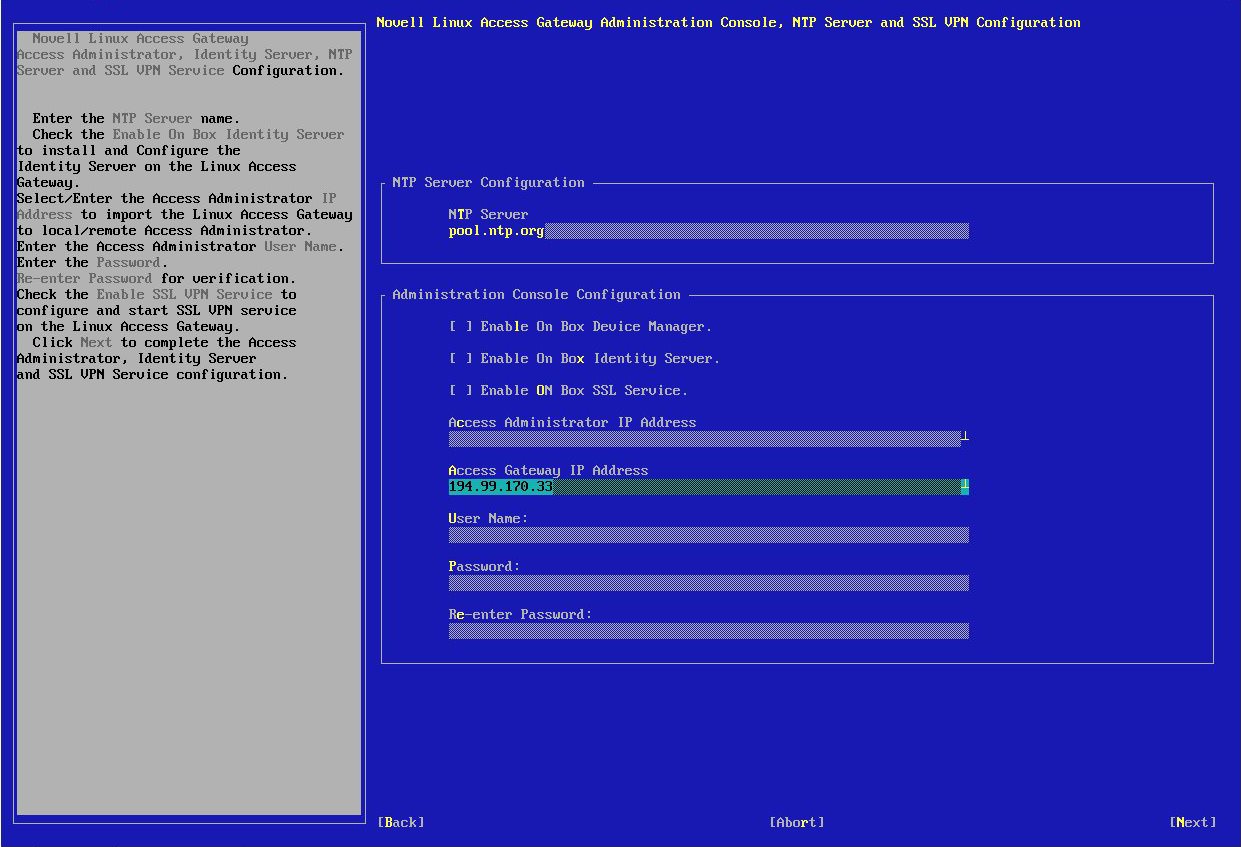
Fill in the following fields:
NTP Server: Specify the name of the NTP server.
Enable On Box Identity Server: Not currently available.
Enable On Box Administration Server: Not currently available.
Enable On Box SSL VPN Server: Select this check box to install and configure the SSL VPN service on the Linux Access Gateway.
Access Administrator IP Address: Specify the address of the Administration Console.
Access Gateway IP Address: Specify the IP address of the Access Gateway.
Username: Specify the name of the Administration Console user.
Password: Specify the password for the user.
Reenter Password: Re-type the password for the user.
-
Tab to , then press Enter.
-
To set a secure password for the config user, tab to , then press Enter.
The config user should be highlighted.
-
Press Enter and change the following fields:
Password: Delete the displayed password and specify a new one.
Verify Password: Delete the displayed password and specify a new one.
-
Tab to , then press Enter.
-
Tab to , then press Enter.
The system configuration is written.
-
Tab to , then press Enter.
The final configuration and auto-import into the Administration Console is started. This might take 10 to 15 minutes, depending on the configuration and hardware.
-
(Optional) To verify the installation of the Access Gateway, log in to Administration Console (see Section 3.2, Logging In to the Administration Console), then click > .
If the installation was successful, the IP address of your Access Gateway appears in the Server list.

The Health status indicator appears yellow after the Access Gateway is imported and registers with the Administration Console, which can take up to 5 minutes. You must configure the Access Gateway in order to change its health to green.
If an Access Gateway starts to import into the Administration Console but fails to complete the process, the following message appears:
Server gateway-<name> is currently importing. If it has been several minutes after installation, click repair import to fix it.
If you have waited at least ten minutes, but the message doesn’t disappear and the Access Gateway doesn’t appear in the list, click the link. For additional help, see Section A.1, Troubleshooting the Access Gateway Import.
-
This completes the installation of the Linux Access Gateway. Continue with the one of the following: