6.2 Using Access Manager Policies to Enforce Authorization
The following scenario explains how to set up Access Manager policies that permit Managers to access the manager pages in the sample payroll application, deny Employees access to the manager pages, but permit Employees and Managers access to their own information pages. These policies do not require any J2EE server configuration to correctly enforce the policies.
6.2.1 Creating an Employee Role and a Manager Role
If you have a particular application that requires more than one role, and it is the only application using these roles, you might want to create one role policy that assigns users to the required roles. The following steps explain how to create one role policy that assigns users to the Manager role and the Employee role.
-
In the Administration Console, click > .
-
Click , specify a name for the role policy, select as the type, then click .
-
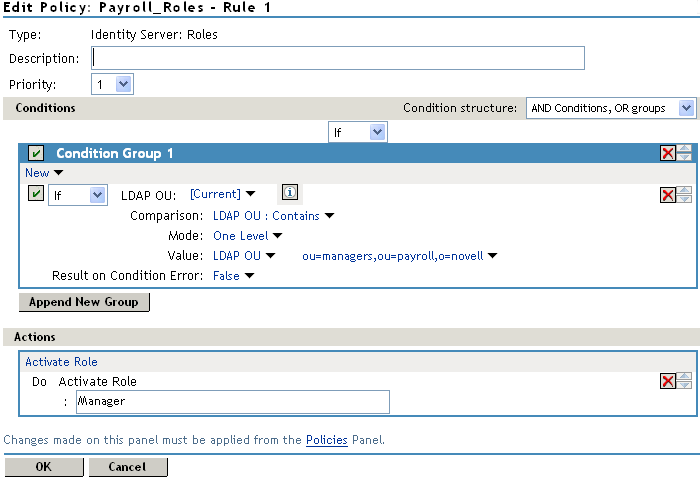
For the first rule, click , create a condition that matches your managers but not your employees, activate the Manager role, then click .
The following rule uses the LDAP OU condition to determine whether the user is a manager. It assumes that all managers are in the ou=managers,ou=payroll,o=novell container.
-
To create the second rule of the policy, click .
-
In Condition Group 1, click , create a condition that matches your employees but not your managers, activate the Employee role, then click .
The following rule uses the LDAP OU condition to determine whether the user is an employee. It assumes that all employees are in the ou=employees,ou=payroll,o=novell container.

-
To save your Role policy, click > .
-
Activate the Role policy for your Identity Server cluster configuration. Click > >
-
Select the name of your Role policy, click , then click .
-
Update the Identity Server. Click > .
-
Continue with Section 6.2.2, Creating Authorization Policies.
6.2.2 Creating Authorization Policies
The payroll application is a .ear file that contains both an EJB module and a Web (.war) module. Each module type requires its own type of Authorization policies, and to fully protect the application, you must create the following policies:
Creating EJB Authorization Policies
You need to create two policies: one that permits Managers to access EJB resources and one that permits Employees to access EJB resources.
-
In the Administration Console, click > .
-
To create an Authorization policy for the employees, click , specify a name for the policy, select as the type, then click .
-
For the first rule, click , set up a condition that permits access if the user has been assigned the Employee role, then click . Your rule should look similar to the following:

-
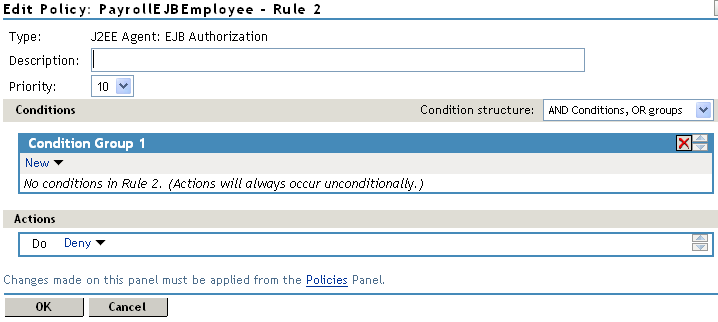
To create the second rule in the policy, click .
-
To create a generic deny rule, assign a deny action, then click . Your rule should look similar to the following:
-
To save your employee policy, click > .
-
To create a policy for the managers, click , specify a name for the policy, select as the type, then click .
-
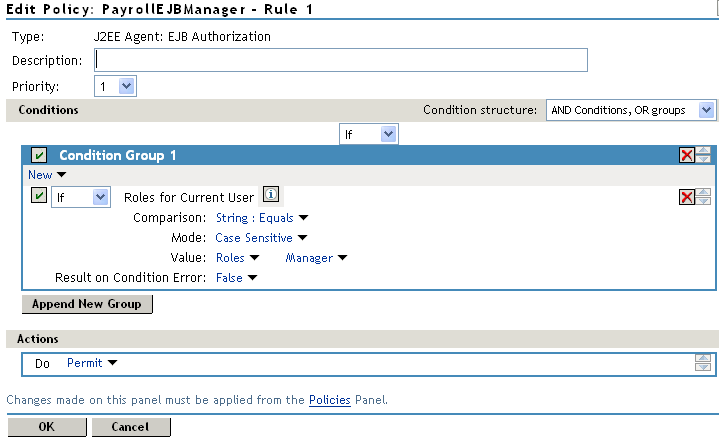
For the first rule, click , set up a condition that permits access if the user has been assigned the Manager role, then click . Your rule should look similar to the following:
-
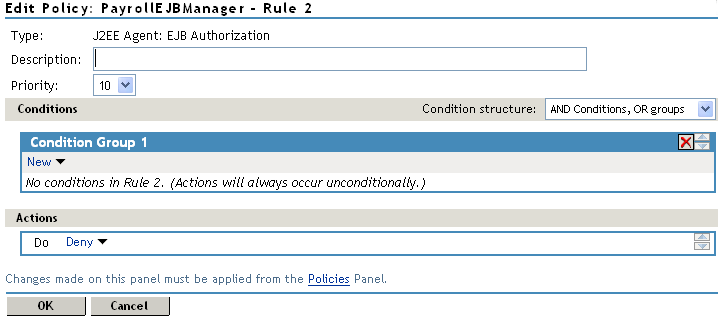
To create the second rule in the policy, click .
-
To create a generic deny rule, assign a deny action, then click . Your rule should look similar to the following:
-
To save your manager policy, click > .
-
Continue with Creating Web Authorization Policies.
Creating Web Authorization Policies
You need to create two policies: one that permits Managers to access resources and one that permits Employees to access resources.
-
In the Administration Console, click > .
-
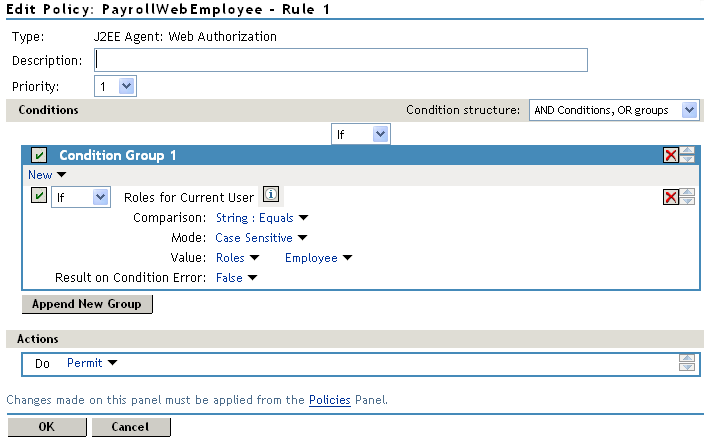
To create an Authorization policy for the employees, click , specify a name for the policy, select as the type, then click .
-
For the first rule, click , set up a condition that permits access if the user has been assigned the Employee role, then click . Your rule should look similar to the following:
-
To create the second rule in the policy, click .
-
To create a generic deny rule, assign a deny action, then click OK. Your rule should look similar to the following:

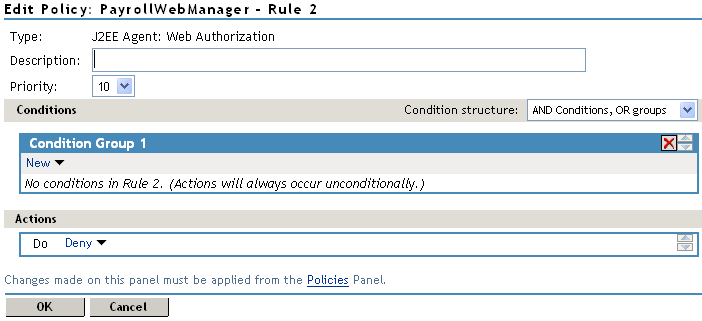
When you create a policy with one or more permit rules and you end it with a deny rule with a priority of 10, the logic of the policy is clear. Users who match a permit rule are allowed access; everyone else is denied access.
-
To save your employee policy, click > .
-
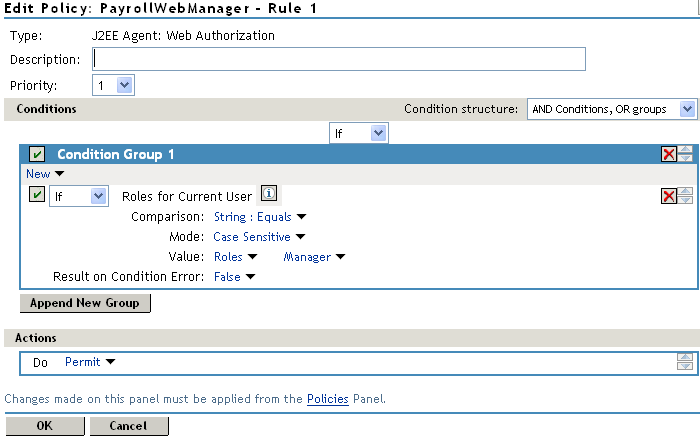
To create a policy for the managers, click , specify a name for the policy, select as the type, then click .
-
For the first rule, click , set up a condition that permits access if the user has been assigned the Manager role, then click . Your rule should look similar to the following:
-
To create the second rule in the policy, click .
-
To create a generic deny rule, assign a deny action, then click . Your rule should look similar to the following:
-
To save your manager policy, click > .
-
Continue with Section 6.2.3, Assigning Policies to Protected Resources
6.2.3 Assigning Policies to Protected Resources
After creating the Authorization policies, you need to create protected resources for the payroll application, then assign the policies to the protected resources.
Assigning the Authorization Policies to Protected Web Resources
To allow the J2EE Agent to enforce authorization for the payroll Web module, you need to create three protected resources for the payroll application.
-
Click > > .
-
In the Access Control Configuration section, deselect , select , then click .
-
Click , specify the name of the payroll .war file (PayrollWeb.war), select as the , then click .
-
Click to create the required protected resources.
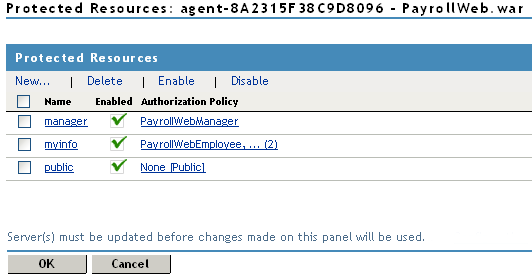
The protected resource has /manager/* as its URL path and enables the Authorization policy. This policy allows only managers to access the manager pages. Everyone else is denied access.
The protected resource has /myInformation.jsp and /payserv as its URL paths. Both the and Authorization policies are enabled for this resource. This allows both employees and managers to view their own information pages.
The protected resource uses /* for its URL path and is not assigned an Authorization policy. This allows everyone who can log in to the Identity Server to have access to the public pages of the application.
-
To save your changes, click , then click .
-
On the J2EE Agents page, click .
Assigning the Authorization Policies to Protected EJB Resources
To allow the J2EE Agent to enforce authorization for the payroll EJB module, you need to create policies for four EJBs.
-
Click > > .
-
In the Access Control Configuration section, deselect , select , then click .
-
Click , specify the name of the payroll .jar file (PayrollEJB.jar), select as the , then click .
-
Click to create the required EJB modules for this application.
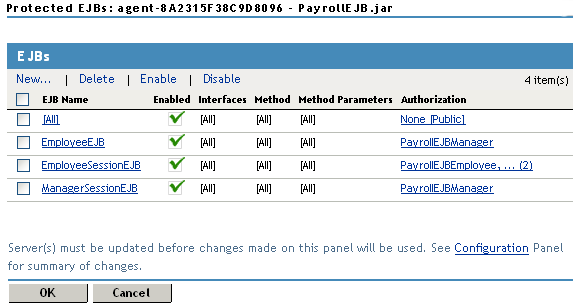
The EJB is not assigned an Authorization policy. This allows everyone who can log in to the Identity Server to have access to the public EJBs of the application.
The enables the Authorization policy. This policy allows only managers to change sensitive employee information, such as an employee’s salary.
The enables both the and Authorization policies for this resource. This allows both employees and managers to view their own employee information.
The enables the Authorization policy. This policy allows only managers to manage employee information. Everyone else is denied access.
-
To save your changes, click , then click .
-
On the J2EE Agents page, click .
6.2.4 Testing the Configuration
-
Deploy the sample payroll application on your J2EE server.
The location of the sample application is platform-specific:
-
On a Linux J2EE server, the application is copied to the /opt/novell/nids_agents/example directory.
-
On a Windows J2EE server, the application is copied to the <Install_Directory>\sampleapp directory.
-
-
On your J2EE server, prepare the application to use the agent for login and logout. (See Section 3.1, Preparing the Application for the Agent).
These steps have already been performed for the sample application. See the web.xml file in the application’s WEB-INF directory.
-
Enable the RunAs role feature on your J2EE server. See the following:
-
JBoss: This tasks have already been performed for JBoss. To understand what was modified, see Section 3.2, Configuring Applications on the JBoss Server.
-
WebSphere: See Section 3.3.2, Configuring for RunAs Roles.
-
WebLogic: See Section 3.4, Configuring Applications on the WebLogic Server.
-
-
To test this configuration, send the following request from a browser:
http://<Application_Server_DNS_Name>:<port>/payroll
Replace <Application_Server_DNS_Name> with the DNS name or the IP address of your application server. Replace <port> with the port number you have configured the J2EE Agent to use.
-
Log in as a user who matches the condition to receive the Employee role. Access the and the .
-
Log out and log in as a user who matches the condition to receive the Manager role. Access the and the .
As a manager, you can add Employee Records. Then when employees log in, their records are displayed on .