4.4 Monitoring Access Gateway Alerts
The Access Gateway has been programmed to issue events to various types of systems (such as a Novell® Audit server or a Syslog server) so that the administrator can be informed when significant changes occur that modify how the Access Gateway is performing. For information about auditing and audit events, see Section 4.5, Enabling Access Gateway Audit Events. This section describes how to use the following types of alerts:
4.4.1 Reviewing Java Alerts
The Alerts page allows you to view information about current Java alerts and to clear them. An alert is generated whenever the Access Gateway detects a condition that prevents it from performing normal system services.
-
In the Administration Console, click > > > .

-
To delete an alert from the list, select the check box for the alert, then click . To remove all alerts from the list, click the check box, then click .
-
Click .
-
(Optional) To verify that the problem has been solved, click > > > .
4.4.2 Configuring Access Gateway Alerts
You can configure alerts for individual Access Gateways and for Access Gateway clusters. To set up notification for these types of alerts, see the following sections:
Access Gateway Alerts
For a Access Gateway, this option allows you to send notification of generated system alerts to the Administration Console, to a Syslog server, to a log file, or to a list of e-mail recipients.
-
In the Administration Console, click > > > .

-
To add a new profile, click .
-
Specify a name for the profile, then click .
-
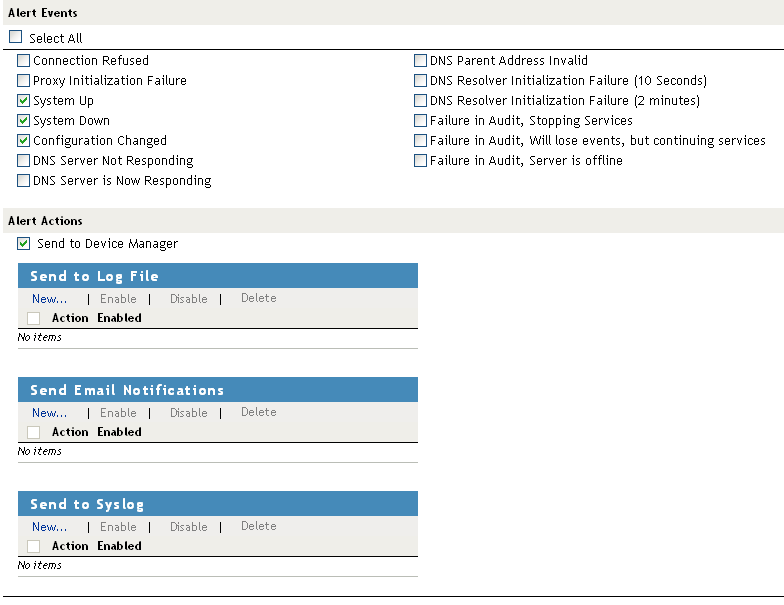
To select the alerts for notification, select one or more of the following:
Alert
Description
Generated when a connection is refused.
Generated when the Embedded Service Provider fails to initialize.
Generated each time the Access Gateway is started.
Generated each time the Access Gateway is stopped.
Generated each time the configuration of the Access Gateway is modified.
Generated each time the DNS stops responding.
Generated each time the DNS server comes up.
Generated when the IP address of DNS parent is invalid.
Generated when the DNS resolver initialization fails.
Generated when the DNS resolver initialization fails.
Generated when the audit server has failed, and the Access Gateway has been configured to stop services.
To configure the Access Gateway to continue when auditing services are not available, click > , deselect the option, then click .
Generated when the audit agent has failed. The Access Gateway continues to run, but no audit events are generated.
As a workaround while solving this problem, you can enable proxy service logging (see Section 4.2, Configuring Proxy Service Logging). The common and extended log files provide some details on the HTTP traffic.
If you do not want the Access Gateway to run without generating events, you need to manually shut down the Access Gateway.
Generated when the audit agent is unable to contact the audit server. When this condition occurs, the audit agent uses local caching for the audit events.
Do not allow this condition to continue indefinitely. The Access Gateway soon reaches the limits of its local cache. If this happens, events can be lost and the Access Gateway might need to stop services.
For troubleshooting information, see “Troubleshooting Novell Audit” in the Novell Audit Administration Guide.
-
To send alerts to the Administration Console, select the check box.
-
To send alerts to a log file, click in the section, specify a name for the log profile, then click .
-
Configure the following Log File details:
-
Log File Name: Specify a name for the log file and a path where the file should be stored.
-
Max File Size: Specify a maximum size in KB for the log file. The size can be from 50 to 100000 KB. Specify 0 to indicate that there is no maximum file size.
-
-
Click .
-
-
To enable e-mail notification click in the Send Email Notifications section, specify a name for the e-mail profile, then click .
-
Configure the following e-mail details:
-
E-mail Recipients: To add a recipient to the list, click , specify the e-mail address of the recipient, then click . You can add multiple e-mail addresses. To delete a recipient, select the user’s email address, click , then click .
-
Mail Exchange Servers: To add a mail server, click , specify the IP address or the DNS name of the mail exchange server, then click . You can add multiple mail exchange servers. To delete a server, select the server, click , then click .
-
-
Click .
-
-
To enable syslog alerts click in the Send to Syslog section, specify a name for the Syslog profile, then click .
-
Configure the following syslog details:
-
Facility Name: Specify a facility name for the Syslog server. It can be any name from local0 to local7. If you specify local0 as your facility name, the alerts are stored at \var\logs\ics_dyn.log. The Access Gateway Appliance uses local0 for normal logging information. Therefore, it is not recommended to specify local0 as your facility name.
-
-
Click .
-
-
To enable an alert action profile, select the action profile, click , then click .
The action to send the alerts to a log file, to email addresses, or to a syslog file is not performed until the action profile is enabled.
-
On the Alert Profiles page, verify that the Alert Profile you have created is enabled.
-
To save your modifications, click twice.
-
On the page, click .
Access Gateway Cluster Alerts
To view information about current alerts for all members of a cluster:
-
In the Administration Console, click > > > .

-
Analyze the data displayed in the table.
-
To acknowledge all alerts for an Access Gateway, select the check box for the Access Gateway, then click . When you acknowledge an alert, you clear the alert from the list.
-
To view information about a particular alert, click the server name.