2.7 Managing Direct Access to the Identity Server
Users usually log into the Identity Server when they request access to a Web resource. They are redirected by the Access Gateway from the resource to the Identity Server to provide the required credentials for the resource. After they are authenticated, they are not prompted for credentials again, unless a resource requires credentials that they haven’t already supplied.
However, users can log directly into the Identity Server and access the User Portal, or they can access information about available Web Services Description Language (WSDL) services. This section describes how to manage access to these pages.
2.7.1 Logging In to the User Portal
Users can log directly in to the Identity Server when they enter the Base URL of the Identity Server in their browsers. For example, if your base URL is http://doc.provo.novell.com:8080/nidp, entering this URL prompts the user to authenticate with the credentials required for the default contract.
Figure 2-3 User Portal
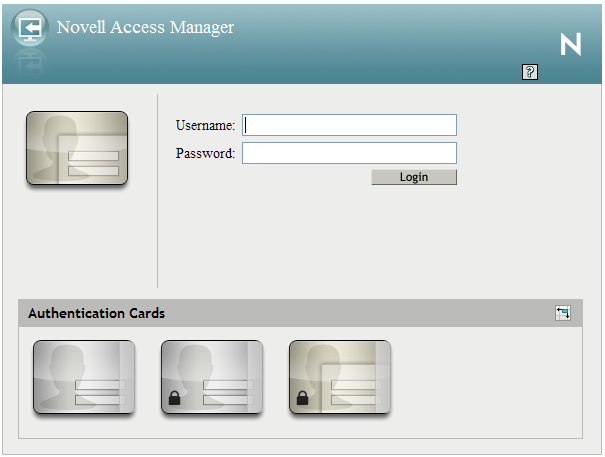
When users log directly into the Identity Server, the users need to use the default card for authentication. This is the card that appears in the top left frame, and the credentials it requires are displayed in the top right frame.
On a newly installed system, cards for all the authentication contracts that are installed with the system are displayed. To avoid confusing your users, you need to disable the option for the contracts you do not want your users to use. In the Administration Console, click > > > > > > .
Also, make sure you modify the default contract to match a card that is displayed. In the Administration Console, click > > > > .
If you display multiple cards, users can use different credentials to authenticate multiple times by selecting another authentication card and entering the required credentials. This is only useful if the credentials grant the user different roles or authorize access to different resources.
If you have configured the Identity Server to be a service provider and have established a trusted relationship with one or more identity providers, the cards of these trusted identity providers appear in the Authentication Cards section. Your users can use the identity provider’s authentication card to federate their account at the identity provider with their account at the service provider. When they federate an account, they are telling the service provider to trust the authentication established at the identity provider. This enables single sign-on between the providers. The card can also be used to defederate the accounts. On the authentication card, click , then select .
If you have configured the Identity Server to be an identity provider for service providers, a Federation page is accessible after log in. From this page, users can federate and defederate their accounts with trusted service providers.
2.7.2 Specifying a Target
You need to specify a target for the following conditions:
-
You want to direct the users to a specific URL after the users log in to the Identity Server.
-
You do not want users to have access to the User Portal page.
Use one of the following methods to specify the target:
-
Specify a Target in the URL: You can have your users access the Identity Server with a URL that contains the desired target. For example:
https://<domain.com>:8443/nidp/app?target=http://www.novell.comwhere <domain.com> is the DNS name of your Identity Server. In this example, the users would end up at the Novell Web site after logging in.
-
Specify a Hidden Target on your Form: If you have your own login form to collect credentials and are posting these credentials to the Identity Server, you can add a hidden target to your login form. When authentication succeeds, the user is directed to this target URL. This entry on your form should look similar to the following:
<input type="hidden" target="http://www.novell.com">
These methods work only when the user’s request is for the /nidp/app. If the user’s request is a redirected authentication request for a protected resource, the protected resource is the target and cannot be changed.
2.7.3 Blocking Access to the WSDL Services Page
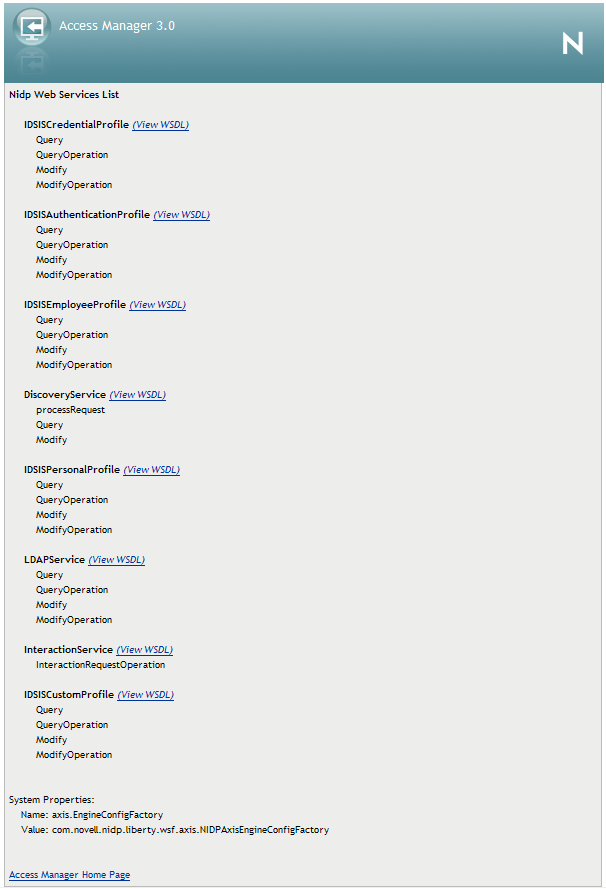
Users can access the WSDL services page when they enter the base URL of the Identity Server in their browsers with the path to the Services page. For example, if your base URL is http://bfrei.provo.novell.com:8080/nidp, the users can access the services page with the following URL:
http://bfrei.provo.novell.com:8080/nidp/services
The Services page contains the following information and links:
Figure 2-4 WSDL Services Page
If you do not want your users to have access to this page, you can block access by modifying the web.xml file located in the following directory:
Linux: /opt/novell/nids/lib/webapp/WEB-INF
Windows: \Program Files\Novell\Tomcat\webapps\nidp\WEB-INF
Near the top of the file, in the context initialization parameters section, add the following lines:
  <context-param>
    <param-name>wsfServicesList</param-name>
    <param-value>full</param-value>
  </context-param>
When <param-value> has a value of full, users can access the Services page. To modify this behavior, replace full with one of the following values:
|
Value |
Description |
|---|---|
|
404 |
Returns an HTTP 404 status code: Not Found |
|
403 |
Returns an HTTP 403 status code: Forbidden |
|
empty |
Returns an empty services list |
If the parameter is removed from the file or if you enter an invalid value, the value is interpreted as full, and users have access to the page.
You need to restart Tomcat for your modifications to take effect:
Linux: Enter the following command:
/etc/init.d/novell-tomcat5 restart
Windows: Enter the following commands:
net stop Tomcat5
net start Tomcat5