9.8 Upgrading the Linux Access Gateway Appliance
Upgrade running time: about five minutes.
You can upgrade the Linux Access Gateway Appliance without affecting the current configuration. This upgrade script downloads the RPM package from the specified server address through either the HTTP or FTP protocol, and then upgrades the Access Gateway modules.
NOTE: You must use the lagupgrade.sh script to upgrade the Linux Appliance. Using the CD to upgrade the Linux Appliance is not supported.
Moving from the SLES 9 version of the Access Gateway to the SLES 11 version is not a simple upgrade. It is a migration. For instructions, see Section 9.5.5, Migrating to the SLES 11 Access Gateway Appliance.
The Linux Appliance can be upgraded with the following methods:
-
In an interactive method, where you are prompted to enter the required parameters.
-
In a silent method, where all the required parameters are passed in the command line.
-
By using the Administration Console.
If you have installed SSL VPN along with the Linux Appliance, check the version of SSL VPN that is currently installed on your machine. If you have the high bandwidth version of SSL VPN installed, log in to the Novell Customer Center to download the high bandwidth version. The low bandwidth version of SSL VPN is packaged with the Linux Appliance upgrade file.
NOTE:If you customized the error pages for Access Manager 3.0 (as mentioned in Customizing Error Pages on the Access Gateway Appliance
in the Novell Access Manager 3.1 SP2 Access Gateway Guide), copy the images used in the custom error pages from /var/opt/novell/tomcat4/webapps/LAGERROR/images to /var/opt/novell/tomcat5/webapps/LAGERROR/images, after upgrading to Novell Access Manager 3.1.
This section contains the following information:
-
Section 9.8.2, Upgrading the Linux Appliance by Using the Interactive Method
-
Section 9.8.3, Upgrading the Linux Appliance by Passing Parameters in the Command Line
-
Section 9.8.4, Upgrading the Linux Appliance by Using the Administration Console
-
Section 9.8.5, Installing or Updating the Latest Linux Patches
9.8.1 Prerequisites
Before you proceed to upgrade the Access Gateway Appliance, make sure you do the following:
-
If you have installed the SSL VPN server with the Access Gateway Appliance and you have customized the SSL VPN user interface, make a backup of the customized sslvpnclient.jsp file, then save it as /var/opt/novell/tomcat5/webapps/sslvpnsslvpnclient.jsp.rpmsave file.
If a file with that name already exists, then either delete or move the existing file to another location before saving the current .jsp file. See
Customizing the SSL VPN User Interface
in the Novell Access Manager 3.1 SP2 SSL VPN Server Guide. -
Back up any customized Tomcat files.
If you have customized the tomcat5.conf file or the server.xml file, back up these files before upgrading. These files are overwritten during the upgrade process.
-
Download the upgrade file from Novell and extract it.
For the actual filename, see the Readme.
-
Copy the Linux Appliance upgrade file to an HTTP or an FTP server accessible by the gateway.
-
Rename the .tar.gz file to lagrpms.tar.gz.
The file posted for download needs a specific name that reflects the version of the upgrade. The upgrade script requires that the file have a generic name: lagrpms.tar.gz.
NOTE:By default, the Linux Appliance RPM package is named lagrpms.tar.gz. The RPMs are packaged with the directory name lagrpms for the lagrpms.tar.gz file. If you have downloaded and repackaged the RPMs with a different package name or directory name, make sure that the directory name matches the package name. For example, if the package name is final.tar.gz, make sure that the directory name is also final.
9.8.2 Upgrading the Linux Appliance by Using the Interactive Method
You can interactively upgrade the Linux Appliance by using the lagupgrade.sh script.
-
Log in as root.
-
Enter the following command to start the upgrade script:
/chroot/lag/opt/novell/bin/lagupgrade.sh
-
Specify the upgrade option to use. Enter 1 to upgrade only the Linux Access Gateway, 2 to upgrade only the SSL VPN server, and 3 to upgrade the Linux Access Gateway and the SSL VPN server installed on the same machine.
IMPORTANT:If you have installed the Linux Appliance and the SSL VPN server on the same machine:
-
You must select option 3 to upgrade SSL VPN server along with the Linux Appliance. The components must be simultaneously upgraded because the 3.1 version of the Linux Appliance and the 3.0 version of SSL VPN cannot coexist.
-
When you click option 1, the SSL VPN server is also upgraded to 3.1 because there are dependencies. The following message is displayed:
You have 3.0 SSLVPN installed. It will now be upgraded to 3.1.
-
Do not select option 2, because upgrading only the SSL VPN server to 3.1 when the Linux Appliance is running in version 3.0 is not supported. If you select this option, the following message is displayed to you:
LAG needs to be upgraded to 3.1 for SSLVPN to be upgraded.
-
-
Specify the protocol to use when downloading the RPM packages. Enter 1 to use HTTP, 2 to use FTP, and q to quit the upgrade process.
-
(Optional) If you selected FTP, you are prompted to specify following information:
-
Specify the FTP username.
-
Specify the FTP password.
-
-
Specify the address of the server where the RPM packages are located.
Use either the IP address or the DNS hostname of the server.
-
Specify the path and name of the RPM packages. For example:
/publish/upgrades/accessgateway/SP3/lagrpms.tar.gz
The RPM package is downloaded to your system and the upgrade begins.
-
View the /var/log/lagupgrade.log file to verify the results of the upgrade process.
9.8.3 Upgrading the Linux Appliance by Passing Parameters in the Command Line
The lagupgrade.sh upgrade script allows you to enter the required parameters on the command line.
-
Log in as root.
-
Enter the following command:
/chroot/lag/opt/novell/bin/lagupgrade.sh --url <protocol>://<hostname>/<path>/<packageName> --upgrade-option <option>
<protocol> refers to the protocol to use when downloading the RPM packages. It can be HTTP or FTP.
<hostname> refers to the address of the server from where the RPM packages can be downloaded. Enter either the IP address or the DNS hostname of the server at the prompt.
<path> refers to the path to the RPM packages.
<packageName> refers to the RPM package name.
<option> refers to the upgrade option. By default, the script takes the option and upgrades only the Linux Appliance.
-
If you want to upgrade only the Linux Appliance, enter the following command:
/chroot/lag/opt/novell/bin/lagupgrade.sh --url http://10.10.10.1/publish/upgrades/accessgateway/sp3/lagrpms.tar.gz
IMPORTANT:If you have installed the Linux Appliance and the SSL VPN server on the same machine, then use the below option to upgrade both the Linux Appliance and the SSL VPN server.
-
If you want to upgrade both the Linux Appliance and the SSL VPN server that are installed on the same machine, enter the following command:
/chroot/lag/opt/novell/bin/lagupgrade.sh --url http://10.10.10.1/publish/upgrades/accessgateway/sp3/lagrpms.tar.gz --upgrade-option LAG and SSLVPN
-
If you want to upgrade only the SSL VPN server that is installed with the Linux Appliance, enter the following command:
/chroot/lag/opt/novell/bin/lagupgrade.sh --url http://10.10.10.1/publish/upgrades/accessgateway/sp3/lagrpms.tar.gz --upgrade-option SSLVPN only
IMPORTANT:Do not use this command to upgrade the SSL VPN server to 3.1 when the Linux Appliance is running version 3.0. This configuration is not supported. If you select this option, the following message is displayed:
LAG needs to be upgraded to 3.1 for SSLVPN to be upgraded
-
-
The RPM package is downloaded to your system and the upgrade begins.
-
View the /var/log/lagupgrade.log file to verify the results of the upgrade process.
9.8.4 Upgrading the Linux Appliance by Using the Administration Console
-
In the Administration Console, click .
-
Select the name of the Access Gateway (usually the IP address), then click .
-
In the field, specify the URL from which to download the upgraded version of the server. The URL must begin with a scheme and end with the filename. For example:
http://updates.company.com/lag/linux/lagrpms.tar.gz
-
Select either and continue with Step 5, or select and skip to Step 9.
-
Click to start the upgrade.
-
Click , then select the command to view more information about the upgrade.
If the Administration Console successfully sent the upgrade command to the Access Gateway, the command displays Succeeded. This does not mean that the upgrade is done, only that the command has been received.
-
Continue with Step 12.
-
Click .
-
Fill in the following fields:
Name Scheduled Command: Specify a name for the command. This name is used to identify the command on the Command Status page and in log files.
Description: Specify additional information about the command, if any. This field is optional.
Date & Time: Specify the date and time to execute the upgrade command. You can select the day, month, year, hour, and minute from the respective drop-down lists.
-
Click .
-
Click to view more information about the command.
-
The status of the scheduled command changes from pending to executing when the upgrade begins.
-
To check the status of upgrade, do one of the following:
-
Click to view the upgrade log.
-
Check the health of the Access Gateway. When the upgrade command is successfully sent, the Access Gateway should be in a green state. As the upgrade proceeds, the health should turn red when the Access Gateway is stopped, white when the Access Gateway is disconnected and rebooting, then green.
-
-
The following details on the Upgrade page are not updated until the Administration Console performs its regularly scheduled health check:
-
Current Running Version: The version that is currently running on the Access Gateway.
-
Upgrade State: The current state of the upgrade process.
It can take up to twenty minutes before these fields are refreshed with the current values.
-
-
(Conditional) If the Health status does not turn green, click the icon.
If NTP is configured but not synchronized, click .
If you are using the default NTP server (pool.ntp.org), either you need to wait a few minutes (or longer) for time to synchronize, or you can configure the Access Gateway to use a different NTP server.
9.8.5 Installing or Updating the Latest Linux Patches
WARNING:The Linux Access Gateway Appliance is an appliance. Installing additional packages other than security updates breaks your support agreement with Novell. If you encounter a problem, Novell Support can require you to remove the additional packages and to reproduce the problem before receiving any help with your problem.
Prerequisites
-
The Linux Appliance installs a customized version of SLES 9 SP 3 or SLES 11 depending on the version you have installed. If you want to install the latest patches as they become available, you must have a Novell user account to receive Linux updates.
-
If you have installed Linux Appliance for the first time on your system, log in as root and run lagupgrade.sh before you proceed with the following sections.
Select the patch upgrade method that fits your system:
Installing or Updating the Security Patches on the SLES 9 Linux Access Gateway Appliance
To install or update the latest available Linux patches:
-
Log in as root.
-
Enter the following command to launch YaST:
you
-
In the option, select , then tab to and press Enter.
-
When you are prompted to log in, specify the credentials of your registered Novell user account.
Enable the check box, then tab to and press Enter.
-
Select and press Enter.
-
A list of Security patches is displayed.
-
If you are installing the Security patches for first time, install all the listed patches by selecting each patch and pressing Enter.
In the Notify message box, select and press Enter.
A + symbol is displayed next to the patch that is selected for installation.
-
If you are updating the Security patches, ignore the installed patches, which have an i symbol next to them. Install only new patches available in the list by selecting each new patch and pressing Enter.
In the Notify message box, select and press Enter.
A + symbol is displayed next to the patch that is selected for installation.
-
-
Click to proceed with the installation.
-
If any of the following warning messages are displayed, select and press Enter to proceed with the installation.
-
Security update for Linux kernel
-
Security update for subdomain-parser
-
Security update for opensc and opensc-devel
-
-
After the installation is completed, click .
-
Restart the Access Gateway Appliance for Linux kernel update to take effect.
-
Enter the following command to check the logs:
tailf /var/log/YaST2/y2log
Installing or Updating Security Patches for the SLES 11 Linux Access Gateway Appliance
To get the latest security updates for the SLES 11 Access Gateway Appliance, the user must register with the Novell Customer Center by using the activation code obtained with the product:
-
Go to .
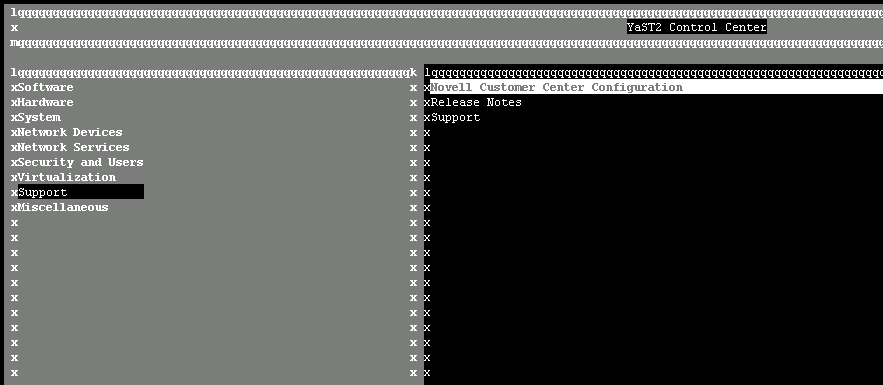
-
Select , then select in the screen.
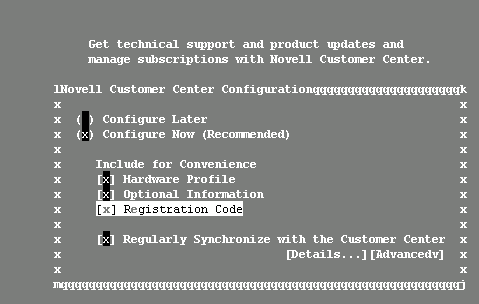
-
Click .
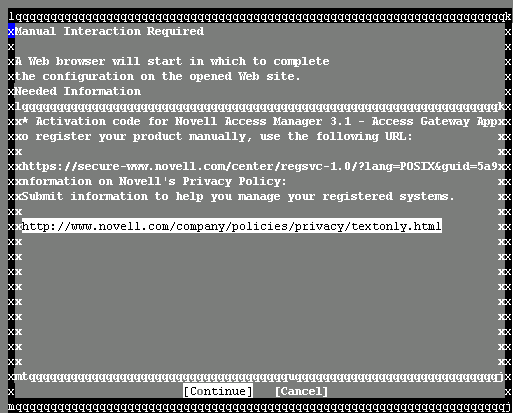
The Manual Interaction Required screen appears. It might take a few minutes to connect to the server.
This screen indicates that to activate the product, you must provide a valid e-mail ID associated with the Novell account and the activation code.
-
Click .
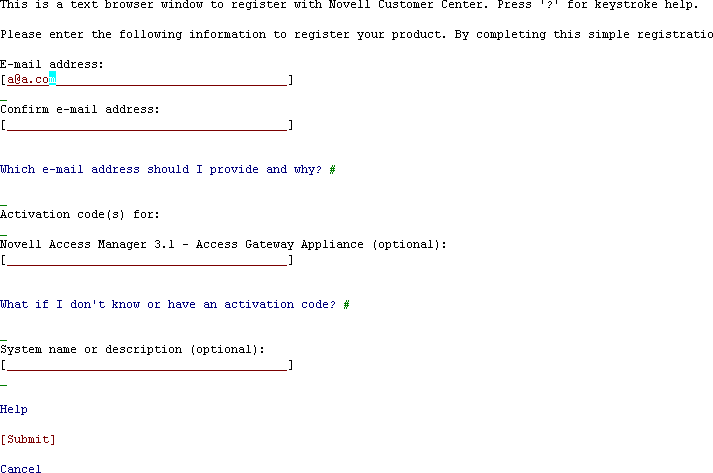
-
To specify the e-mail address, activation code and system name in the relevant fields:
-
Select the relevant option, then press . A text field appears in the bottom left corner of the screen.
-
Specify value for the selected option in this text field, then press to return to the screen.
-
Repeat these steps for each field.
-
-
Click after you have specified all the relevant information to complete the registration.
NOTE:
If you do not have appropriate entitlements, or after entering Activation code and submitting you might get the Activation code as INVALID, then you are not able to register and get the security updates
To resolve the same, please contact Novell Sales or Customer support to create a $0 order against Access Manager and also specify the number of nodes used in your environment.
When you are updating multiple nodes of Linux Access Gateway you might get a message as "1 Subscription over limit".
To resolve the same, please contact Novell Sales or Customer support and also specify the number of nodes used in your environment, so that they provide the appropriate keys to enable the same.
-
Enter Q to close the window.
-
Enter Y to continue.
The Manual Interaction Required screen is displayed. The software repositories are created on the Access Gateway Appliance. You will receive a message from the Novell Customer Center Configuration indicating that the configuration was successful.
-
Click to return to YaST2 Control Center.
-
Click to exit YaST.
-
Open a shell prompt and specify the following command to verify if the SLES 11 repository named NAM31-AGA-Updates was created for SLES 11 Access Gateway Appliance:
zypper lrAn output similar to the following appears:
# | Alias | Name | Enabled | Refresh --+----------------------------------------+----------------------------- 1 | NAM-Access-Gateway-Appliance-3.1 3.1.2 | NAM-Access-Gateway-Appliance-3.1 3.1.2 | Yes | No 2 | nu_novell_com:NAM31-AGA-Updates | NAM31-AGA-Updates | Yes | Yes -
Do one of the following:
-
To update specific patches, run the following command:
zypper in <package-name>
Replace <package-name> with the package name, or use a wildcard to get packages starting with a particular name. For example, to get all gcc packages, you can use the following command:
zypper in gcc-*
-
To update all the latest patches, do the following:
-
Specify the following command to get updated security patches for the appliance:
zypper patch
-
Run the zypper patch command again to install any other required patches.
NOTE:The zypper patch command is executed twice because when the command is executed the first time, one of the patches installed affects the package manager. Therefore, the command must be executed again to install any other needed patches.
-
-
-
Restart the machine when the following warning message appears:
Warning: One of installed patches requires reboot of your machine. Reboot as soon as possible.
-
Go to > > and verify that all the required patches are installed or upgraded.
Configuring the Subscription Management Tool for SLES 11 Access Gateway Appliance
Any machine running SUSE Linux Enterprise Server 11 (SLES11) can be configured to register against local Subscription Management Tool (SMT) server and download software updates from there instead of communicating directly with the Novell Customer Center and the NU servers. The Access Gateway Appliance is built on SLES 11 and you can configure it to get updates from the SMT server.
To use an SMT server for client registration and as a local update source, you must configure the SMT server in your network first. The SMT server software is distributed as an add-on for SUSE Linux Enterprise Server. For information on configuring the SMT server, see Subscription Management Tool (SMT) for SUSE Linux Enterprise 11.
The following sections describe the configuration required for the Access Gateway Appliance:
SMT configuration for Linux Access Gateway
You must configure the SMT server and set up subscription for NAM31-AGA-Updates channel to receive the updates for Novell Access Manager appliance.
SMT Configuration
-
Install the SMT server in a SLES11 Server. For more information, see Subscription Management Tool (SMT) for SUSE Linux Enterprise 11.
-
Log into you Novell Customer Center account.
-
Select , then click .
-
Copy the mirroring credentials before logging out of your Novell Customer Center account.
-
Run the SMT Configuration tool from YAST, then specify the mirroring credentials.
-
Run the tool.
The NAM31-AGA-Updates repository, is displayed in the tab.
NOTE:For this release, only 32-bit version of SLES11 based Linux Access Gateway is supported.
-
Select , then click to ensure mirroring is selected for this repository.
-
Click . This step ensures that the NAM31-AGA-Updates channel updates are mirrored from to your local SMT server.
-
Click to close the tool, when mirroring is complete.
Configuring the SLES11 Linux Access Gateway
-
Copy /usr/share/doc/packages/smt/clientSetup4SMT.sh from the SMT server to the client machine.
You can use this script to configure a client machine to use the SMT server or to reconfigure it to use a different SMT server.
-
Specify the following command as root to execute the script on the client machine:
./clientSetup4SMT.sh --host server_hostname
For example,
./clientSetup4SMT.sh --host smt.example.com.
You can get the SMT server URL by running the SMT Configuration tool at the server. The URL is set by default.
-
Enter y to accept the CA certificate of the server.
-
Enter y to start the registration.
-
The script performs all necessary modifications on the client.
-
Execute suse_register command to perform registration.You might get an warning messgae as follows:
Refresh failed. You may want to try again with --no-refesh option.(34)
-
(Conditional) Run suse_register --no-refresh command if the above warning message appears..
-
Specify zypper lr command to list the configured update channel.
An output similar to the following appears:
zypper lr
# | Alias                                                 | Name                                   | Enabled | Refresh
--+-------------------------------------------------------+----------------------------------------+---------+--------
1 | NAM-Access-Gateway-Appliance-3.1 3.1.2                | NAM-Access-Gateway-Appliance-3.1 3.1.2 | Yes     | No
2 | SMT-http_idp148_labs_blr_novell_com:NAM31-AGA-Updates | NAM31-AGA-Updates                      | Yes     | Yes
-
Specify zypper up command to get online updates from the local SMT server:
-
When the zypper up command is used, you are prompted to trust the key and you can select either trust temporarily or trust always and Type t or a press Enter.
New repository or package signing key received:
Key ID: 6A218CA6F34DE937
Key Name: N Ramesh <nramesh@novell.com>
Key Fingerprint: 44A78D536583F0DAC057F5E76A218CA6F34DE937
Repository: NAM31-AGA-Updates
Do you want to reject the key, trust temporarily, or trust always? [R/t/a/?]: a
-
Type Yes for download, and press Enter.
-
(Conditional) Restart the machine when the following warning message appears:
Warning: One of installed patches requires reboot of your machine. Reboot as soon as possible.
Troubleshooting
Given below are some of the errors that you might see and the steps to resolve these issues:
-
During the client configuration, if you see the following error:
Repository 'NAM31-AGA-Updates' is invalid.
[|] Repository type can't be determined.
Please check if the URIs defined for this repository are pointing to a valid repository.
it indicates that patches were not properly mirrored at the local SMT server.
To workaround this issue, start mirroring at the server manually by using the following command:
smt mirror –D
-
If you see the following error while running the smt mirror –D command in your SMT server <rpm_name>.src.rpm: 404 Not Found
edit /etc/smt.conf and set the value MirrorSRC=false. Save the file and run the smt mirror –D command again.