1.5 Installing the J2EE Agent on WebLogic
The agent needs to be installed on the same machine as your WebLogic server. The WebLogic server must be installed on a machine that does not contain any Access Manager components.
1.5.1 Installing WebLogic Agent by Using the Installer
-
Verify that the machine meets the minimum requirements. See Section 1.2, Prerequisites.
-
Download the agent installer from Novell.
IMPORTANT:Make sure that your installation folder name has no spaces. For example, you cannot specify the folder name as Novell Access Manager J2EE Agents, but you can specify the name as Novell_Access_Manager_J2EE_Agents.
-
Make sure the WebLogic server is running.
The WebLogic server must be running if you are performing a single server installation of J2EE Agents. The WebLogin server need not be running if you are installing J2EE Agents in a Base or Cluster mode.
-
Run the installer.
-
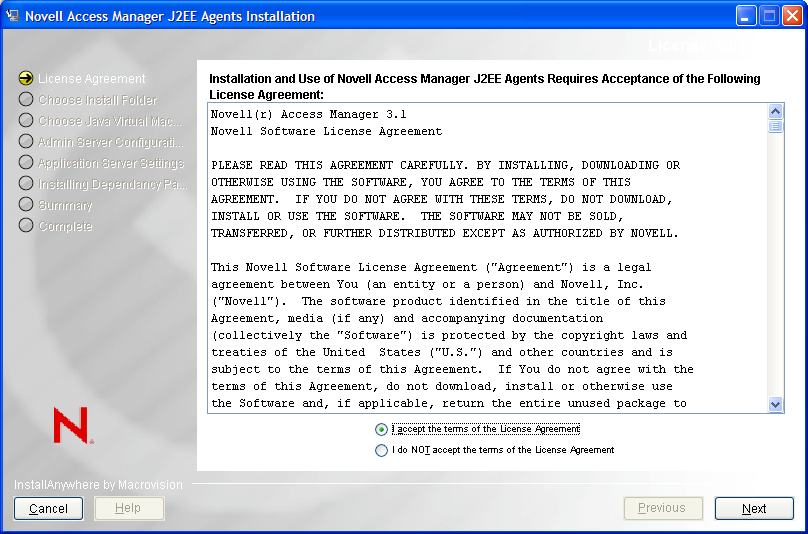
Review the License Agreement, accept it, then click . The installation selection page is displayed.
-
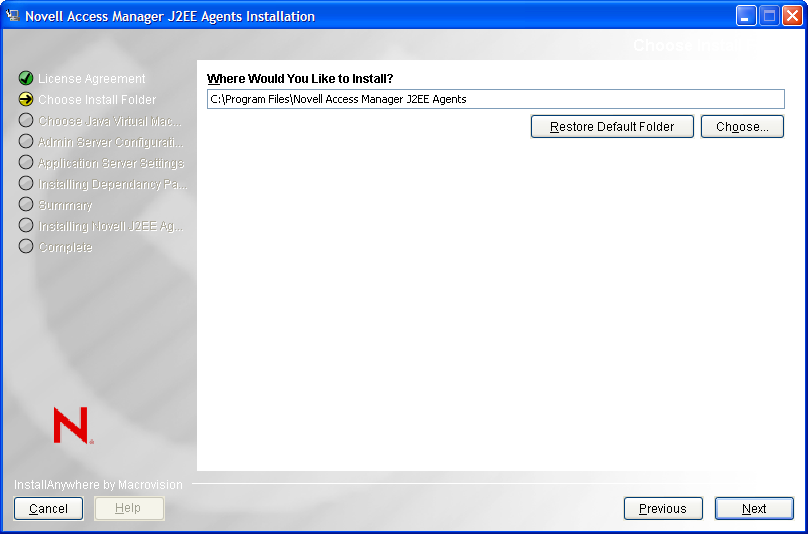
Select a directory to install the Novell J2EE gent components, then click . The Choose a Java Virtual Machine page is displayed.
-
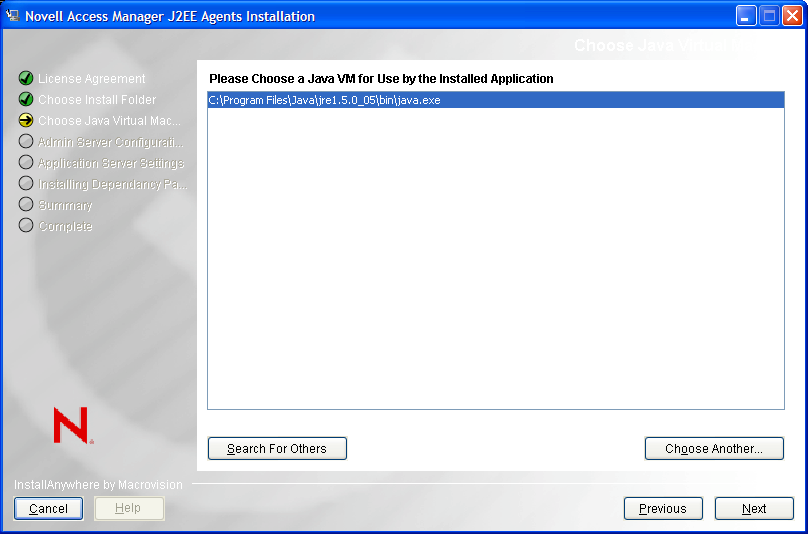
Select a Java Virtual Machine (JVM*) to be used by the installed application.
A default JVM is displayed.
If you do not select a JVM here, the installer uses the java.home property value of the Java runtime that is used to run the installer to proceed with the installation.
-
(Optional) If you want to select another JVM, click and browse to select the JVM of your choice. Click to get a list of available JVMs and select the one you want.
-
Click . the Administration Server Communication page is displayed.
-
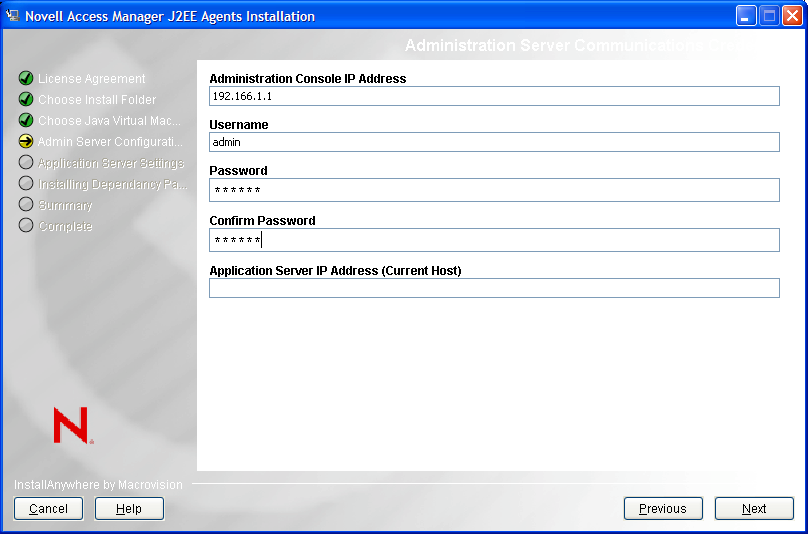
Specify the following information required for server communication between the agent and the Administration Console.
Administration Console IP Address: Specify the IP address of your Novell Access Manager Administration Console.
Username: Specify the username of the admin user of the Novell Access Manager Administration Console.
Password: Specify password of the admin user of the Novell Access Manager Administration Console.
Confirm Password: Specify the password again to confirm it.
Application Server IP Address (Current Host): Review the entered address. If your server is configured for more than one IP address, make sure you specify the IP address of the machine from which the Novell Access Manager Administration Console is reachable.
-
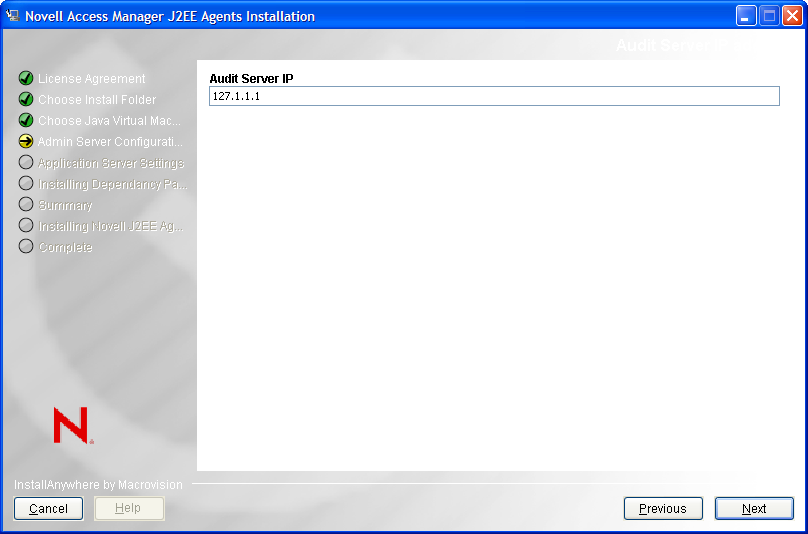
Click The Audit Server page is displayed.
-
Specify the audit server IP address:
-
(Conditional) If you do not have the Audit server installed, the J2EE installer installs the Audit server for you. Specify the IP address of the Novell Access Manager Administration Console as the .
-
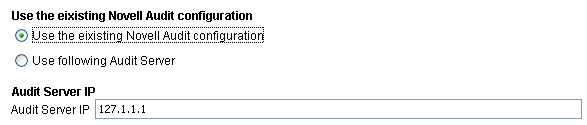
(Conditional) If you have the Audit server installed, specify if you want to replace the existing Audit server or use the existing server.
-
-
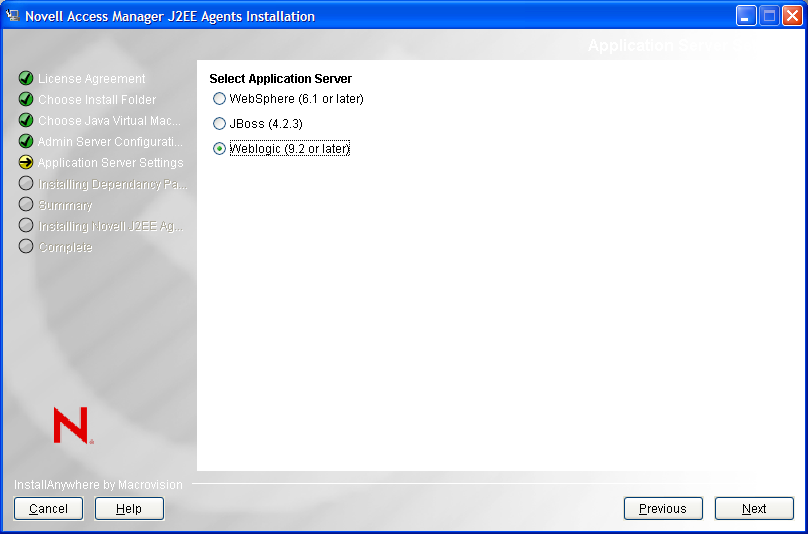
Click . The Select Application Server page is displayed.
-
Select , click . The installation selection page is displayed.
-
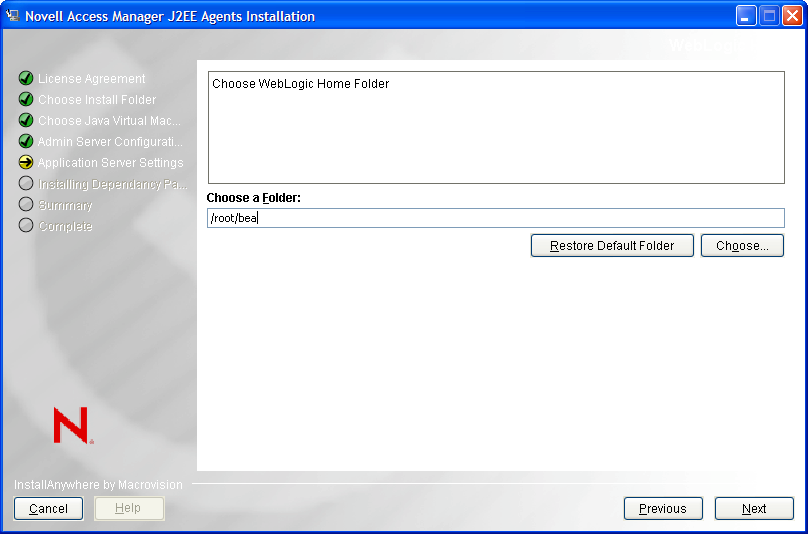
Specify the path to the directory where WebLogic is installed. Click to select a folder for installation. Click to restore the default installation location.
-
Click . The Installation Type page is displayed.
-
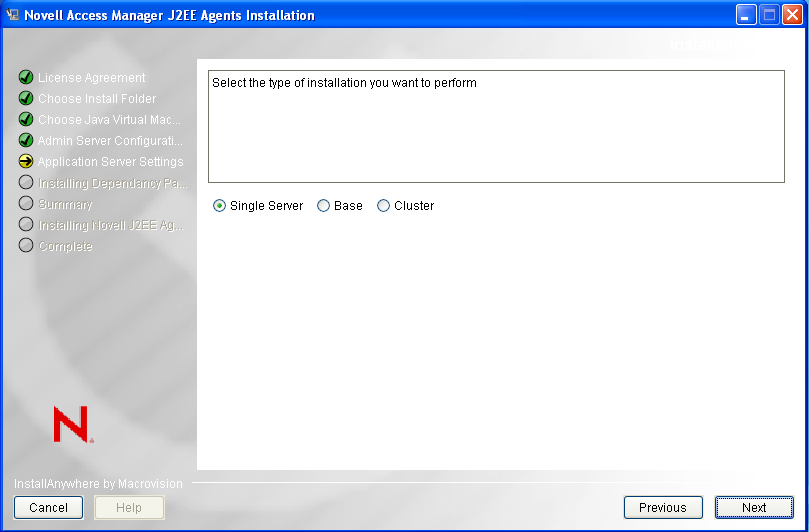
Specify any one of the following the installation types and click :
Single Server: Select this option to install a single instance of an application server.
Base: Select this option while installing the agent on a machine that acts as a node and is part of a cluster.
Cluster: Select this option while installing the agent on a machine where the domain is configured.
The WebLogic Domain page is displayed.
-
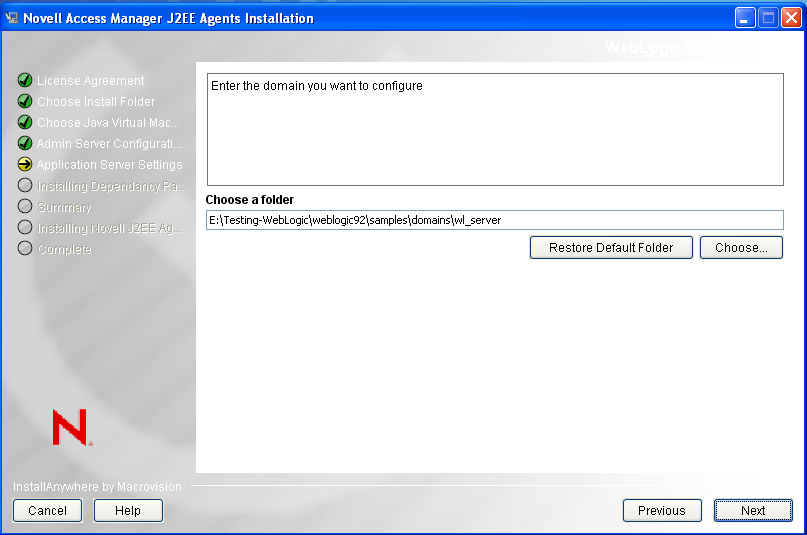
Specify the WebLogic Domain Home folder. Click to select a folder for installation. Click to restore the default installation location.
-
Click . The WebLogic Administration Console Details page is displayed.
-
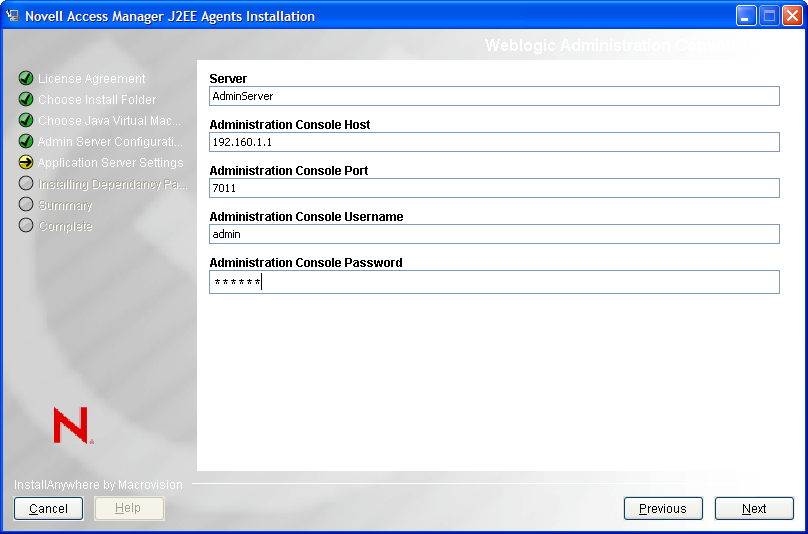
Specify the information required for server communication between the agent and the Administration Console. Fill in the following fields:
Server: Specify the name of the WebLogic Administration Console server.
Administration Console Host: Specify the IP address of the Administration Console.
Administration Console Port: Specify a port number for the Administration Console.
Administration Console Username: Specify the username of the admin user of the Administration Console.
Administration Console Password: Specify the password of the admin user of the Administration Console.
-
Click . The JCC Dependent Packages Installation page is displayed.
-
Click to continue with the agent installation.
-
Review the installation summary, then click to install the agent.
-
Click when the installation is complete.
-
Stop the WebLogic Server if it is running.
-
Complete the procedure in Section 1.5.3, Configuring WebLogic for J2EE Agents.
-
To verify if the installation of the agent is complete, see Section 1.6, Verifying If a J2EE Agent Is Installed.
-
(Optional) If you want to deploy a sample Payroll application to test the WebLogic Agent, refer to Section 1.5.4, Deploying the Example Payroll Application.
1.5.2 Installing a J2EE Agent by Using the Console
-
Download the agent installer from Novell.
-
Enter the following command in the command prompt to run the installer on the console:
<filename> -i console
Replace <filename> with the name of the J2EE agent installer.
-
Review the License Agreement, then press Y to accept it.
-
Specify an absolute path to install the Novell J2EE Agent components, or press Enter to continue with the default installation path.
-
Specify a Java Virtual Machine (JVM) to be used by the installed application.
All the available JVMs are displayed with a number. The default JVM is displayed with an arrow. Press Enter to select the default JVM, or specify the number of one of the listed JVMs.
-
Specify the following information required for communication between the agent and the Administration Console:
-
Specify the IP address of your Novell Access Manager Administration Console.
-
Specify the username and password of the admin user of the Novell Access Manager Administration Console. Confirm the password by re-entering it.
-
Review the entered address. If your server is configured for more than one IP address, make sure you specify the IP address of the machine from which the Novell Access Manager Administration Console is reachable.
-
-
(Conditional) If you do not have the Audit server installed, the J2EE installer installs the Audit server for you. Specify the IP address of the Novell Access Manager Administration Console as the , then press Enter.
-
(Conditional) If the Audit server is already installed on your machine:
-
You are asked to specify if you want to replace the existing Audit server or use the existing server.
-
Press 1 to use the existing Audit server.
-
Press 2 to replace the existing Audit server.
-
-
(Conditional) Press 1 to use the existing Novell Audit Configuration.
-
(Conditional) Press 2 to use a different Audit Server and then specify the IP address.
-
-
Specify a number for the Web Application Server installed. Specify 3 for WebLogic, then press Enter.
-
Read the alert message and press Enter to continue.
-
Specify the path to the directory where WebLogic is installed, then press Enter.
-
Specify the WebLogic Domain Home folder, then press Enter.
-
Specify the name of the WebLogic Administration Console server, then press Enter.
-
Specify the IP address of the Administration Console, then press Enter.
-
Specify a port number for the Administration Console, then press Enter.
-
Specify the username of the admin user of the Administration Console, then press Enter.
-
Specify the password of the admin user of the Administration Console, then press Enter.
-
Click . The JCC Dependent Packages Installation page is displayed.
-
Press Enter.
-
Review the installation summary, press Enter to install the agent, then press Enter again.
-
To verify the installation of the agent, see Section 1.6, Verifying If a J2EE Agent Is Installed.
1.5.3 Configuring WebLogic for J2EE Agents
After you install the WebLogic application server, you must configure it for the WebLogic J2EE Agent as follows:
Modifying the WebLogic Java Security Policy
Java 2 Security uses the weblogic. policy file to determine access to resources. You can modify the policy file so that it uses the correct defaults.
-
In a text editor, browse to and open one of the following files, depending on your platform:
-
In Linux: <Domain Home>/bin/startWeblogic.sh
-
In Windows: <Domain Home>/bin/startWeblogic.cmd
-
-
Remove the following Java parameter:
-Djava.security.policy=<filename>
-
Save and close the file.
-
Continue with Configuring the Login.
After the installation of J2EE Agents, the security policy refers to the <AGENT_HOME>/weblogic.policy file.
There appears to be a bug in WebLogic 9.2 that prevents the Administration Console applications from functioning with the default permissions in the weblogic.policy file. This bug also prevents some of the Java 2 permissions for the agent to be explicitly set when the security manager is enabled. The only workaround Novell has found is to grant Java 2 permissions to everything.
The <AGENT_HOME>/weblogic.policy file contains the following lines.
grant {
     java.security.AllPermission
};
This should not add any more security risk than running WebLogic without the security manager enabled, which is the default configuration for WebLogic.
Configuring the Login
To configure the login, you can use either use a script or the WebLogic Administration Console:
Using a Script to Configure Login
-
Start WebLogic.
-
Execute the WebLogic scripting tool. Specify the command appropriate for the platform:
Linux: WL_HOME/common/bin/wlst.sh
Windows: WL_HOME\common\bin\wlst.cmd
-
To the command, add the appropriate parameters to execute the weblogic_config.jy script. Separate each parameter with a space. Running the script without additional parameters prints the required parameters.
Linux Example: /opt/bea/weblogic92/common/bin/wlst.sh /opt/novell/nids_agents/bin/weblogic_config.jy weblogic password base_domain AdminServer localhost:7001
Windows Example: C:\bea\weblogic92\common\bin\wlst.cmd C:\Novell\bin\weblogic_config.jy weblogic password base_domain AdminServer localhost:7001
-
Restart the WebLogic server.
The agent should import into Access Manager Administration Console when the WebLogic server starts.
-
(Optional) Verify and test the installation:
-
To verify that the agent is installed, see Section 1.6, Verifying If a J2EE Agent Is Installed.
-
To test the agent, see Section 1.5.4, Deploying the Example Payroll Application
-
-
The J2EE Agent must be configured before users can access resources. Continue with Section 2.0, Configuring the Agent for Authentication.
Using the Administration Console to Configure Login
In the WebLogic Administration Console, you need to configure the JAAS Login Module:
-
Start WebLogic.
-
In a browser, log in to the WebLogic Administration console:
http://<weblogic ip>:<Weblogic port>/console
Replace <weblogic ip> with the IP address or DNS name of your WebLogic Administration Console.
Replace <weblogic port> with the port number of your Web
-
In the list, click .
-
Click the default realm ().
-
Click the tab.
-
In the top right corner, click .
-
In the list, click .
-
Specify a name in the field, select for the , then click .
-
In the list, click and change the from to .
-
Return to the list.
-
Change the > to .
-
Click .
-
Restart the WebLogic server.
The agent should import into Access Manager Administration Console when the WebLogic server starts.
-
(Optional) Verify and test the installation:
-
To verify that the agent is installed, see Section 1.6, Verifying If a J2EE Agent Is Installed.
-
To test the agent, see Section 1.5.4, Deploying the Example Payroll Application
-
-
The J2EE Agent must be configured before users can access resources. Continue with Section 2.0, Configuring the Agent for Authentication.
1.5.4 Deploying the Example Payroll Application
You can use a sample application to test the agent installation:
-
In the WebLogic Administration console, click in the list.
-
Click .
-
Click .
-
In the field, click the server.
-
Browse and select the payroll application PayrollApp.ear from the following location:
-
/opt/novell/nids_agents/examples directory on Linux.
-
<Install_Directory>\sampleapp directory on Windows.
-
-
Click .
-
Select , then click .
-
Accept the default settings, then click .
-
To start the Payroll application, click .
-
Restart the WebLogic server.
For more information on testing the configuration, see Section 7.2.4, Testing the Configuration.