14.3 Configuring Traffic Policies
You can configure a maximum of 250 traffic rules per role, depending on the length of the policy name. If you have configured multiple traffic policies, the policies are prioritized based on the order of their creation.
The roles for a user are created in the Identity Server. These roles are displayed in the traffic policies page by default. But SSL VPN traffic policies cannot be tightly coupled with the roles created for the Identity server. In scenarios such as a federated setup, where the role can be injected from another Identity Server, you can add or remove the user-configured roles, while creating the traffic policies.
14.3.1 Configuring Traffic Policies
You can configure a different set of traffic policies for different roles as follows:
-
In the Administration Console, click > .
-
Select from the section. The SSL VPN Traffic Policies page is displayed.

-
Click . The New dialog box is displayed.
-
Specify the traffic policy name in the field, then click .
-
Click the newly added traffic policy. The Edit Traffic Policy page is displayed.
Fill in the following fields:
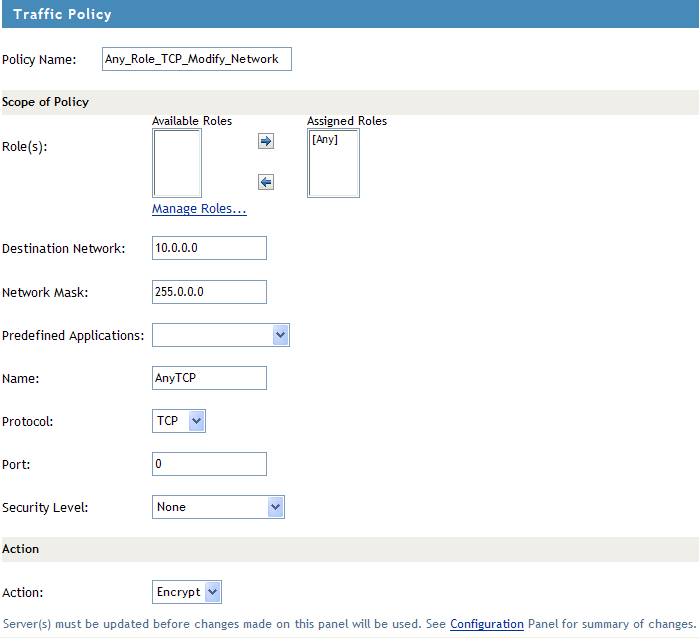
Policy Name: Displays the name that you have specified for the traffic policy.
Role (s): The role to which the traffic rule applies. If the role is created in the Identity Server, it is displayed in by default. Select the role you want to assign the traffic policy to and click the forward arrow to send it to . If you want to assign a traffic policy to multiple roles, press the Ctrl key when selecting the roles.
To assign a traffic policy to user-defined roles, click the button.
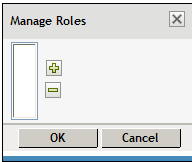
Click the icon to add the roles and click the icon to delete the roles. Click to confirm your changes, or click to discard the changes.
The role is case-sensitive. If the role configured is Employee and the Identity Server sends a request for employee, the rule is not pushed to the client. You cannot change the role name after you have configured a traffic rule. If you do so, the changes are not reflected in the associated traffic rule.
Destination Network: Specify the host IP address or the destination IP address.
Network Mask: The network mask is displayed by default when you specify the destination address. However, you can edit the mask.
Predefined Application: Select a predefined application from the drop-down list.
Name: Specify a name for the application. This information is optional.
Protocol: Select a protocol from the drop-down list. You can select the protocol to be TCP, UDP, ICMP, or Any.
Port: Specify the port number on which the service is available. You can also specify a range of port numbers. You can specify a port range separated by a comma or a hyphen. For example 8, 10, 11-15.
NOTE:Specify 0 to allow all ports depending on the protocol.
Action: Specify if a service can be allowed or denied. Select to allow the service in encrypted form. Select if you do not want to allow the service.
Security Level: Specify the minimum level of security to be adhered to by the client machine in order to apply this traffic policy. For more information on how to configure security levels, see Section 14.2, Configuring Client Security Levels.
-
To delete a traffic rule, select the rule, then click .
-
To enable a traffic rule, select the rule, then click.
-
To disable a traffic rule, select the rule, then click .
-
To save your modifications, click , then click on the Configuration page.
14.3.2 Rule Ordering
You can configure multiple rules for a user’s role. However, for a user, traffic policies are applied based on the order of the traffic rules. For example, the policy of the first traffic rule is applied to the user first, followed by the second, and so on. If you want to order the rules based on their priority, you can drag and drop the rules in the order that you want them to be placed.
14.3.3 Exporting and Importing Traffic Policies
You can export the traffic policies that you have created and save them on your local machine as an XML file. This file can be imported when you want to copy the policies into a new setup or into an existing setup, for example, if you want to add to or duplicate the traffic policies. This feature is also useful when you want to reinstall a setup.
-
In the Administration Console, click > .
-
Select from the section. The SSL VPN Traffic Policies page is displayed.
-
Select the policies that you want to export, then click .
-
Specify a filename for the XML document that saves the configuration.
-
Specify a location to save the XML file.
-
To import the exported XML file, select the server into which you want to import the traffic policies.
-
Click in the traffic policies page.
-
Browse and select the XML file that contains the saved traffic policies.
-
To save your modifications, click , then click on the Configuration page.