8.3 Deploying the Traditional Novell SSL VPN
Figure 8-3 Deployment Scenario for SSL VPN Enabled by the Access Gateway
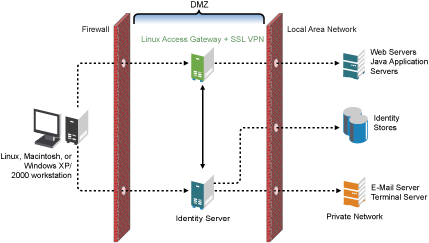
When you deploy the traditional Novell SSL VPN, you can install the SSL VPN along with the Identity Server on the same machine, you can install SSL VPN along with Linux Access Gateway on the same machine or you can install the Linux Access Gateway, Identity server and the SSL VPN server on different machines.
The following sections explain the prerequisites and the procedures for single machine installation:
8.3.1 Prerequisites
-
For the hardware and software requirements, see Section 4.1, Prerequisites.
-
Public IP address. You need two IP addresses if the UDP port is not opened in the firewall or if both Enterprise and Kiosk mode listen on the TCP port. You can also use the second IP address as the secondary IP address.
-
One private IP address.
-
One public DNS name
-
One security certificate.
8.3.2 Deployment Procedure
-
Install the Administration Console.
For more information on installing the Administration console, see
Installing the Access Manager Administration Console
in Novell Access Manager 3.1 SP1 Installation Guide. -
Install the Identity Server.
For more information on installing the Identity Server, see
Installing the Novell Identity Server
in the Novell Access Manager 3.1 SP1 Installation Guide. -
Configure the Identity Server.
For more information on configuring the Identity Server, see
Configuring an Identity Server
in the Novell Access Manager 3.1 SP1 Identity Server Guide. -
Assign the security certificate.
For more information, see
Enabling SSL Communication
in the Novell Access Manager 3.1 SP1 Setup Guide. -
Install the Linux Access Gateway server.
For more information, see
Installing the Linux Access Gateway Appliance
in the Novell Access Manager 3.1 SP1 Installation Guide.During the installation steps, make sure that you select to install SSL VPN along with the Linux Access Gateway.
The SSL VPN server is auto-imported into the Administration Console after the installation.
-
Configure the Linux Access Gateway to accelerate and protect the SSL VPN Server.
For more information, see Section 10.0, Accelerating the Traditional Novell SSL VPN.
-
In the Administration Console, select . The health status at this stage should be green indicating that the SSL VPN server is properly imported into the Administration Console and a trust relationship between the Identity Sever and the SSL VPN server has been established.
-
Configure the Client Integrity check policies and other relevant configurations for SSL VPN.
For more information on configuring the SSL VPN, see Section III, Configuring SSL VPN.