7.1 Managing the Print Manager
Although the default settings let users print without additional configuration, you might want to modify some of the settings so that you can manage your printing resources most effectively.
7.1.1 Understanding the Print Manager Database
The Print Manager uses a database to store information about the printers it controls. The database creates a backup when you create or delete a printer and also every night at 1:00 a.m. The last four backups are saved. When a new backup file is created, the oldest of the four stored files is deleted. If the oldest backup file is older than four days, then the Print Manager creates a new backup.
If the database fails to load through normal methods, you can retrieve the database from eDirectory™ and load the Print Manager on any other server in the eDirectory tree.
IMPORTANT:You cannot restore a database from eDirectory to the same server that it was backed up from. In order to restore a database from eDirectory to its original source server, you must first restore it to a different server and then back up the database to eDirectory from that server. You can then restore it to its original server.
Modifying the Database Backup Options
-
At the server console, go to the menu for the Print Manager.
-
Select > .
-
Modify the desired settings.
-
Use Escape to return to the menu.
Restoring a Database from eDirectory
-
At the server where you want to restore the database, enter
load ndpsm /dbvolume=full_NDS_volume_name
See Print Manager Startup Switches for more information.
-
Select the name of the Print Manager whose database you want to restore.
If the server with the original database is up and running, its name appears in this menu. If the server is down, no server name appears here. The only Source option available is eDirectory (existing jobs are lost).
-
Select the source of the backup you want to restore.
In most cases, you can select eDirectory as the source.
-
Select the volume where you want the database placed.
The restored database is then copied to the location you selected.
7.1.2 Using the Print Manager Health Monitor
The Print Manager Health Monitor provides you with a global view of your print system. The Health Monitor shows you the current status of printer agents, and allows you to configure settings and generate reports about your system.
Understanding the Print Manager Health Monitor
The Print Manager Health Monitor is a powerful tool to manage and troubleshoot your print system. The following examples show some of the features and information available in the Health Monitor.
How can I tell which printers are not being used?
The opening page of the Health Monitor shows all of your printers: their current state and general statistics including the number of print jobs printed in the last hour, in the last day, and since the Print Manager was last started.
A quick look at these statistics helps you identify which printers are not being used. By clicking a printer name, you can see additional details about the printer that can help you troubleshoot why users are not using the printer.
For example, if the printer status shows Error printing, then click the printer for a list of known problems. If one of the known problems is Printer not connected, then use the IP address listed in the Load String field to ping the printer to determine if the IP address is valid.
By looking at the statistical information, you can correct printer problems or make decisions about redeploying underused printers to departments that print a lot.
Are any public access printers in my print system?
Many companies implemented print systems with public access printers—printers that are accessible to anyone. As security and budgets have become important issues, companies are migrating their public access printers to control access printers so that access to the printers can be managed through eDirectory.
Using the Print Manager Health Monitor, you can quickly scan all printers and determine if any public access printers still exist in the print system by generating a report of printer agents using the Associated NDS Printers report item. As you scan the report, look for printers with a listing of False, meaning they do not have an associated eDirectory Printer object. If a printer does not have an associated Printer object, then it is a public access printer.
IMPORTANT:We recommend that all public access printers be converted to a controlled access printer by associating an eDirectory Printer object with the printer agent. This lets you to manage the printer through iManager, use the printer with iPrint, and take advantage of advanced iPrint features like auditing.
I am migrating to iPrint. How can I tell if the printers have the correct settings?
In order for iPrint to work correctly, printers must have IPP enabled and an associated printer driver. While you could use Novell iManager to look at each printer individually, you can save time by using the Print Manager Health Monitor to generate a report showing all of your printers with these two settings.
Go to the Generate a report page, check the iPrint Enabled and driver types check boxes, and then generate a report. Now you can see which printers still need to be enabled for iPrint and which printers still need a printer driver associated with them.
Accessing the Print Manager Health Monitor
The Health Monitor can be accessed from Novell Remote Manager or from the Manage Print Manager page in iManager. From Novell Remote Manager, complete the following:
-
Use your Web browser to log in to Novell Remote Manager at http://server_ip_address/PsmStatus.html.
-
Under , click .
You can now view current printer agent states, startup or shutdown printer agents, and view other information about your print system.
Generating Reports
The report feature of the Health Monitor allows you to generate a report that can be displayed on the page or saved as a comma-separated-value (.csv) file that can be used in a spreadsheet program.
-
From the NDPS Manager Health Monitor main page, click > .
-
(Optional) To save the report as a file, click under the heading.
The heading specifies the location and filename of the report.
-
Select the information you want included in the report by checking the corresponding check boxes.
-
Click .
The following are some common reports that you might want to generate.
Printer Configurations: To determine what features are enabled for each Printer Agent, select the following:
Printer’s Current State: To view the states of the printers and any printer console messages, select the following:
Printing Statistics: To view statistics about your print system, select the following:
Gateway Information: To view information about a gateway associated with the Printer Agents, including the gateway’s IP address, select the following:
Printer Driver Associations: To view the printer drivers associated with each printer, select the following:
Printer and Printer Agent Associations: Because a Printer Agent can service more than one printer, use the option to view the number of printers serviced by each Printer Agent.
Configuring Health Monitor Settings That Affect Novell Remote Manager
You can configure settings in the Health Monitor to control how the Health Monitor affects the Novell Remote Manager’s overall health indicator. Generally, you should keep the default settings unless you are instructed by Novell to make a change.
-
From the NDPS Manager Health Monitor, click .
-
Adjust the settings.
See the online help for information about the available settings.
Posting Administrator Messages about a Printer
Suppose a printer has been taken offline for repairs, but you keep getting phone calls from other administrators that the printer has an error in the Health Monitor. This can be resolved by leaving a message about the printer in Health Monitor. Users can see the message, but only administrators can edit it.
-
From the NDPS Manager Health Monitor, click the printer you want, then click .
-
Type the text you want displayed for this printer.
-
Click .
To remove a message, follow the steps above and delete the text in the message box (Step 2).
7.1.3 Setting Up Printer Pooling
You can create a pool of printers to share the load of printing. Users install one of the printers in the pool. When a printer in the pool has a print job waiting, the Print Manager can redirect that print job to an idle printer in the pool. The Print Manager attempts to evenly distribute print jobs among all printers in a pool.
For example, if four printers are in the pool and the first printer is printing a 100-page job, then the next print job is sent to the second printer. If the second printer completes the print job, and the first printer is still busy, the next print job is sent to the third printer. Printer pools are specific to the Print Manager, and a printer pool cannot span multiple Print Managers.
Printers that are included in a pool should be the same model and use the same printer drivers. You can only include printers from the same Print Manager in a pool.
When you create a printer pool, the pool information resides in the Print Manager and can only be viewed using Novell iManager. Unlike the Printers and the Print Manager, a separate eDirectory object for a printer pool is not created.
After you set up a printer pool, users install only one of the printers in the pool. When a user submits a print job to the installed printer, the Print Manager uses the method described in the above example to send the print job to the next available printer in the pool. Users should be reminded that their print job might be printed by any printer in the pool. For this reason, the physical printers that are members of a printer pool should be located close to one another. You might also want to enable banner pages, depending on the type of documents being printed.
To set up printer pooling
-
From Novell iManager, click > .
-
Select the print services manager for this pool.
-
Select , then click .
-
Specify the name of the printer pool.
This name is only used to identify the pool within Novell iManager.
-
Select the printers you want included in the pool.
-
Click , then .
To modify or delete a pool, follow the above steps and select the desired action from the Select an Operation list in Step 3.
7.1.4 Using Print Auditing
To use print auditing, you first need to enable auditing for each printer you want to audit using either Novell iManager or the NDPS® Manager Health Monitor.
When auditing is enabled for a printer agent, a log file is created indicating who printed how many pages to which printer on a given date. The log file is in a comma-separated format (.csv). The data from this log file can be viewed from the Health Monitor or downloaded into a spreadsheet.
Figure 7-1 Auditing Management Page
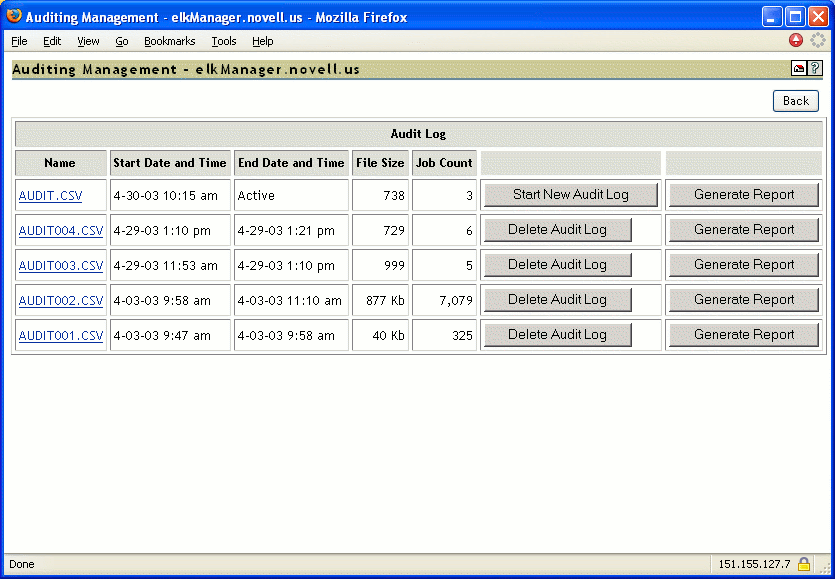
From the Auditing Management page, you can complete the following tasks:
Using Novell iManager to Enable Auditing
-
In Novell iManager, click > .
-
Browse to and select a Print Manager.
-
Select the printers you want to enable auditing for by selecting the check box in the column. Select the check box at the top of the column to enable auditing for all printers in the list.
Using the Health Monitor to Enable Auditing
-
To access the Print Manager Health Monitor, open http://server_IP_address/psmstatus in a Web browser.
For example: http://printing.my_company.com/psmstatus
-
Click the printer you want to enable auditing for.
-
Click .
-
Select the check box.
-
Click
Viewing Auditing Information
You can generate an audit report that shows all print jobs or you can filter the report based on a user or a printer or both.
-
In the Health Monitor, click > > .
If there is more than one audit log, click for the audit log you want to view.
-
(Optional) Filter the search by using the and filters.
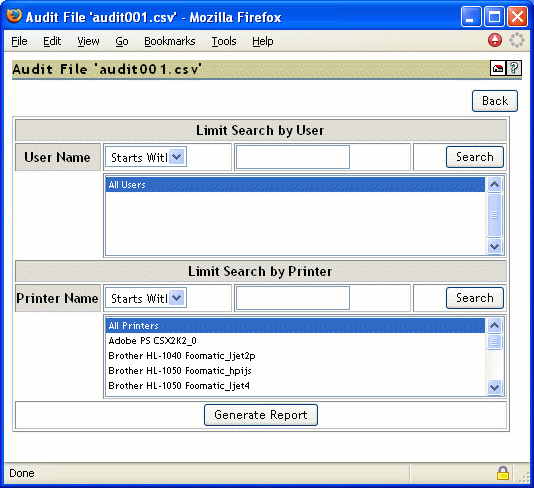
-
Click to view the report.
There are only 250 print jobs listed at a time. To view more print jobs in the report, click .
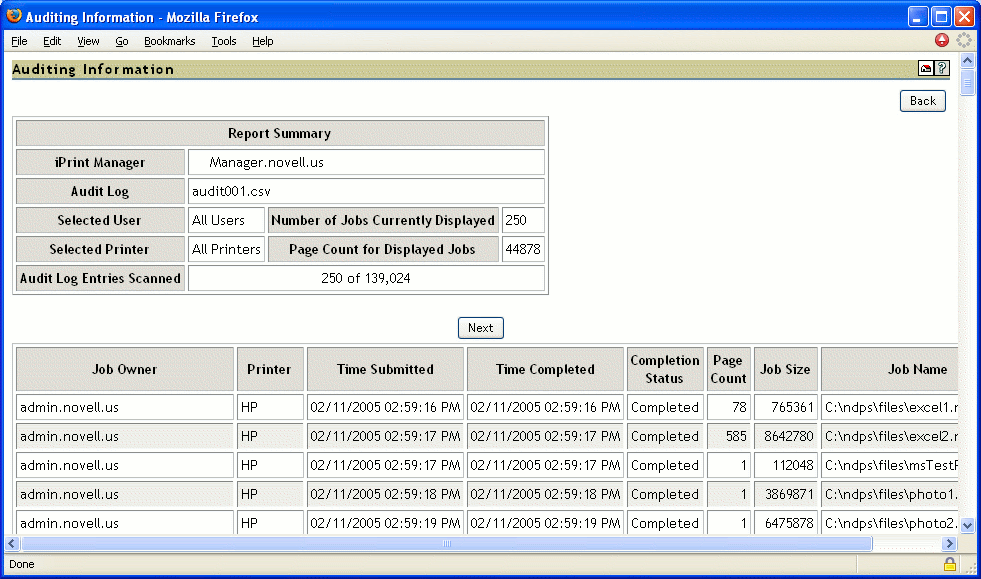
The following table explains the fields that are displayed in the Report Summary.
Table 7-1 Report Summary Fields
The following table explains what is displayed in the body of the report.
Table 7-2 Report Fields
Managing Audit Logs
You can manage your audit logs by using the buttons on the Auditing Management page. When audit logs are no longer needed, you can manually delete them. To automatically save and create new logs, see Configuring Automatic Log Rotation.
The active audit log file (audit.csv) logs data for all printers that have been enabled for auditing. You can generate a report from this file or you can move the data to a saved file using g. You cannot download the audit.csv file. To download a file, it must be saved as a separate audit log. When you move the data to a saved audit log using the , the log file is named auditxxx.csv, where xxx is the next sequential number of the log. After a log file is saved, you can download the file to your workstation and import it into a spreadsheet program.
Configuring Automatic Log Rotation
Audit Log Rotation automatically creates a new log when certain criteria are met.
-
In the Print Manager Health Monitor, click > > .
-
Select .
-
Specify the number of logs to keep.
When the number of logs to keep is reached, the oldest log is deleted when the next log is created. When setting this number, take in to account the criteria you are using to create a new log file. If you want a year’s worth of logs, set the number of audit logs to keep to 12 and then select the and options.
-
Specify the criteria used for log rotation.
By Job Count: Specify the maximum number of print jobs that an audit log can contain before a new log is created.
By Date: Select when you want the audit logs to rotate.
-
Day: The log rotates each day at midnight.
-
Week: The log rotates each Sunday. If the Print Manager is not loaded on Sunday, the log is rotated the next time the Print Manager starts.
-
Month: The log rotates at midnight on the first day of the month.
NOTE:If you select Day or Week, ensure that the entry is large enough so that logs are not rotated before you need the data.
By File Size: Specify the maximum file size (in KB) before a new log is created. The maximum file size is 4 GB.
-
Downloading an Audit Report
When the file is downloaded, you can open the report in a spreadsheet application to sort, view, and format the data to meet your needs. The active audit log, audit.csv, cannot be downloaded. You must first start a new audit log by clicking Start New Audit Log, and then download the newly created audit log.
-
On the Print Manager Health Monitor main page, click > .
-
Right-click the name of the audit log you want to download, then click .
-
Follow the prompts and save the file to the desired location.
7.1.5 Moving the Print Manager
Sometimes it is necessary to move the Print Manager from one server to another. If you assigned a DNS name to the Print Manager, you should update the DNS entry with the new IP address that the Manager is running on after the move is completed; otherwise you are not able to manage the Print Manager and users cannot be able to print.
WARNING:The URLs generated by iPrint are based on the server’s IP address or a DNS name. If you move a Print Manager to a server that has a different IP address or a different DNS name, a new URL is generated. Users must delete and reinstall their iPrint printers. If you are using NDPS® Printers, printing is not affected.
-
If the Print Manager is currently running, unload it by clicking > .
-
Browse to and select the Print Manager you want to move, then click .
-
Click .
WARNING:All printing associated with this Print Manager ceases and waiting print jobs are lost.
-
At the other server console, enter
load ndpsm
If you need to use a startup switch, see Print Manager Startup Switches.
-
Select the Print Manager object you want to load.
A specific Print Manager can run only once.
You are prompted to download the database, and the Manager starts running.
7.1.6 Enabling Printer Agent Redirection
Printer Agent Redirection is useful when you are decommissioning an iPrint printer and want to automatically redirect printing to a different iPrint printer without users manually deleting and reinstalling the printer. Redirection can continue even after you delete the printer agent for iPrint printers only.
Printer Agent Redirection is supported with the iPrint client for Windows v4.26 or later.
With Printer Agent Redirection enabled by entering a Printer Redirect URL, the client attempts to access the printer and is then redirected to the new printer. The client verifies that it can access the new printer before deleting the installed printer and installing the new printer.
Before implementing Printer Agent Redirection, you should be aware of the following:
-
When you redirect a Printer Agent, the iPrint Printer List Web page is automatically updated to install the redirected printer. This means when a user clicks to install a printer listed from the list page, the link has been updated to install the redirected printer.
For example, you redirect a printer agent that has the name of Printer_1_Color to a printer called Color_Printer. On the iPrint Printer List Web page, the user sees and clicks on Printer_1_Color. After the printer is installed, the printer listed in the Windows Printer Folder is Color_Printer.
-
Printers on maps are not automatically redirected. If you are using maps and you redirect the printer agent, you need to also update your map and republish it to show the newer printer agent. You should update the map before enabling Printer Agent Redirection because as soon as you enter a redirection URL, the link on the map is broken and any user clicking on the link in the map receives an error.
-
If you redirect a printer agent to another printer that is also being redirected, the iPrint client attempts to install the final destination printer; however, this might cause undesired results.
For example, if you have redirected Printer_1_Color to Color_Printer, and then redirect Printer_A to Printer_1_Color, the iPrint client attempts to install Color_Printer for Printer_A.
IMPORTANT:You should enable Printer Agent Redirection before deleting a printer; otherwise, when the client accesses the Print Manager and cannot find the associated printer agent for an installed printer, the installed printer is deleted.
WARNING:If you are using iPrint Client Management, you should not use Printer Agent Redirection. Using Printer Agent Redirection for printers being used by iPrint Client Management can cause undesired results.
Instead, you should update iPrint Client Management with the desired printers.
Managing Printer Agent Redirection
Before deleting printer agents from a print manager, you should enable Printer Agent Redirection for iPrint printers by entering another printer URL. By adding the URL before deleting the printer, workstations can update to the newest printer.
The Printer Agent Redirection lists include NDPS and iPrint printers. If you enable redirection for NDPS printers, then install the iPrint client on the workstations and edit the UpgradeNDPSPrinter= entry in the iprint.ini file, NDPS printers can be upgraded. However, if you delete an NDPS printer agent, redirection is discontinued.
-
In Novell iManager, click > .
-
Browse to and select a Print Manager.
-
Click .
-
For each printer agent you want to redirect, use the browse button to select the Printer object in eDirectory to ensure that you use the correct URL.
If the printer resides in a different tree, you can manually enter the URL using the following format: ipp://server/ipp/pa_name where server is the IP address or DNS name of the server and pa_name is the printer agent.
-
Click .
Each URL is validated to ensure that the format is valid and that the printer agent is available. An error is displayed when the URL cannot be validated.
Managing Deleted Printer Agent Redirection
Each time a printer agent is deleted, it is moved to the Deleted Printer Agent Redirection list. Periodically, you should review this page and delete printers that are no longer being accessed or printers where redirection was not enabled.
-
In Novell iManager, click > .
-
Browse to and select a Print Manager.
-
Click > .
-
Select the printer agents to delete.
Using and , you can determine if users are still attempting to access a specific printer and if sufficient time has passed so that you can delete printer agents from the list.
-
Click .
Each URL is validated to ensure the format is valid and that the printer agent is available. An error is displayed when the URL cannot be validated.
7.1.7 Print Manager Startup Switches
To always load a Print Manager with the same startup switch, add the switch to the load Print Manager entry in the server’s autoexec.ncf file.
Syntax:
load ndpsm Print_Manager_name_and_context /startup_parameter
Example:
load ndpsm .sales_manager.corp.acme /dbvolume=sales_sys
The following table lists the startup switches you can use when loading ndpsm.nlm.
Table 7-3 Print Manager Startup Switches
|
Startup Parameter |
Description |
|---|---|
|
nodatabase |
Load the Print Manager without opening the database. The Database Options menu is displayed. This lets you examine, back up, restore, resynchronize, and uninstall the Print Manager database. |
|
noipx |
The Print Manager does not support the IPX™ protocol. |
|
noip |
The Print Manager does not support the IP protocol. |
|
nosrs |
Prevents the NDPS Manager from looking for an SRS. Use this switch in conjunction with the Broker’s /noadvert switch. |
|
noens |
|
|
dbvolume=full_NDS_volume_ name |
Download the database from eDirectory and reconnect pointers to the local server where the command is executed. This is useful for moving the Print Manager to a new volume. |
|
dbvolume=nocheck |
The Print Manager does not validate that the database volume is local. This is used with Clustering. |
|
setens=broker_name |
Set the Event Notification Service to the specified Broker for all printers associated with this Print Manager. |
|
setrms=broker_name |
Set the Resource Management Service to the specified Broker for all printers associated with this Print Manager. |
|
qloadbalance |
The Print Manager evenly distributes the waiting print jobs among printers that are ready. This is used when pooling printers. |
|
iprinton |
The iPrint attribute is turned on for all printers associated with the Print Manager. |
|
dnsname=NDPSM_DNS_name |
This sets a DNS name to a Print Manager object. You need to include the DNS information in your DNS lookup tables. You use this switch only once, and the Print Manager uses the same DNS name each time it is loaded. To change the DNS name, use the switch with the new name. If you included the DNS name before deploying printing with this manager, then you can easily move the Print Manager to another server without disrupting printing. NOTE:The DNS name must be assigned before printing on the Print Manager is deployed. |
|
defragdatabase |
Reallocates the data within the psmdb.dat file, the NDPS Manager database. This switch often resolves database corruption problems. Symptoms of database corruption include errors when loading ndpsm, inability to manage printer agents within the manager database, and slow performance. |
|
qnumjobs= number |
Optional configuration when Printer Agents are configured to service legacy print queues. Must load ndpsm.nlm dated 15JUN2006 or later. Without this switch, 1 job is pulled from the print queue at an average of every 6 seconds. For some print environments, this is too slow. By using this switch, you can specify the number of jobs to be pulled every 2 seconds from the queue. For example, to pull 500 jobs from the queue every 2 seconds is /QNUMJOBS=500 |