7.2 Managing Disk Partitions
The Partition Disks page displays the disk layout according to the physical connections in your server, using indentation to indicate where a volume physically resides.
Figure 7-2 Example Partition Disk Page
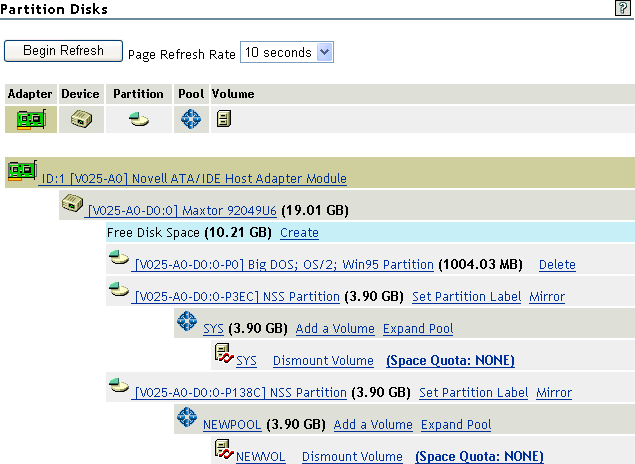
You can see the adapters, devices, partitions, pools, and volumes at different levels of indentation. If free space is available for creating a new partition, pool, or volume, you can also view it under each device. A link for creating a volume, mirroring a volume, adding a volume, or expanding a pool is displayed next to the devices, pools, or volumes listed.
You must assign the free space on the disk to create an NSS pool or a traditional volume. With traditional volumes, you assign physical segments from physical partitions on multiple devices. There are physical limitations in how you combine member segments to create the volume. With NSS pools, you assign logical segments from multiple devices without needing to be aware of the underlying physical partitioning. NSS abstracts that for you so that you can use every bit of available space on each device. After you create your pool, you create logical volumes that reside in the pool. The number of volumes per pool is virtually unlimited. You can set the volume size or let it grow to the size of the pool.
To access the Partition Disk page, click the link under in the navigation frame.
WARNING:This feature is intended for use in the context of disk carving; that is, creating and manipulating new volumes in the free space available to the server. Use caution when performing these operations on volumes containing data.
From this page, you can do one or more of the following tasks.
7.2.1 Creating a Partition, Partition and Pool, or Partition and Volume
-
On the Partition Disks page, locate and click the link next to the free space on the device that you want to create the partition on.
-
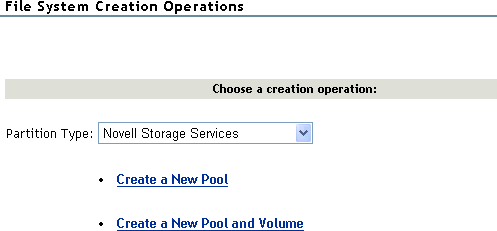
From the drop-down list, select the type of partition you want to create.
-
Click the applicable link for the action you want to perform.
For NSS partitions, you must create a pool when you create a partition. By clicking the link, you can create a NSS partition, pool, and volume in the same action.
When creating a traditional NetWare partition, you can create a partition and volume in the same action by clicking the link.
-
Complete the required fields for the type of partition, partition and pool, partition, pool and volume, or partition and volume you are creating; click ; then confirm your decision by clicking in the resulting dialog box.
7.2.2 Labeling or Renaming a Partition
After creating a partition, you can give the partition a name (label). Or, after assigning the partition a name, you can rename the partition or delete the label. You can also expand, mirror, or delete the partition. You can create and mount or delete volumes within the partition.
-
On the Partition Disks page, locate and click the link or the name_of_the_partition link next to the partition you to want to label or rename.
-
In the field, type the name for the partition, click , then click .
7.2.3 Deleting a Partition Label
-
On the page, locate and click the name_of_the_partition link next to the partition you to want to remove.
-
Click , then click .
7.2.4 Expanding a Partition or Pool
-
On the Partition Disks page, locate and click the link next to the pool that you want to expand.
-
Click the link with the space available that you want to use.
-
Specify the amount of space (in megabytes) that you want to use, then click .
7.2.5 Mirroring a Partition
-
On the Partition Disks page, locate and click the link next to the partition you to want to mirror.
-
Locate and click a free disk space segment in the list displayed.
The operation begins. When it is complete, the status “100% mirrored” is displayed.
7.2.6 Deleting a Partition
WARNING:When managing partitions, use care when removing partitions or volumes to prevent losing data by deleting the wrong partition or volume.
-
Access the page.
-
(Conditional) If it is an NSS partition, delete any pools in the partition.
-
Click the link for the partition, then click .
7.2.7 Creating a Volume and Mounting a Volume
-
On the Partition Disks page, do one of the following:
-
Locate and click the link next to the free space on the device that you want to create the volume on
-
Click the link next to the pool or partition you want to create the volume in.
-
-
Select the type of partition you want to create the volume on.
This step is assumed if you have clicked the link.
-
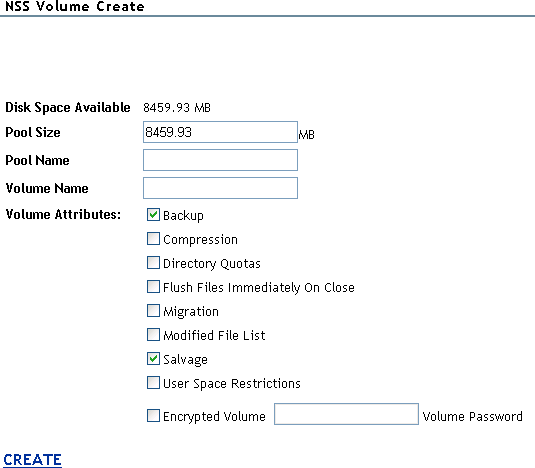
Provide information for the required fields for the type of pool and volume or partition and volume you want to create, then select the check boxes for the volume attributes that you want to set.
If you select the check box for making the volume encrypted, you must also enter a password for accessing the encrypted volume.
IMPORTANT:Deciding which attributes you want to assign to your volume is now important because some attributes cannot be changed after the volume is created.
-
Click , then confirm your decision by clicking in the resulting dialog box.
-
In order to use the new volume, mount it by clicking the link next to it or by clicking the link next to the volume name on the Volume Management page.
7.2.8 Renaming an NSS Pool
On the Disk Partition Disks page, you can access the links to rename an NSS pool or NSS volume.
-
Locate and click the link next to the pool you to want to rename.
-
Specify the new name in the field, then click .
7.2.9 Renaming a Volume
WARNING:When renaming a volume, no data is lost; but it is possible that access to data (trustee information, user rights to specific directories on a renamed volume, etc.) might be jumbled, so proceed with caution.
This feature is intended for use in the context of disk carving; that is, creating and manipulating new volumes in the free space available to the server.
We do not recommend renaming a volume with important information and user access already residing there.
-
Access the applicable Volume Information page:
Click the link in the navigation frame; then on the Partition Disks page, locate and click the volume_name link for the volume you to want to rename.
or
Click the link in the navigation frame, then click the icon
 next to the volume name you want to change.
-
On the Volume Information page, click the link.
-
Specify the new name in the field, then click .
7.2.10 Deleting a Volume
WARNING:When managing partitions, use care when removing partitions or volumes to prevent losing data by deleting the wrong partition or volume.
On the Partition Disks page, you can access links to delete an NSS pool or any type of volume.
-
Dismount the volume by clicking the link next to the volume you to want to delete.
-
Click the link next to the volume you to want to delete, then confirm your decision by clicking in the resulting dialog box.
7.2.11 Deleting an NSS Pool
-
On the Partition Disks page, click the link next to the pool name you want to delete, then confirm your decision by clicking in the resulting dialog box.
A link is displayed next to the NSS partition that was automatically created when you created the volume or pool. This partition must be deleted to make the space completely free, or you can create a new pool and volume as desired in this partition.
-
To make the space completely free for reuse, delete the partition by clicking the link next to the NSS partition you want to delete, then clicking in the resulting dialog box.
7.2.12 Changing a Space Quota for a Volume
On the Partition Disks page, you can view and set the space quota set on each volume.
-
Locate and click the link next to the volume you to want to change.
-
Click the link.
-
Specify the value (in megabytes) of the space size you want to specify, then click .
-
Confirm your decision by clicking .
7.2.13 Viewing Name Space Information or Loading and Installing a Name Space on a Traditional Volume
On the Partition Disks page, you can view and load and install name spaces on traditional volumes.
-
Locate and click the link next to the volume you to want to view.
-
Locate the name space you want to load, then click the link in the column.
-
Locate the name space you want to install, click the link in the column, then confirm your decision by clicking .
7.2.14 Creating an eDirectory Object for Existing Traditional Volumes
If a NetWare volume exists on the server that does not have a corresponding object in eDirectory, a link appears on the volume line in Novell Remote Manager on the Partition Disks page. This can occur when you create a new server and keep an existing traditional NetWare volume.
To create the eDirectory object for the volume, click the link next to the applicable volume name.