5.2 OSPF
OSPF was developed to satisfy the need for a scalable, open-standards routing protocol for large IP internetworks. It is a link state protocol that provides highly efficient routing and fast convergence.
OSPF makes large internetworks more manageable by enabling you to partition them into administrative domains called areas. Areas impose a hierarchy on the internetwork. All OSPF areas are connected to a central backbone area by an Area Border Router (ABR). The ABR shares OSPF routing information between the area and the backbone.
When configuring an OSPF area, you assign to it a 4-byte decimal number called the Area ID. You also indicate which of the router’s network interfaces belong to the area and whether the area is a stub area.
Novell TCP/IP supports the use of virtual links between OSPF routers. A virtual link patches together a partitioned backbone. It creates a direct point-to-point link between the ABRs that connect the partitioned backbone areas through the transit area.
Most IP internetworks in use today are not pure OSPF networks; that is, portions of these internetworks still employ other routing protocols, such as RIP. OSPF uses an Autonomous System Boundary Router (ASBR) to import and propagate routing information from these protocols. ASBRs are always located on the border of an OSPF domain. When configuring OSPF, you can enable your router to operate as an ASBR. For an ASBR to import RIP routes learned through an interface, RIP must be enabled on that interface.
Each OSPF router has its own Router ID, a 4-byte number that uniquely identifies the router and enables it to participate in informational exchanges with neighboring routers. The default Router ID is the IP address of the first interface bound to IP on the router. Although INETCFG enables you to change the Router ID, you should use the default unless you need a simpler numbering scheme for administrating several hundred routers on an internetwork.
HINT:If you are using an unnumbered point-to-point interface, we recommend that you configure a unique router ID.
Optionally, OSPF can be configured to authenticate its packets by providing an authentication key —an 8-byte, alphanumeric password—in each OSPF packet header. OSPF authentication gives you administrative control over which routers participate in link state exchanges on the internetwork. A router without proper authentication is excluded from these exchanges and, essentially, from performing any OSPF routing. Novell TCP/IP enables you to provide authentication for an area and to provide an authentication key for each network to which the router is connected. By default, authentication is turned off.
OSPF enables you to assign a cost value to each network interface you configure. This enables you to establish a preferred route according to the type of network media connected to the interface. For example, you might want to increase the cost of an interface that uses a slow link so that, given the choice, OSPF uses the interface to a faster, less costly link.
Like RIP, OSPF can run over most WAN connections, depending on which call type you use. On-demand calls, for example, typically use static routes instead of an active routing protocol.
IMPORTANT:An active routing protocol, such as OSPF, should not be used on an on-demand link because it periodically brings up the link and causes the link to continue to stay up.
Permanent calls on an IP network typically use a routing protocol, such as OSPF or RIP, to communicate routing information. However, they can also use static routes to conserve bandwidth. OSPF can also run over a nonbroadcast multiaccess network, such as X.25 or frame relay, but you must provide the IP address of the peer OSPF router at the other end of each connection.
HINT:Novell TCP/IP enables you to run OSPF and RIP on the same router, but under normal circumstances, you should run them separately on different interfaces. Although an ASBR must run both protocols so that it can import RIP routes and propagate them to other OSPF routers, you should not run both on too many other routers in your OSPF domain. Doing so consumes additional network bandwidth and router memory, and might even create routing loops.
The extent to which you must configure OSPF depends on the characteristics of your network, such as its size and topology, and whether it uses other IP routing protocols besides OSPF. To help you configure only what is necessary, this section provides the following procedures:
5.2.1 Basic OSPF Configuration
You can enable OSPF routing on the router as well as configure OSPF on a network interface by using Novell Remote Manager or INETCFG.
Using Novell Remote Manager
-
Log in to Novell Remote Manager, then click Configure TCPIP > Start TCP/IP Configuration > Configure TCP/IP.
-
In the TCP/IP Protocol Configuration window, set OSPF to Enabled.
This action enables OSPF routing globally on the router. If you want to disable OSPF routing on a single interface, set the Status parameter to Disabled as described in Step 6.
-
Click Save.
The system displays a TCP/IP Configuration Successful message:
-
Click OK to return to the TCP/IP Configuration Menu window.
-
Click TCP/IP to Interface Bindings > an existing binding > the View/Modify button to the right of Configure TCP/IP Bind Options > the View/Modify button to the right of OSPF Bind Options.
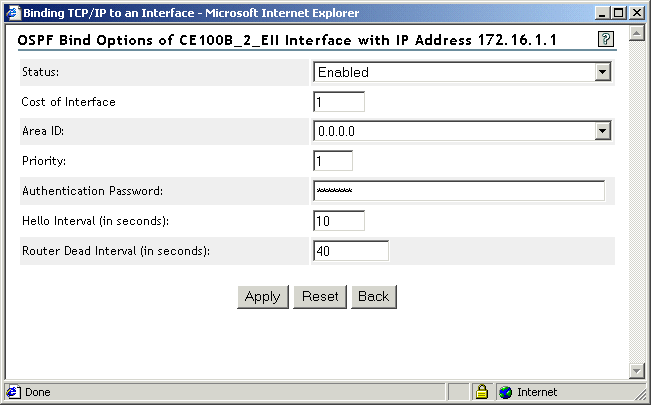
Figure 5-4 OSPF Bind Options of board_name Interface with IP Address IP_address Window
-
The Status field indicates whether OSPF routing is active on this interface. OSPF routing is enabled by default; to disable OSPF routing only on this interface, select Disabled from the drop-down list.
The OSPF Bind Options window also includes the following parameters:
-
Cost of Interface
-
Area ID
-
Priority
-
Authentication Password
-
Hello Interval
-
Router Dead Interval
-
Neighbor List
IMPORTANT:Because the default settings for these parameters are suitable for most IP networks, you should change them only for a specific purpose. Misconfiguring these parameters can increase routing traffic or cause loss of connectivity on your network.
-
-
To save your changes and return to the TCP/IP Configuration Menu window, click Apply > Apply > Save > Back.
-
If you want these changes to take effect immediately, click Reinitialize Options.
Using INETCFG
-
Load INETCFG, then select Protocols > TCP/IP.
-
Select the OSPF field, then select Enabled.
This action enables OSPF routing globally on the router. If you want to disable OSPF routing on a single interface, set the Status parameter to Disabled as described in Step 3.
-
Press Esc repeatedly to return to the Internetworking Configuration menu, then select Bindings > an existing binding > OSPF Bind Options.
-
The Status field indicates whether OSPF routing is active on this interface. OSPF routing is enabled by default; to disable OSPF routing only on this interface, select Status, then select Disabled.
The OSPF Bind Options menu also includes the following parameters:
-
Cost of Interface
-
Area ID
-
Priority
-
Authentication Password
-
Hello Interval
-
Router Dead Interval
-
Neighbor List
IMPORTANT:Because the default settings for these parameters are suitable for most IP networks, you should change them only for a specific purpose. Misconfiguring these parameters can increase routing traffic or cause loss of connectivity on your network.
-
-
Press Esc until you return to the Internetworking Configuration menu. Select Yes if you are prompted to save your changes.
-
If you want these changes to take effect immediately, select Reinitialize System > Yes.
5.2.2 Advanced OSPF Configuration
You can configure advanced OSPF features using Novell Remote Manager or INETCFG:
Using Novell Remote Manager
-
Log in to Novell Remote Manager, then click Configure TCPIP > Start TCP/IP Configuration > Configure TCP/IP.
-
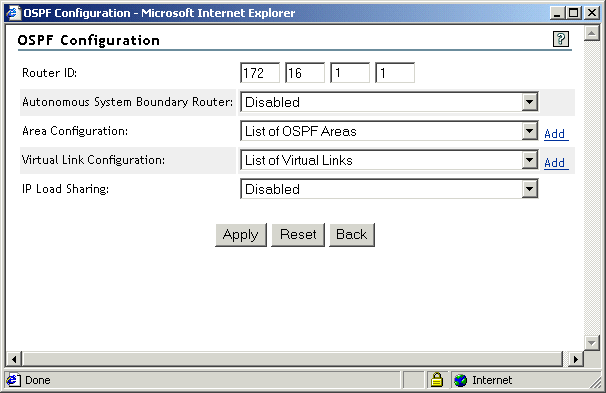
In the TCP/IP Protocol Configuration window, click the View/Modify button to the right of OSPF Configuration.
-
The OSPF Configuration window is displayed and includes the following parameters:
-
Router ID
-
Virtual Link Configuration
-
IP Load Sharing
IMPORTANT:Most network configurations do not require you to change these parameters.
Figure 5-5 OSPF Configuration window
-
-
To configure an ASBR, set the Autonomous System Boundary Router field to Enabled
Enabling this parameter enables the router to operate as an ASBR. In this capacity, the router advertises non-OSPF routes, such as those generated by RIP and EGP. In addition, static routes and direct routes to the OSPF domain are advertised. This is necessary to preserve connectivity throughout an internetwork that uses routing protocols other than OSPF. This parameter should be configured only on routers that connect an OSPF area to an area that uses a different routing protocol.
Do not enable this parameter on an internetwork that uses only OSPF. Doing so causes unwanted traffic on the route.
-
To configure an OSPF area, click Add for Area Configuration and continue with Step 6. Otherwise, go to Step 11.
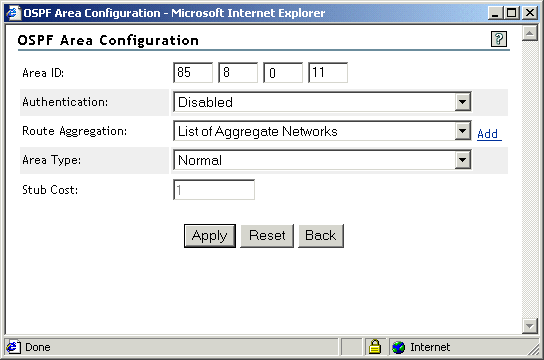
Figure 5-6 OSPF Area Configuration Window
-
In the OSPF Area Configuration window, configure the following area parameters:
-
Area ID: Four-byte decimal number that identifies the area. For example, a valid Area ID is 85.8.0.11. However, the Area ID does not need to be an IP address. You can enter any number, but it must be in the format of an IP address. If you enter a hexadecimal number, INETCFG converts it to decimal.
For the router to belong to an area, the Area ID that identifies that area must be assigned to at least one of the router’s interfaces. You assign an Area ID to an interface in Step 10.
-
Authentication: Switch that enables or disables authentication for the area.
If you enable authentication on this router, you must enable authentication on all other routers in the area. Also, all interfaces belonging to that area must have an authentication key. You provide the authentication key in Step 10.
-
Route Aggregation: Network number of a group of networks that is aggregated into one network number. To assign the Network and Mask values of this network number, click Add. Because supernetting is not supported, the aggregated network must be the same length as the natural mask of the network class.
-
Area Type: Type of OSPF area that can be Normal or Stub. All routers in the same area must agree on the area type.
The backbone area (0.0.0.0) cannot be a stub area.
-
Stub Cost: Cost of the default route advertised to the stub area. This parameter is used only if the Area Type is set to Stub.
-
-
To save your changes, click Apply > Apply > Save. The system displays a TCP/IP Configuration Successful message.
-
Click OK to return to the TCP/IP Configuration Menu window.
-
Click TCP/IP to interface Bindings > an existing binding > the View/Modify button to the right of Configure TCP/IP Bind Options > the View/Modify button to the right of OSPF Bind Options.
-
If you are configuring an OSPF area, configure the following area parameters:
-
Area ID: ID of the area to which this interface belongs. Press Enter to determine the list of available areas. Use the Up-arrow and Down-arrow keys to select an area, then press Enter to select it.
-
Authentication Password: Eight-byte password that authenticates the router’s OSPF packets to the area to which this interface belongs. Valid characters are 0 to 9, A to Z, a to z, underscore, and dash.
This parameter is required only if you enabled the Authentication parameter for the area you select, as described in Step 6.
IMPORTANT:Not all interfaces within the same area are required to have the same authentication key; however, all interfaces connected to the same network must have the same authentication key.
-
-
To save your changes and return to the TCP/IP Configuration Menu window, click Apply > Apply > Save > Back.
-
If you want these changes to take effect immediately, select Reinitialize Options.
Using INETCFG
-
Load INETCFG, then select Protocols > TCP/IP.
-
Select OSPF Configuration.
The OSPF Configuration menu is displayed and includes the following parameters:
-
Router ID
-
Virtual Link Configuration
-
IP Load Sharing
IMPORTANT:Most network configurations do not require you to change these parameters.
-
-
To configure an ASBR, select Autonomous System Boundary Router > Enabled.
Enabling this parameter enables the router to operate as an ASBR. In this capacity, the router advertises non-OSPF routes, such as those generated by RIP and EGP. In addition, static routes and direct routes to the OSPF domain are advertised. This is necessary to preserve connectivity throughout an internetwork that uses routing protocols other than OSPF. This parameter should be configured only on routers that connect an OSPF area to an area that uses a different routing protocol.
Do not enable this parameter on an internetwork that uses only OSPF. Doing so causes unwanted traffic on the route.
-
To configure an OSPF area, select Area Configuration and continue with Step 5. Otherwise, go to Step 11.
The OSPF Areas menu is displayed.
This menu lists the IDs of all areas to which the router belongs. If you have not configured an OSPF area on this router, the only area listed is 0.0.0.0, the backbone area.
-
Select an existing area or press the Insert key to create a new area.
-
Configure the following area parameters:
-
Area ID: Four-byte decimal number that identifies the area. For example, a valid Area ID is 85.8.0.11. However, the Area ID does not need to be an IP address. You can specify any number, but it must be in the format of an IP address. If you specify a hexadecimal number, INETCFG converts it to decimal.
For the router to belong to an area, the Area ID that identifies that area must be assigned to at least one of the router’s interfaces. You assign an Area ID to an interface in Step 8.
-
Authentication: Switch that enables or disables authentication for the area.
If you enable authentication on this router, you must enable authentication on all other routers in the area. Also, all interfaces belonging to that area must have an authentication key.You provide the authentication key in Step 8.
-
Route Aggregation: Network number of a group of networks that is aggregated into one network number. Press Insert to assign the Network and Mask values of this network number. Because supernetting is not supported, the aggregated network must be the same length as the natural mask of the network class.
-
Area Type: Type of OSPF area, which can be Normal or Stub. All routers in the same area must agree on the area type.
The backbone area (0.0.0.0) cannot be a stub area.
-
Stub Cost: Cost of the default route advertised to the stub area. This parameter is used only if the Area Type is set to Stub.
-
-
Press Esc until you are prompted to save your changes, then select Yes.
-
Press Esc until you return to the Internetworking Configuration menu, then select Bindings > an existing binding > OSPF Bind Options.
-
If you are configuring an OSPF area, configure the following area parameters:
-
Area ID: ID of the area to which this interface belongs. Press Enter to determine the list of available areas. Use the Up-arrow and Down-arrow keys to select an area, then press Enter to select it.
-
Authentication Password: Eight-byte password that authenticates the router’s OSPF packets to the area to which this interface belongs. Valid characters are 0 to 9, A to Z, a to z, underscore, and dash.
This parameter is required only if you enabled the Authentication parameter for the area you select, as described in Step 6.
IMPORTANT:Not all interfaces within the same area are required to have the same authentication key; however, all interfaces connected to the same network must have the same authentication key.
-
-
Press Esc until you are prompted to save your changes, then select Yes.
-
Press Esc to return to the Internetworking Configuration menu.
-
If you want these changes to take effect immediately, select Reinitialize System > Yes.
5.2.3 Configuring Load Sharing over Equal-Cost OSPF Routes
IP maintains multiple equal-cost OSPF routes. Load sharing enables a router to divide traffic over equal-cost routes. The router can have several next hops available toward any destination. With this configuration, the router can divide the traffic among the various equal-cost routes to the destination. As a result, load sharing increases the effective bandwidth of an end-to-end path. In addition, it can improve the traffic distribution on an internetwork.
NOTE:Load sharing is performed only on equal-cost routes learned from OSPF.
You enable load sharing within OSPF. IP maintains a maximum of four equal-cost routes to each destination network. The OSPF equal-cost routes are maintained internally and are not displayed in TCPCON.
IMPORTANT:Because OSPF networks tend to be large and complex, we recommend that you do not manually adjust the cost of the interface to create equal-cost routes. It is best to let OSPF automatically determine the equal-cost routes to the destination network.
You can configure load sharing on the router by using Novell Remote Manager or INETCFG.
Using Novell Remote Manager
-
Log in to Novell Remote Manager, then click Configure TCPIP > Start TCP/IP Configuration > Configure TCP/IP.
-
In the TCP/IP Protocol Configuration window, set OSPF to Enabled.
-
Click the View/Modify button to the right of OSPF Configuration.
-
In the OSPF Configuration window, set IP Load Sharing to Enabled.
-
To save your changes and return to the TCP/IP Configuration Menu window, click Apply > Apply > Save > Back.
-
If you want these changes to take effect immediately, click Reinitialize Options.
Using INETCFG
-
Load INETCFG, then select Protocols > TCP/IP.
-
Select OSPF > Enabled.
-
Select OSPF Configuration.
-
Select IP Load Sharing > Enabled.
-
Press Esc until you are prompted to save your changes, then select Yes.
-
Press Esc to return to the Internetworking Configuration menu.
-
If you want these changes to take effect immediately, select Reinitialize System > Yes.