3.10 Working with Server Logs
To effectively manage a Web server, it is necessary to get feedback about the activity and performance of the server as well as any problems that might be occurring. Apache provides very comprehensive and flexible logging capabilities.
Access logging, which records client access to the Web server, is enabled on Apache by default. If your Web server experiences a high volume of traffic, you should consider either disabling it or configuring it so that the log files cannot grow larger than your server's hard drive capacity.
Error logging, which records problems with Web server functioning, is always enabled, but you can control the severity (and therefore the amount) of errors that are recorded.
To work with server logs in Apache Manager, click the tab.
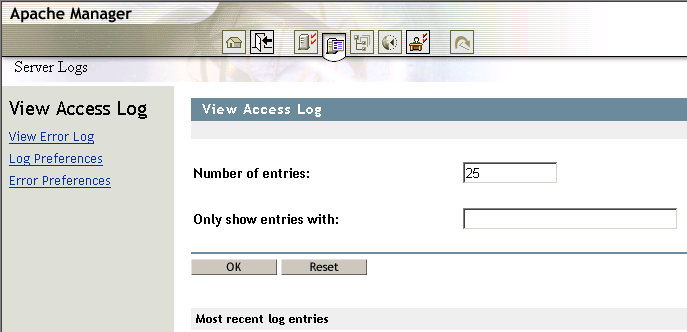
Figure 3-6 Apache View Access Log
For more information about access and error logging on the Apache Web server, see Log Files on the Apache Web site.
3.10.1 Viewing the Access Log
The access log records information about clients who access your Web server, such as their IP addresses and the date and time when they accessed the Web server.
This information can be very useful. Here are a few examples:
-
Tracking advertising success: Identifies the success of banner ads by viewing how often a banner ad has been clicked.
-
Tracking visibility to search engines: Identifies which search engines are indexing your site.
-
Tracking efficiency of a purchase system: Identifies how long customers are spending in your electronic purchasing process.
The type of information displayed depends on the settings of the Log Preferences page. A typical log shows an IP address, date, time, and the requested URL. For example:
172.16.5.18 - [27/Oct/2002:22:40:05 -0700] 200 - "GET HTTP/1.1" "http://www.digitalairlines.com/"
To configure the amount of access logging that you want to take place, see Setting Access Log Preferences.
3.10.2 Viewing the Error Log
The View Error Log page in Apache Manager displays the contents of Apache's error log, which is the most important of the log files. The error log file is where the Apache httpd sends diagnostic information and where any errors related to processing requests are recorded.
Because the error log data can be viewed through Apache Manager, you can view it from anywhere you have Web access.
The error log is the first place to look when a problem occurs with starting the server or with the operation of the server, because it often contains details of what went wrong and how to fix it.
For more information about the error log, see Log Files on Apache.org.
To configure the amount of error logging that you want to take place, see Section 3.10.5, Setting Error Preferences.
3.10.3 Filtering Access and Error Log Data
You can filter log data by specifying the maximum number of entries to be returned at one time. You can also filter the access log so that only entries containing specific information is returned, such as a specific IP address or date.
To filter the number of access log entries displayed:
-
In the field, specify the number of log entries you want displayed at one time.
This can be any number between 1 and 500.
-
Click .
To filter log entries containing specific alphanumeric information:
-
In the field, specify an alphanumeric string.
For example, 22/Aug/2003.
-
Click .
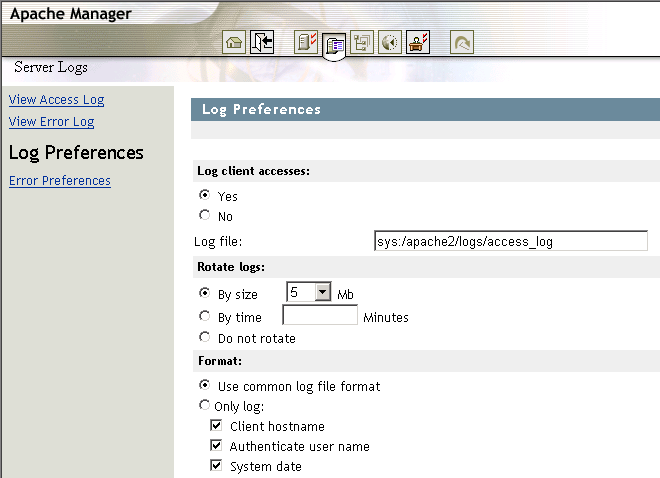
3.10.4 Setting Access Log Preferences
The Log Preferences page in Apache Manager lets you enable or disable access logging, log rotations, the location of access log files, and the type of data to capture in the access log.
Figure 3-7 Apache Log Preferences
To enable (or disable) access logging:
-
On the Log Preferences page, click .
-
In the field, specify the path to the access log file.
The default path is /apache2/logs/access_log.
-
Click > to save your changes.
or
Click > to save your changes and restart Apache so your changes are immediately put into effect.
For information about where configuration information is stored, see Section 2.3.3, Saving Configuration Changes and Restarting Apache in Apache Manager.
-
After enabling access logging, continue with:
Enabling Log Rotation
Even on a moderately busy server, the quantity of information stored in log files is very large. The access log file typically grows 1 MB or more per 10,000 requests. To manage growing log files, Apache can be directed to create a new log file when the initial log file reaches a certain size, or after a specified number of minutes has passed.
However, as an administrator, you must periodically delete or move the log files to prevent them from taking over your server's disk space. You can do this manually or by creating a batch file to delete them for you. Either way, you must manage the log files yourself.
Deleting or moving the log files cannot be done while the server is running, because Apache continues writing to the old log file as long as the file remains open. Instead, the server must be restarted after the log files are moved or deleted so that it can open new log files.
To enable the rotation of log files based on log file size:
-
From the Log Preferences page, select the option to have the logs switched when a specific size (in megabytes) is reached in the first log file.
-
Click the drop-down list and select the number of megabytes at which the logs should be rotated.
-
Click > to save your changes.
or
Click > to save your changes and restart Apache so your changes are immediately put into effect.
For information about where configuration information is stored, see Section 2.3.3, Saving Configuration Changes and Restarting Apache in Apache Manager.
To enable the rotation of log files based on a specified time period:
-
From the Log Preferences page, select the option to have the logs switched when a specified period of time (in minutes) has elapsed.
-
In the field, specify the number of minutes between each log file rotation.
-
Click > to save your changes.
or
Click > to save your changes and restart Apache so your changes are immediately put into effect.
For information about where configuration information is stored, see Section 2.3.3, Saving Configuration Changes and Restarting Apache in Apache Manager.
To disable log file rotation:
-
From the Log Preferences page, select the option to disable log rotation.
When this option is selected, a single log file is used. If your Web site supports a high volume of traffic, do not disable log file rotation.
-
Click > to save your changes.
or
Click > to save your changes and restart Apache so your changes are immediately put into effect.
For information about where configuration information is stored, see Section 2.3.3, Saving Configuration Changes and Restarting Apache in Apache Manager.
Specifying a Log File Format
Common Log Format (CLF) is required by many off-the-shelf log analyzers such as wusage or ANALOG. If you will be using one of these tools to analyze your log files, select CLF.
The CLF format is:
host ident authuser date request status bytes
Alternately, you can select from the list of data types that you want Apache to log by checking one or more of the items in the Only Log list on the Log Preferences page in Apache Manager.
To specify the common log file format:
-
On the Log Preferences page, click .
-
Click > to save your changes.
or
Click > to save your changes and restart Apache so your changes are immediately put into effect.
For information about where configuration information is stored, see Section 2.3.3, Saving Configuration Changes and Restarting Apache in Apache Manager.
To customize the log file format:
-
On the Log Preferences page, click .
-
Select each of the items you want Apache to log.
-
Click > to save your changes.
or
Click > to save your changes and restart Apache so your changes are immediately put into effect.
For information about where configuration information is stored, see Section 2.3.3, Saving Configuration Changes and Restarting Apache in Apache Manager.
For more information about logging, see the LogFormat directive on the Apache Web site.
3.10.5 Setting Error Preferences
The Error Preferences page in Apache Manager lets you control and archive error logs.
Controlling Error Logs
Options under the Error Log Settings heading on the Error Preferences page let you control the error logging process.
Figure 3-8 Apache Error Log Preferences
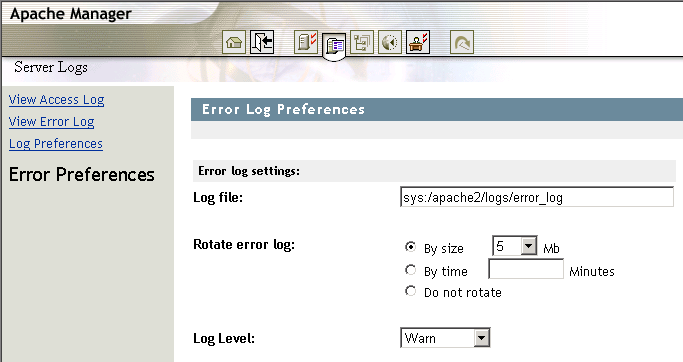
-
In the field, specify the name of the Apache Web server error log file.
By default, the error log file (error_log) is stored in the sys:/aspache2/logs directory.
-
In the field, select whether you want error logs rotated after a specified file size has been reached or after a specified period of time has passed.
For more information about log file rotation, see Enabling Log Rotation, where the subject is discussed in the context of access log files.
-
In the field, select the type of errors you want to log:
-
Emergency
-
Alert
-
Crit
-
Error
-
Warn
-
Notice
-
Info
-
Debug
When you select a log level, that level of error and those of greater importance are recorded. Therefore, if you select a log level that is high on the list, fewer errors are recorded. If you select a log level that is lower on the list, more errors are recorded. Typically, a level of at least crit is appropriate for a smoothly running Web server.
-
-
To manage the error log files that accumulate due to error log rotation, continue with Archiving Error Logs.
Archiving Error Logs
To conserve disk space, you can compress, move, or deleted older error log files that are no longer in use.
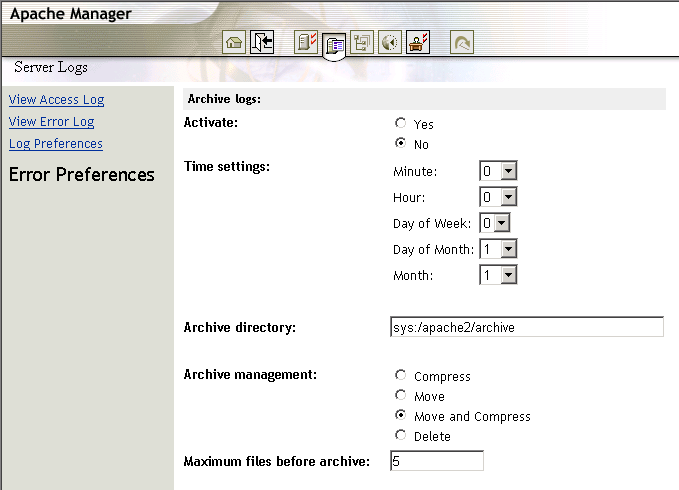
-
In the field, select .
-
In the field, set up an archive schedule.
You can schedule archiving to occur on a monthly, weekly, daily, or even more frequent basis by specifying hours and minutes.
-
In the field, specify the full pathname of the location where you want to move error log files, perhaps in preparation for backup.
-
In the field, select the action you want to perform on older log files.
Compress: Compress the error log files, but leave them in the directory specified in the Log File field. You can use any standard file compression utility to uncompress the log files at a later time.
Move: Move the error log files to the directory specified in the Archive Directory field (but do not compress them).
Move and Compress: Move the error log files to the directory specified in the Archive Directory field and compress them.
Delete: Delete the error log files.
-
In the field, specify the number of error log files that can be in the log file directory before the operation selected in Step 4 takes place.
The default is 5 files, meaning that when the sixth error log file is created, the first error log file is compressed and/or moved, or deleted.