12.3 Initializing and Sharing a SAN Device
NSS pools can be up to 8 TB in size and use space from one or more devices. For clustered pool resources, we recommend one device per pool. Each of the devices that you want to use for shared pool must be initialized and marked as shareable for clustering.
You must initialize a device (disk or LUN) to set up its device format before you can create an NSS pool on it. You can also initialize a device to wipe its current structure and reconfigure it. Only initialized devices are visible to the NSS management tools when you create a pool.
Initializing a device formats it with an MSDOS or a GPT partitioning scheme. MSDOS supports devices up to 2 TB in size. GPT supports devices of any size. The default is MSDOS. If the device size is greater than 2 TB and the partitioning scheme is not specified, the default partitioning scheme of MSDOS applies, and the device size is truncated to 2 TB with the remainder as unusable space.
WARNING:Initializing a device removes all partitions and data from the device. Do not initialize the device that contains the operating system.
Devices that have never been initialized have a format of None. Devices that are being used for a Novell Cluster Services SBD (split brain detector) partition also have a format of None; however, you should not use initialization to remove an SBD partition. For information about removing an SBD partition, see Section 9.18, Creating or Deleting Cluster SBD Partitions. After the SBD partition is removed, you can initialize the device.
You can initialize and share a device by using the Storage plug-in for iManager, the Novell Storage Services (NSS) Management Utility (NSSMU), or the Novell Linux Volume Manager (NLVM) command line interface.
12.3.1 Initializing and Sharing a Device with iManager
-
Ensure that the SAN device is attached to all nodes in the cluster.
-
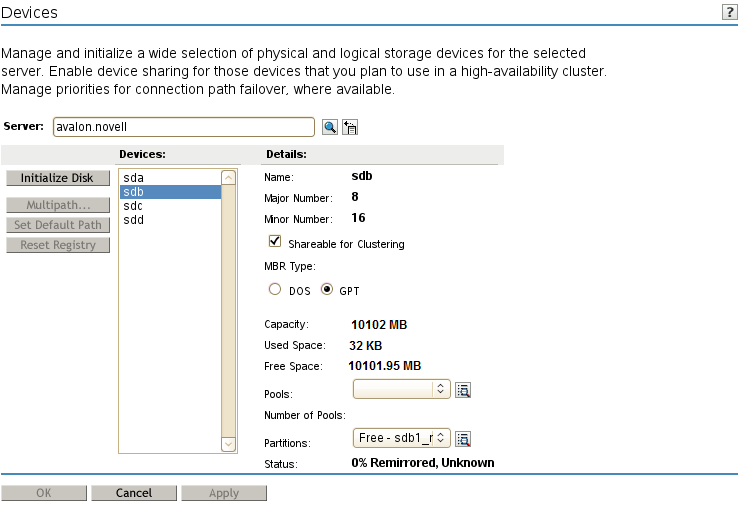
Log in to iManager as an administrator user, then select Storage > Devices.
-
Browse to select the Cluster object (
 ) of the cluster.
Selecting the Cluster object automatically selects the server that is currently the master node in the cluster.
-
From the list, select the device where you want to create the pool.
-
If the device has not been previously initialized or if you want to delete the current partitioning structures on the device, click , then click to confirm and continue.
WARNING:Initializing a disk destroys all of the data on it.
-
If you are prompted, specify whether to use the GPT or DOS partitioning scheme, then click to complete the initialization.
GPT can be used for any size device. DOS supports devices up to 2 TB in size.
Wait for the page to refresh before continuing.
-
In the area, select the check box, then click to apply the change.
-
Repeat Step 4 through Step 7 for each device that you want to use in the pool.
-
Exit iManager.
-
Continue with Section 12.4.1, Creating a Cluster-Enabled Pool and Volume with iManager.
12.3.2 Initializing and Sharing a Device with NSSMU
-
Ensure that the SAN device is attached to all nodes in the cluster.
-
Log in as the root user to the master node in the cluster, then open a terminal console.
-
At the command prompt, enter:
nssmu
-
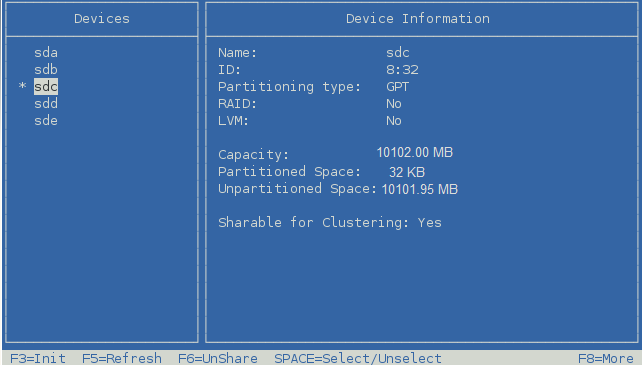
In the NSSMU, select and press Enter.
-
In the list, select the device where you want to create the pool.
-
If the device has not been initialized or if you want to delete the current partitioning structures on the device, press F3 to initialize the selected device, then press Y (Yes) to confirm and continue.
WARNING:Initializing a disk destroys all of the data on it.
-
Specify whether to use the GPT or DOS partitioning scheme, then click to complete the initialization.
GPT can be used for any size device. DOS supports devices up to 2 TB in size.
Wait for the page to refresh before continuing.
-
Press F6 to mark the device as shareable for clustering.
The value changes from to .
-
Repeat Step 5 through Step 8 for each device that you want to use in the pool.
-
Exit NSSMU.
-
Continue with Section 12.4.2, Creating a Cluster-Enabled Pool and Volume with NSSMU.
12.3.3 Initializing and Sharing a Device with NLVM
-
Ensure that the SAN device is attached to all nodes in the cluster.
-
Log in as the root user to the master node in the cluster, then open a terminal console.
-
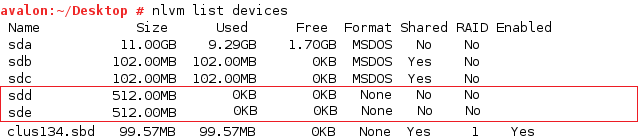
View a list of active devices by entering
nlvm list devices
-
Identify the device that you want to initialize. If a device contains data, be prepared to lose all data on the device when you initialize it.
In the following example, the sdd and sde devices are uninitialized and display a format of None. The clus1.sbd device is a mirrored RAID device that is used for the SBD partition of a cluster named clus1. Do not select an SBD device.
-
Initialize the device by entering
nlvm [--force] [--no-prompt] init <device_name> [format=<gpt|msdos>] sharedFor command usage information, see
Init Device
in the OES 11 SP3: NLVM Reference.You are automatically prompted to confirm the initialize action. Respond Y (Yes) or N (No). Use the --no-prompt NLVM option to suppress the confirmation.
Replace device_name with the node name of the device to be initialized, such as sde. The device name must be the first option after init.
Specify gpt or msdos as the partitioning scheme to use when formatting the device.
The shared option marks the device as shareable for clustering after the initialization is complete. A small partition is created on the device to store the shared setting.
For devices that contain data, you can specify the --force option to force the initialization if the init command cannot delete any pools on the disk.
For example, to initialize a device with the MSDOS partitioning scheme and mark it as shareable for clustering, enter
nlvm init sde format=msdos shared
-
List details about the device to verify that the device is formatted, and the amount of free space has increased.
nlvm list device <device_name>For example, enter
nlvm list device sde
