12.21 Deleting and Re-Creating a Pool Cluster Resource (Disabling and Re-Enabling Clustering for a Pool)
You can re-create the resource objects for a pool by deleting the resource-related objects, creating new Pool and Volume objects, and then cluster-enabling the existing pool. This is the same as disabling and re-enabling clustering for a pool. We strongly recommend that you delete the resource for a pool from the master node in the cluster.
The Cluster Options page of the Clusters plug-in for iManager provides a option that automatically deletes the resource-related objects in eDirectory and updates the cluster information:
-
Cluster-named Pool object
-
Cluster-named Volume object for each of the pool’s volumes
-
Cluster Resource object for the pool
-
Virtual server for the cluster resource (NCS:NCP Server object)
This deletes the resource-related objects, but not the storage area they represent. To delete a resource and create a new one with the same name, you must wait to create the new one until eDirectory synchronizes all of the objects in the tree related to the deleted resource.
Ensure that you offline the cluster resource before attempting to delete either the cluster resource or the clustered pool. For example, if you want to unshare a pool, offline the cluster resource for the pool before you mark the device as Not Shareable for Clustering. Then you can delete the eDirectory object for the cluster resource.
WARNING:If you attempt to delete a cluster resource without first offlining it, deletion errors occur, and the data associated with the clustered pool is not recoverable.
All resource configuration must happen from the master node. On the Cluster Options page for iManager, you are automatically connected to the Cluster object, which is associated with the master node. On the > page for iManager, connect to the Cluster object, not to the individual servers. Run NSSMU only on the master node.
Use the following procedure to delete and re-create a cluster resource for a pool:
-
If the resource is on a non-master node in the cluster, migrate it to the master node.
As the root user, open a terminal console, then enter
cluster migrate <resource_name> <master_node_name>
The master node must be in the resource’s preferred nodes list. To view or modify the list, see Section 10.10, Configuring Preferred Nodes and Node Failover Order for a Resource.
-
Use the cluster status command to check the resource status. If the resource is online or comatose, take it offline by using one of the following methods:
-
Enter the following at the command prompt as the root user:
cluster offline <resource_name>Use the cluster status command to verify that the resource has a status of before you continue.
-
In iManager, go to > , then select the cluster. On the Cluster Manager page, select the check box next to the cluster resource, then click .
Refresh the Cluster Manager page to verify that the resource has a status of before you continue.
-
-
In iManager, use the Clusters plug-in to delete the cluster resource.
-
Select > , then select the cluster.
-
Select the tab.
-
Select the check box next to the resource, then click .
-
When you are prompted to confirm the deletion, click to continue, or click to abort the deletion.
-
In the in iManager, browse to verify that the Cluster Resource objects and related objects were removed from eDirectory.
If necessary, you can manually delete the objects. In iManager, go to > , select the objects, then click .
-
-
Use the function to re-create Storage objects for the pool and its volumes.
These objects are needed by Novell Cluster Services when you re-create the resource.
-
In iManager, select > , then select the master node if you plan to re-create the storage object, or select the node where you want the pool to reside as a locally available pool.
-
Select the pool, then click .
-
Select the pool, then click .
This creates a Pool object in eDirectory with a name format of <server_name>_<pool_name>_POOL.
-
Select > The server should still be selected.
-
Select the volume, then click .
-
Select the volume, then click .
This creates a Volume object in eDirectory with a name format of <server_name>_<volume_name>.
-
Repeat Step 4.e through Step 4.f for each volume in the pool.
-
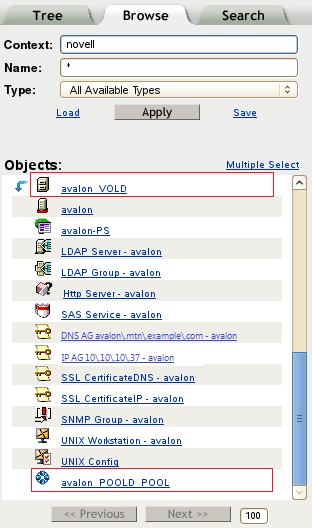
In the in iManager, browse to verify that the Pool object and Volume object were created.
For example, the following Tree View shows the Pool object avalon_POOLD_POOL and the Volume object avalon_VOLD were created for server avalon.
-
-
Use the Clusters plug-in to cluster-enable the pool:
For detailed instructions, see Step 5 thru Step 18 in Section 12.5, Cluster-Enabling an Existing NSS Pool and Its Volumes.
To re-create the cluster resource with the same name, you must wait to create the new one until eDirectory synchronizes all of the objects in the tree related to the deleted resource.
-
In , select > , select the cluster.
-
Select the tab.
-
On the Cluster Options page, click the link in the Cluster Objects toolbar.
-
On the Resource Type page, select the radio button, then click .
The Cluster Pool Information page opens.
-
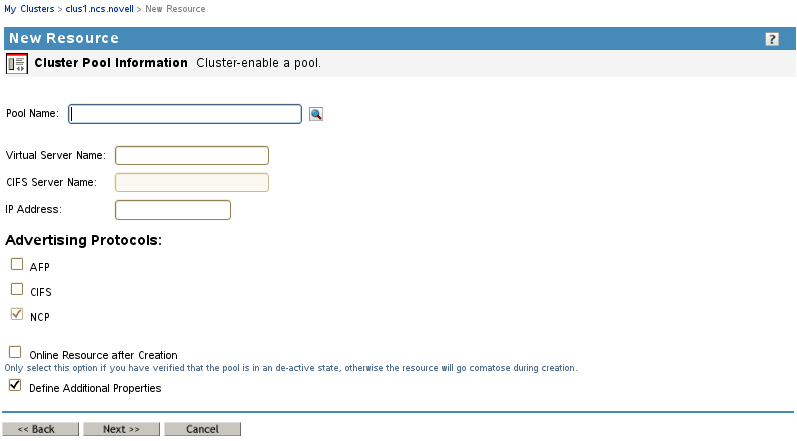
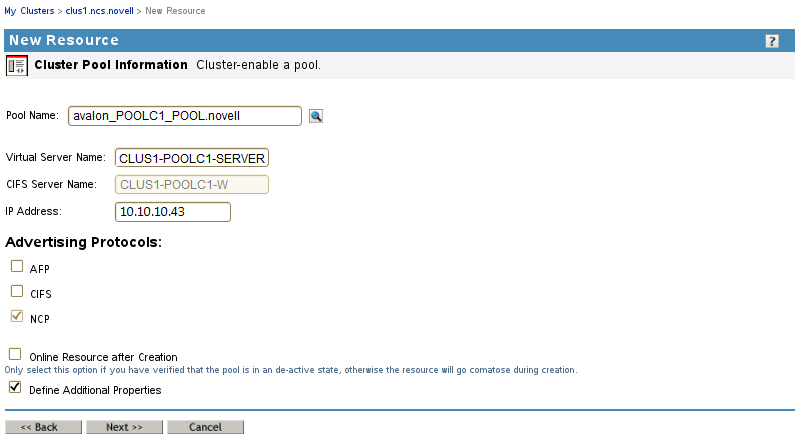
On the Cluster Pool Information page, specify the following information, then click :
-
Pool name
-
Virtual server name
-
IP address
-
Advertising protocols (NCP, AFP, CIFS)
-
If you enable CIFS, specify the CIFS Server name.
-
Deselect the check box.
-
Select the check box.
-
-
On the Resource Policies page, configure the resource policies for the start, failover, and failback modes, then click .
See Configuring the Start, Failover, and Failback Modes for Cluster Resources.
-
On the Resource Preferred Nodes page, assign the preferred nodes to use for the resource, then click .
See Configuring Preferred Nodes and Node Failover Order for a Resource.
The pool cluster resource appears in the list on the Cluster Options page, such as POOL1_SERVER.
-
(Optional) View the resource properties, and enable monitoring and configure the monitoring script.
-
Bring the resource online. Select the Cluster Manager tab, select the check box next to the resource, then click .
The pool is activated and its volumes are mounted on the primary preferred node that is configured for the pool cluster resource.
If the pool goes comatose, take it offline, check that the pool is deactivated on the local server, then try again.
-