8.3 Managing Samba Shares

In Samba, a share is a location on the server’s file system that is made available for multiple users on the network to access and store files. These appear to Windows users as normal folders accessible via the network.

This section covers the following share-related tasks that are performed via the Samba management plug-in in iManager:

8.3.1 Viewing the Existing Samba Shares

The default Samba shares on an OES server include the following:

  • [homes] is a special section of the Samba configuration that defines parameters for the automatic creation of home directories.

  • [users] is a standard location for users’ private work areas (/home).

  • [groups] is a standard location for group work areas (/home/groups).

  • [profiles] is a special section that defines parameters for network profiles.

Refer to the SLES 11 Samba documentation for more information about these default share entries.

The list also includes any additional shares you have created on the server.

8.3.2 Creating a Samba Share

To create a new Samba share:
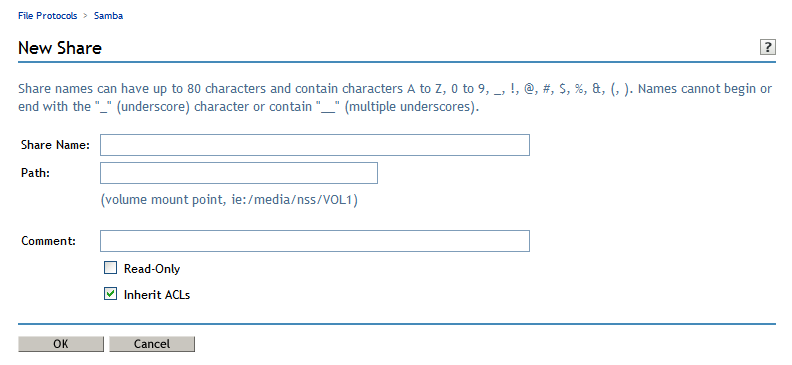
  1. Select the Shares tab and click New.

  2. In the Share Name field, type a name that complies with the naming guidelines shown. The share name does not have to match the folder name. It should be a descriptive label that reflects the share’s purpose.

  3. In the Path field, type the full path to the folder you want to share; for example, /home/projects/xyz/data. The folder must already exist on the OES server. The share includes this folder and its subfolders.

  4. (Optional) In the Comment field, type a description that identifies the share; for example, “Data directory for the XYZ project”.

  5. Select whether you want the share to be Read-Only (the default is no, or Read-Write) and whether you want the inherit ACLs feature enabled (the default is yes).

  6. Click OK to create the share.

    Or click Cancel to return to the previous page without creating the share.

8.3.3 Editing a Samba Share

To edit an existing Samba share:

  1. Select the Shares tab and either click the name of the share, or select the share and click Edit.

  2. In the Path field, type another existing path for the share.

  3. In the Comment field, edit the comment string associated with the share.

  4. Select whether you want the share to be Read-Only (the default is no, or Read-Write) and whether you want the inherit ACLs feature enabled (the default is yes).

  5. Click OK to save your changes.

    Or click Cancel to return to the previous page without saving the changes.

8.3.4 Deleting a Samba Share

To delete one or more Samba shares:

  1. Select the Shares tab.

  2. Select the shares you want to delete, then click Delete.