5.3 Meeting the Upgrade Requirements

5.3.1 Securing Current Data

Before upgrading, secure the current data on the server. For example, make a backup copy of the data so that you can restore the data volumes later if needed.

Save your configuration files. Copy all configuration files to a separate medium, such as a removable hard disk or USB stick, to secure the data. This primarily applies to files stored in /etc as well as some of the directories and files in /var and /opt. You might also want to write the user data in /home (the Home directories) to a backup medium. Back up this data as root. Only root has read permission for all local files.

5.3.2 Ensuring That There Is Adequate Storage Space on the Root Partition

Before starting your upgrade, make note of the root partition and space available.

If you suspect you are running short of disk space, secure your data before updating and repartition your system. There is no general rule regarding how much space each partition should have. Space requirements depend on your particular partitioning profile and the software selected.

WARNING:If you require more root partition space and if it resides in an EVMS container, you might not be able to repartition or expand the size of the root partition without deleting data elsewhere on the device.

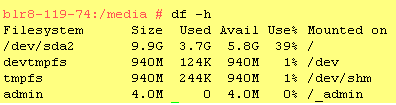
The df -h command lists the device name of the root partition. In the following example, the root partition to write down is /dev/sda2 (mounted as /) with 5.8 GB available.

5.3.3 Preparing the Server You Are Upgrading

Complete the steps in Table 5-2 for your target server.

Table 5-2 Preparing the Server You Are Upgrading

If the Server Is Running

Do This Before Upgrading the Server

SLES 10 SP3

  1. Ensure that the products and services you have running on the server can run on the new SLES 11 SP4 kernel.

  2. Download and update the latest Sentinel agent from. Failing to update the agent could result in SLES 11 booting issues.

  3. Ensure that the mount options for all the partitions in SLES 10 are set to Device ID or Device Path. For more information, see Section 5.3.7, Changing the Mount Options Before an Upgrade.

  4. Ensure that the server meets the hardware requirements for SLES 11 SP4. See “System Requirements for Operating Linux” in the Deployment Guide.

    Itanium is not a supported platform for OES 11.

  5. See the SLES 11 SP4 entry.

SLES 11 SP4

OES 2 SP3

  1. Run YaST > Software > Online Update to patch the OES 2 SP3 server to the latest patch level.

  2. Ensure that the server and services are still running as desired.

  3. Upgrade to OES 11 SP3 using the instructions in this section, then apply all patches and verify services.

OES 11 SP1

  1. Run YaST > Software > Online Update to patch the OES 11 SP1 server to the latest patch level.

  2. Ensure that the server and services are still running as desired.

  3. Upgrade to OES 11 SP3 using the instructions in this section, then apply all patches and verify services.

OES 11 SP2

  1. Run YaST > Software > Online Update to patch the OES 11 SP2 server to the latest patch level.

  2. Ensure that the server and services are still running as desired.

  3. Upgrade to OES 11 SP3 using the instructions in this section, then apply all patches and verify services.

5.3.4 Checking the Server’s IP Address

Ensure the server has a static IP address.

5.3.5 Checking the Server’s DNS Name

Ensure that DNS returns the correct static IP address when you ping the server's full DNS name. For example,

ping myserver.example.com

5.3.6 Ensuring That the Server Has a Server Certificate

IMPORTANT:Most OES servers have either an eDirectory certificate or a third-party certificate installed.

These instructions only apply when that is not the case.

Ensure that the server has a server certificate that has been generated and exported as a Common Server certificate.

To check for or add a certificate:

  1. Launch YaST.

  2. Click Security and Users > CA Management.

  3. If no certificate authorities (CAs) are listed, create one by clicking Create Root CA.

    If a CA is listed, you can use it by selecting the CA and clicking Enter CA.

  4. If you are using a listed CA, you must provide the CA password (generally the root password).

  5. Click Certificates > Add.

  6. Fill out the forms required for a server certificate. After the last form is complete, a server certificate is created and listed in the certificate list.

  7. Select the certificate you just created.

  8. Click the Export button, then select Export as Common Server Certificate.

5.3.7 Changing the Mount Options Before an Upgrade

Before starting the upgrade from OES2 to OES11 SP3, ensure that the mount options for all the partitions are set to Device ID or Device Path. The default mount option in SLES 10 is Kernel Device Name, which is not persistent, and therefore it is unreliable for use during an upgrade process.

IMPORTANT:Mount options should not be changed when you are upgrading an OES 2 SP3 instance installed on XEN whose root partition is on EVMS. Before starting the upgrade, apply the latest patches for OES 2 SP3 and SLES 10, then proceed with the upgrade to OES 11 SP3.

NOTE:After performing this procedure, do not attempt to boot the OES2 server. Instead, start the upgrade to OES11 SP3.

If the mount options are incorrect, use the following procedure to select the applicable one:

  1. Log on to the OES2 server with root privileges.

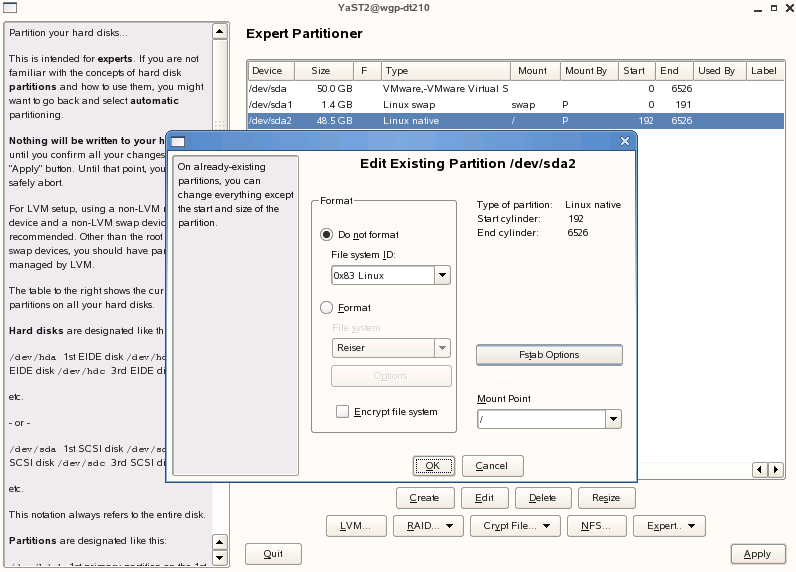
  2. In the terminal, type yast2 disk.

  3. In the Warning dialog box, click Yes.

  4. In the Expert Partitioner window, select a partition, such as root(/), then click Edit > Fstab Options.

  5. Under Fstab options:, click Device ID or Device path > OK > OK.

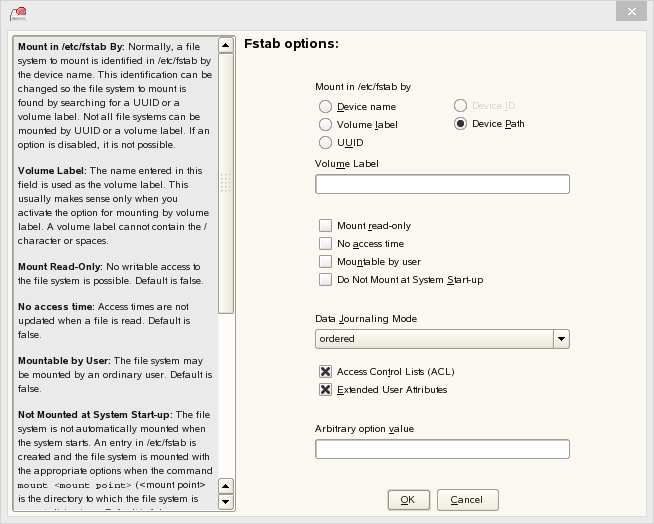
    IMPORTANT:If you plan to clone your hard disks in the future, do not select Device ID as a mount option. The cloning process will fail. For more information, see New default in SLES/SLED 10 SP1: mount "by Device ID".

  6. Repeat Step 4 and Step 5 for all the partitions.

  7. After you have changed the mount options, click Apply.

  8. In the Changes: dialog box, click Finish.

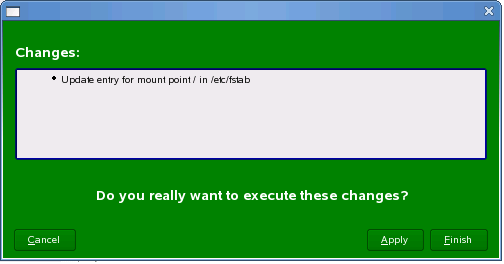
    The mount options are successfully changed.

5.3.8 Preparing an Installation Source

Review and complete the instructions for Setting Up a Network Installation Source. We recommend using the network installation option, especially if you are upgrading multiple servers.