16.6 Migrating the File System Using Command Line Utilities

This section provides information on how to use the command line to migrate a file system running on NetWare, OES 1 Linux, OES 2 Linux, or OES 11 to OES 11.

NOTE:All the migration commands must be run on the target server.

This section covers the following scenarios:

16.6.1 Migrating Data to a Server in the Same Tree

This section describes how to migrate file system data from a NetWare, OES 1 Linux, OES 2 Linux, or OES 11 server to an OES 11 server in the same eDirectory tree.

Migrating the Data

The migfiles command migrates files and directories. If you need to modify the home directories of the migrated users, you also need to use mls, maptrustees, and migtrustees.

  1. (Conditional) If you need to modify the home directories of the migrated users, run the following command:

    mls

  2. Run the migfiles command to copy the data from the source server to the target server.

  3. (Conditional) If you need to modify the home directories of the migrated users, run the following commands in the order specified:

    maptrustees

    migtrustees

Examples

The following examples illustrate ways to use the various options available for the migration commands.

Volume-to-Volume Migration

This command migrates all data from the Traditional or NSS volume SRCVOL1 on the source server with the IP address 192.168.1.3 to the target server’s TGTVOL1 volume with verbose output:

migfiles -s 192.168.1.3 -V SRCVOL1 -v TGTVOL1 -i

Directory-to-Directory Migration

This command migrates data from the Traditional or NSS path DATA:impstuff on the source server with the IP address 192.168.1.3 to the stuff directory on the NSS volume NSS1 with verbose output:

migfiles -s 192.168.1.3 -V DATA:impstuff -x /media/nss/NSS1/stuff -i

Volume-to-Directory Migration (NSS Volume to NCP Directory)

This command migrates data from the Traditional or NSS volume named DATA on the source server with the IP address 192.168.1.3 to the newdir directory on the NCP volume NCP1 located at path /data/ncp1 without verbose output:

migfiles -s 192.168.1.3 -V DATA -x /data/ncp1/newdir

Remapping Home Directories

These commands migrate the VOL1 volume on the source server 192.168.1.3 to the VOL1 volume on the target server 192.168.1.4. The -H option in the maptrustees command is used to remap the home directories of the users to the target server.

  1. Create a list of files and associated rights on the source volume:

    mls -s 192.168.1.3 -V VOL1 > mls.yaml

  2. Copy the data from the source volume to the target volume:

    migfiles -s 192.168.1.3 -V VOL -x /media/nss/VOL1 -i

  3. Map the trustees and home directories from the source server to the target server:

    maptrustees -s 192.168.1.3 -H /media/nss/VOL1/users/--map-homedir-only mls.yaml> maptrustees.yaml

    The -H option is a path to the base directory that includes all the home directories.

  4. Migrate the information generated in the previous step:

    migtrustees -d 192.168.1.4 -m maptrustees.yaml

Limitations

If you have user space restrictions set on a source NSS volume, the restrictions are migrated to target NSS volumes if you do a full volume migration.

16.6.2 Migrating Data to a Server in a Different Tree

When the source server and target servers are in different eDirectory trees, your file system user and group trustees must be migrated from the source tree to the target tree, along with their associated data. The maptrustees and migtrustees commands are used to migrate users and groups assigned as trustees in the source tree to the target tree. Alternatively, you can use Identity Manager to migrate the eDirectory users and groups, and then use the migmatchup command to match the user from the source server to the target server. Use the maprights and migrights commands only if the user and the group structure has changed during the migration.

Migrating the Data

The main command to use is migfiles. To map the trustees (users and groups) from the source tree to the target tree, you need to use mls, maptrustees, and migtrustees. If you are reorganizing the trustees (migrating to a different context), you also need to use mls, maprights, and migrights to map the trustee rights.

To migrate the data from a source NetWare server or OES server in one eDirectory tree to the target Linux server in another tree:

  1. You can either migrate the source server trustees to the target server or map the source server trustees with the target server.

    • To migrate the trustees, run the following commands in the order shown:

      mls maptrustees migtrustees

    • To map the trustees, run the following commands in the order shown:

      mls

      migmatchup

  2. Run the migfiles command to copy the data from the source to the target server.

  3. (Conditional) If you are migrating users and groups to a different context or matching the user with a different name, run the following commands in the order shown:

    maprights migrights

Examples

Tree-to-Tree Migration Using the Migration Tool to Migrate Trustees

The following example shows how to migrate data from a source NetWare server in one tree to a target OES 11 server in another tree. In this example, the target volumes are NSS volumes, and the users are to be migrated to the same context in the target tree.

  1. Create a list of files and trustees on volume V1 on the source server with IP address 192.168.1.3:

    mls -s 192.168.1.3 -V V1 > mls.yaml

  2. Map the trustees on the source server and output the list to a file:

    maptrustees -s 192.168.1.3 -H /media/nss/VOL1/users/ mls.yaml > maptrustees.yaml

    The -H option replaces the home directory of the source server user with the new home directory specified by the -H option. The -H option is a path to the base directory that includes all the home directories. If the users don’t have home directories, this option doesn’t need to be used.

  3. Migrate the trustees to the target server:

    migtrustees -d 192.168.1.67 --specific-password novell maptrustees.yaml

    If you want to assign each user a random password, use the --random-password option; it stores the passwords in a file. To avoid password theft, dispose of the password file in a secure manner after you have communicated the new passwords to their respective users.

  4. (Conditional) When migrating to an NCP Linux volume, if you want to preserve file ownership in the target tree, you should LUM-enable the migrated users before continuing. For information about LUM-enabling users, see LUM Implementation Suggestions in the OES 11 SP3: Planning and Implementation Guide.

  5. Migrate the data from source volume V1 to target NSS volume VOL1:

    migfiles -s 192.168.1.3 -V V1 -x /media/nss/VOL1/ -i

    After the users have been migrated (this only needs to be done once), additional data volumes can be migrated. Repeat Step 1 to Step 5 to migrate other volumes on the source server.

Tree-to-Tree Migration Using the Migration Tool to Migrate Trustees and Flatten the Trustee Structure

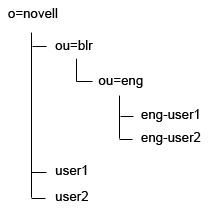
The maptrustees command includes a -k option that allows you to migrate users to a different context in the target tree. When you do this, the container hierarchy is flattened.

For example, suppose your source eDirectory tree looks like the one shown in Figure 16-1.

Figure 16-1 Source eDirectory Tree Structure

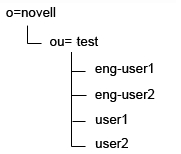
When the users are migrated to ou=test.o=novell, the resulting tree structure is shown in Figure 16-2.

Figure 16-2 Target eDirectory Tree Structure

The following example shows how to migrate data from a source NetWare, OES 1 Linux, OES 2 Linux, and OES 11 server in one tree to a target OES 11 server in another tree. In this example, the target volumes are NCP Linux volumes and the new user context is ou=new-context.o=company.

  1. Create a list of files and trustees on volume SRCVOL on the source server with IP address 192.168.1.3:

    mls -s 192.168.1.3 -V SRCVOL > mls.yaml

  2. Map the trustees on the source server and output the list to a file:

    maptrustees -s 192.168.1.3 -H /usr/novell/NCP1/homes/ -k 'ou=new-context,o=company’ mls.yaml > maptrustees.yaml

    The -H option replaces the home directory of the source server user with the new home directory specified by the -H option. The -H option is a path to the base directory that includes all the home directories. If the users don’t have home directories, this option doesn’t need to be used.

  3. Migrate the trustees to the target server:

    migtrustees -d 192.168.1.67 --specific-password novell maptrustees.yaml

    If you want to assign each user a random password, use the --random-password option; it stores the passwords in a file. To avoid password theft, dispose of the password file in a secure manner after you have communicated the new passwords to their respective users.

  4. (Conditional) When migrating to an NCP Linux volume, if you want to preserve file ownership in the target tree, you should LUM-enable the migrated users before continuing. For more information about LUM-enabling users, see LUM Implementation Suggestions in the OES 11 SP3: Planning and Implementation Guide.

  5. Migrate the data from source volume SRCVOL to target NCP Linux volume NCP1:

    migfiles -s 192.168.1.3 -V SRCVOL -x /usr/novell/NCP1/ -i --no-trustees

    After the users have been migrated (this only needs to be done once), various data volumes can be migrated. Repeat Step 1 to Step 5 to migrate other volumes on the source server.

  6. Map the trustee rights on the source server:

    maprights -V SRCVOL -k ou=new-context,o=company -x /usr/novell/NCP1/ mls.yaml > maprights.yaml

  7. Migrate the trustee rights to the target server:

    migrights -i maprights.yaml

    Repeat Step 1, Step 6, and Step 7 to migrate trustee rights for each source volume being migrated.

Tree-to-Tree Migration with Trustees Already Migrated to the New Tree and Reorganized in the New Tree.

The following example shows how to migrate data from a source NetWare server in one tree to a target OES 11 server in another tree. In this example, the target volume is an NSS volume, and the users have already been migrated by using tools like Novell Identity Manager so that they now reside in different contexts in the target tree. In this example, the Migration Tool is used only to migrate the data and map the trustees correctly.

  1. Create a list of files and trustees on volume V1 on the source server with IP address 192.168.1.3:

    mls -s 192.168.1.3 -V V1 > mls.yaml

  2. Match the users on the source server to the users on the target server:

    migmatchup -s 192.168.1.3 -d 192.168.1.67 -k 'ou=re-org,o=company' mls.yaml > migmatchup.yaml

    migmatchup searches for the trustees in their source context. If it doesn't find a matching trustee, it searches the container specified with the -k option recursively and matches the first trustee with the same name. If the trustee with the same name is not found, it is not matched.

    If the trustee name is changed, then the output of migmatchup can be edited so that each source trustee is mapped to the corresponding user on the target tree.

  3. (Conditional) When you are migrating to an NCP Linux volume, if you want to preserve file ownership in the target tree, you should LUM-enable the migrated users before continuing. For more information about LUM-enabling users, see LUM Implementation Suggestions in the OES 11 SP3: Planning and Implementation Guide.

  4. Migrate the data from source volume SRCVOL to target NSS volume TGTVOL:

    migfiles -s 192.168.1.3 -V SRCVOL -x /media/nss/TGTVOL/ -i --no-trustees

    After the users have been migrated (this only needs to be done once), various data volumes can be migrated. Repeat Step 1 to Step 4 migrate other volumes on the source server.

  5. Map the trustee rights on the source server:

    maprights -V SRCVOL --matchup-file migmatchup.yaml -x /media/nss/TGTVOL/ mls.yaml > maprights.yaml

  6. Migrate the trustee rights to the target server:

    migrights -i maprights.yaml

    Repeat Step 5 and Step 6 to migrate trustee rights for each source volume being migrated.

Limitations

Be aware of the following limitations when performing tree-to-tree migrations:

  • If users have home directories on a volume that is migrated, the Home Directory attribute is changed only for users who are assigned as trustees or who belong to the groups that are assigned as trustees.

  • If the maptrustees and migtrustees commands are used to migrate the users, the following User Object attributes are migrated:

    • Common Name (CN)

    • Country

    • Description (description)

    • E-mail Address (mail)

    • Fax Number (facsimileTelephoneNumber)

    • Full Name (fullName)

    • Generational Qualifier (generationQualifier)

    • Given Name (givenName)

    • Initials (initials)

    • Language (Language)

    • Locality Name (l)

    • Lockout After Detection (lockedByIntruder)

    • Login Allowed Time (loginAllowedTimeMap)

    • Login Disabled (loginDisabled)

    • Login Expiration Time (loginExpirationTime)

    • Login Grace Limit (loginGraceLimit)

    • Login Grace Remaining (loginGraceRemaining)

    • Login Intruder Limit (loginIntruderAttempts)

    • Login Maximum Simultaneous (loginMaximumSimultaneous)

    • Login Script (loginScript)

    • Network Address Restriction (networkAddressRestriction)

    • Organizational Name (o)

    • Organizational Unit Name (ou)

    • Password Allow Change (passwordAllowChange)

    • Password Expiration Interval (passwordExpirationInterval)

    • Password Expiration Time (passwordExpirationTime)

    • Password Minimum Length (passwordMinimumLength)

    • Password Required (passwordRequired)

    • Password Unique Required (passwordUniqueRequired)

    • Physical Delivery Office Name (physicalDeliveryOfficeName)

    • Post Office Box (postOfficeBox)

    • Postal Address (postalAddress)

    • Postal Code (postalCode)

    • State or Province Name (st)

    • Street Address (street)

    • Surname (sn)

    • Telephone Number (telephoneNumber)

    • Title (title)

  • When LUM-enabled users are migrated to a new tree, they are no longer LUM-enabled.

16.6.3 Migrating Data to a POSIX File System

This section provides information on migrating data from NetWare, OES 1 Linux, OES 2 Linux, or OES 11 NSS volumes to a POSIX file system such as EXT3 or Reiser on a target OES 11 server.

Mapping Users, Groups, and File Attributes to POSIX

In this type of migration, eDirectory users and groups are migrated to POSIX. The useradd and groupadd commands are used to create the POSIX users and groups corresponding to their eDirectory equivalents, and the NetWare file attributes are mapped to the POSIX rwx permissions.

Objects in eDirectory with an objectClass of Organization, groupOfNames, or organizationUnit are mapped to POSIX groups. Those with objectClass organizationalPerson are mapped to POSIX users.

Because POSIX user and group names are more restrictive than eDirectory object names, the following conventions are used to map the common name (cn) of the objects to POSIX:

  • Names with 32 or more characters are truncated to 31 characters in length.

  • Characters not belonging to the POSIX portable character class ([A-Za-z_] [A-Za-z0-9_-.] * [A-Za-z0-9_-.$]) are replaced by an underscore ( _ ) character.

For more information about POSIX names, see the man page for the useradd command.

NetWare file attributes are mapped as shown in Table 16-1.

Table 16-1 Mapping NetWare Attributes to POSIX Permissions

NetWare Attribute

POSIX Permissions

No attributes set

rw_ ___ ___

Read Only and Hidden

___ ___ ___

Read Only

r__ ___ ___

Hidden

_w_ ___ ___

For directories, the execute bit for the owner is set.

NOTE:These mappings are based on NetWare attributes, not trustee rights. Administrators should evaluate the post-migration POSIX permissions and make adjustments as necessary to maintain suitable data security for users.

  1. Run the migfiles command to copy the data from the source to the target server.

  2. (Conditional) If you need to modify the home directories of the migrated users, run the following three commands in the order specified:

    mls maptrustees migtrustees

  3. Run the following commands in the order shown:

    mls maprights migrights

Example

The following example shows how to migrate data to a POSIX file system.

  1. Create a list of files and trustees on volume SRCVOL:

    mls -s 192.168.1.3 -V SRCVOL > mls.yaml

  2. Map the trustees on the source server and output the list to a file:

    maptrustees -s 192.168.1.3 -p -H /data/home/ mls.yaml > maptrustees.yaml

    The -H option replaces the home directory of the source server user with the new home directory specified by the -H option. The -H option is a path to the base directory that includes all the home directories. If the users don’t have home directories, this option doesn’t need to be used.

  3. Migrate the trustees to the target server:

    migtrustees -p --specific-password novell maptrustees.yaml

    If you want to assign random passwords to users, use the --random-password option; it stores the new passwords in an output file. To avoid password theft, dispose of the password file in a secure manner after you have communicated the new passwords to their respective users.

  4. Migrate the data from the volume SRCVOL on the source server with IP address 192.168.1.3 to the target POSIX path:

    migfiles -s 192.168.1.3 -V SRCVOL -x /path/to/copy --no-trustees -pi

    Substitute the desired target POSIX path for /path/to/copy.

    Users must be migrated before migrating data volumes. Repeat Step 1 to Step 3 for migrating trustees.

  5. Map the trustee rights on the source server:

    maprights -p -V SRCVOL1 -x /path/to/copy -m maptrustees.yaml mls.yaml > maprights.yaml

  6. Migrate the trustee rights to the target server:

    migrights -p maprights.yaml

    Repeat Step 4, Step 5, and Step 6 for each source volume being migrated.

Limitations

Sparse files are copied as normal files when migrated from NSS to POSIX. This is because of a known limitation from the POSIX perspective. Sparse files are generally supported on restore by restoring the data areas to sparse locations in the file system. The file system then determines whether or not to preserve the sparse nature of the file. POSIX file systems do not preserve the sparse nature of sparse files.

16.6.4 File System Migration Commands

The OES 11 Migration Tool includes several command line tools for file system migrations. Each tool performs a subtask of the migration by taking the required input and outputting the converted output or results to stdout. Table 16-2 lists the commands that are available for file system migrations.

Table 16-2 File System Migration Commands

Command

Description

mls

Lists all files in a given NetWare, OES 1 Linux, OES 2 Linux, or OES 11 NSS path, with associated trustees, rights, and quotas.

migmatchup

Matches users and groups from the source server to the target server.

maptrustees

Maps users and groups from the source server to the target server specifications.

migtrustees

Creates users and groups on the target server based on the output generated by the maptrustees command.

migfiles

Copies files and folders from a source server to a target server.

maprights

Maps NetWare NSS/Traditional or OES NSS file system rights to OES 11 file system rights.

migrights

Sets file rights on the target server as defined by the output from the maprights command.

migcred

Establishes persistent credentials for the migration utilities.

The sections that follow discuss these commands and their options in greater detail. You can also refer to the respective man page for each command or use the -h (--help) and --usage options.

mls

The mls command lists files and associated trustees, rights, and quotas from NetWare, OES 1 Linux, OES 2 Linux, or OES 11 source servers. The output from this command is used as input for both maprights and maptrustees.

To gather the required information for NetWare Traditional or NSS volumes, mls copies tcnvlnx.nlm to the NetWare server. To gather this information for OES 1 Linux, OES 2 Linux, or OES 11 NSS volumes, it uses the.trustee_database.xml file in the ._NETWARE directory.

Syntax

mls -s -V|-X [--continue-after-failover] [-e] [-c] [--precheck] [--update-ifnewer] [--progress] [--progress-interval] [--use-casa] [--source-unsecure-ldap] [--source-ldap-port] [--debug] [--modified-after] [--modified-before] [--accessed-after] [--accessed-before] [--no-dirquotas] [--no-userquotas]

Options

Option

Long Form

Purpose

-s

--source-server

Specifies the source server’s IP address.

Example: -s 192.168.1.3

-V

--source-path

Specifies the volume or directory path to use on the source server.

Examples: -V NSSVOL

-V VOL1:/apps/data

-X

--source-full-path

Indicates the full path of the volume to use on the source server.


--continue-after-failover

Specifies that mls continues migration after a resource failover.

-e

--exclude

Excludes filter on files to be copied. Use this multiple times for excluding multiple file types (eg. -e "*.mp3" -e "*.tmp").


--use-casa

Uses CASA to store and retrieve user names and passwords.


--source-unsecure-ldap

Uses unsecure LDAP connection for all LDAP calls. By default mls uses secure LDAP.


--source-ldap-port

Uses the specified port for LDAP calls. By default, it uses port number 389 for unsecure LDAP and 636 for secure LDAP.

-c

--session-file

--progress

--progress-interval

--debug

--precheck

These options are explained in the Additional Migration Options.


--modified-after

Scans files that are modified after this date.


--modified-before

Scans files that are modified before this date.


--accessed-after

Scans files that are accessed after this date.


--accessed-before

Scans files that are accessed before this date.


--no-dirquotas

Directory quota information is not listed.


--no-userquotas

User quota information is not listed.

migmatchup

The migmatchup command uses input from the mls command to produce a mapping of users and groups from the source server to those on the target server. It uses ldapsearch to retrieve the user and group data from the source and destination LDAP server.

Objects can be excluded from migration by specifying them in the global /etc/opt/novell/migration/obj-exclude-list.conf file, or a custom exclude file can be specified using the -E option. The global exclude file has entries to not migrate a NetWare-specific user such as "cn=admin,ou=Tomcat-Roles,*". If a custom exclude file is specified, then the global exclude file is not read.

Syntax

migmatchup -s -d -k [-E] [-c] [--progress] [--progress-interval] [--debug] [--precheck] [--use-casa] [--source-unsecure-ldap] [--source-ldap-port] [--destination-unsecure-ldap] [--destination-ldap-port] <inputfile>

Options

Option

Long Form

Purpose

-s

--source-server

Specifies the source server's IP address.

-d

--destination-server

Specifies the target server's IP address.

-k

--destination-ldap-container

Options to specify LDAP container to be searched for finding matching users and groups.

-E

--obj-exclude-file

Excludes the objects listed in this file from migration. The entries can contain a pattern with wild cards * and ?. Refer to the object exclude file /etc/opt/novell/migration/obj-exclude-list.conf for more information.

-c

--session-file

--progress

--progress-interval

--debug

--precheck

These options are explained in the Additional Migration Options.


--use-casa

Uses CASA to store and retrieve user names and passwords.


--source-unsecure-ldap

Uses unsecure LDAP connection for all LDAP calls. By default, migfiles uses secure LDAP.


--source-ldap-port

Uses the specified port for LDAP calls. By default, it uses port number 389 for unsecure LDAP and 636 for secure LDAP.


--destination-unsecure-ldap

Uses unsecure LDAP connection for all LDAP calls. By default, migfiles uses secure LDAP.


--destination-ldap-port

Uses the specified port for LDAP calls. By default, it uses port number 389 for unsecure LDAP and 636 for secure LDAP.


inputfile

Indicates the output file produced from the mls command from stdin.

Example

This example illustrates matching users and groups from source server to a target server:

migmatchup -s 192.168.1.3 -d 192.168.1.4 -k o=company mls.yaml

maptrustees

The maptrustees command maps the users and groups from the source server’s tree or domain to the target server’s specifications. It uses input from mls to produce and map user and group data from the source server. You must use maptrustees when migrating data to a different tree or when migrating users and groups to a different context.

By default, maptrustees maps users and groups into a new target tree. The target file server should be in the same tree as the LDAP target server. You can use the -k option to map users and groups into a single target container.

The maptrustees command can also be used to map users and groups to POSIX users and groups in /etc/passwd and /etc/group. It uses ldapsearch to retrieve the user and group data from the source LDAP server. The source LDAP server should be in the same tree as the source file server that produced the mls output.

Syntax

maptrustees -s [-H] [--map-homedir-only] [-p] [-k] [--matchup-file] [-g] [-E] [--use-casa] [--source-unsecure-ldap] [--source-ldap-port] [--debug] [--precheck] [-c] [--progress] [--progress-interval] <inputfile>

Options

Option

Long Name

Purpose

-s

--source-server

Specifies the source server’s IP address.

Example: -s 192.168.1.3

-H

--homedir

Specifies the path to the directory for migrating users’ home directories. This option is used to map users’ home directories to the new path on the target server.

Example: -H /media/nss/nssvol1/homedir


--map-homedir-only

This option is used when source and destination servers are in the same tree. This option forces maptrustees to generate only the users' home directory information, so that migtrustees can modify only the users' home directories. You must also pass --homedir (-H) option along with this option.

-p

--posix

Maps users and groups to /etc/passwd and /etc/group on the OES 11 server. The default is LDAP, if no mapping option is specified.

-k

--destination-ldap-container

Specifies the container where all users and groups are to be migrated.

Example: -k ou=merged,o=company


--matchup-file

Specify a user matchup file as generated by migmatchup.

-g

--primary-group

Specifies the primary POSIX group for migrated users. If not specified, the default primary group is “users.”

Example: -g migrated-users

The specified group must be created before you run the migtrustees command, because migtrustees does not create the group.


--use-casa

Uses CASA to store and retrieve user names and passwords.


--source-unsecure-ldap

Uses unsecure LDAP connection for all LDAP calls. By default, migfiles uses secure LDAP.


--source-ldap-port

Uses the specified port for LDAP calls. By default, it uses port number 389 for unsecure LDAP and 636 for secure LDAP.

-E

--obj-exclude-file

Excludes from migration the objects listed in the specified file.

Example: -E excludefile.txt

If this option is used, the global exclude file is not read. See Excluding Objects for more information.

-c

--session-file

--progress

--progress-interval

--debug

--precheck

These options are explained in the Additional Migration Options.


inputfile

Indicates the output file produced from the mls command or from stdin.

Examples

  • To map users and groups to the same container in the target tree as in the source tree:

    maptrustees -s 192.168.1.3 mls.yaml

    The example assumes that you have the same tree structure in the target tree as in the source tree.

  • To map users and groups to a new container in the target tree, using the output from the mls command:

    maptrustees -s 192.168.1.3 -k ou=merged,o=company mls.yaml

    A new container named ou=merged,o=company is created in the target tree, and all migrated users and groups are created within that container.

  • To map users to /etc/passwd and /etc/group in a POSIX environment and redirecting the output to the maptrustess.yaml file:

    maptrustees -s 192.168.1.3 -p mls.yaml > maptrustees.yaml

Excluding Objects

When generating the list of users and groups to be mapped to the target tree, maptrustees reads the obj-exclude-list.conf file in the /etc/opt/novell/migration/ directory and excludes the eDirectory objects listed in that file.

The global exclude file includes entries for NetWare objects, such as cn=admin,ou=Tomcat-Roles.

If you find that objects are being migrated from your source eDirectory tree that you do not want to appear in the target tree, you can add the objects to the obj-exclude-list.conf file. Use fully distinguished object names in LDAP (comma-delimited) format. For example:

cn=testuser,ou=users,o=novell

NOTE:NCP Server objects that are assigned as file system trustees are not migrated in a tree-to-tree migration.

migtrustees

The migtrustees command uses input from maptrustees to create users and groups in the target tree. It uses ldapadd and ldapmodify to make the changes on the target LDAP server.

If the -p (--posix) option has been specified in maptrustees, migtrustees uses useradd and groupadd to create users and groups in /etc/passwd and /etc/group.

If the -g (--primary-group) option was specified in maptrustees, the specified group must already exist or it must be created before running migtrustees.

Syntax

migtrustees -d [-i] [-A] [-m] [-p] [-r] [--use-casa] [--destination-unsecure-ldap] [--destination-ldap-port] [--debug] [--precheck] [-c] [--progress] [--progress-interval] [--specific-password] [--newusers-password-file] <inputfile>

Options

Option

Long Form

Purpose

-d

--destination-server

Specifies the target server’s IP address (not needed for POSIX migrations).

Example: -d 192.168.1.5

-i

--verbose

Prints verbose information regarding the user and group migration status.

-A

--audit

Audits the results of the user and group migration.

-m

--modify-existing

Modifies or updates users or groups if they already exist.

If you do not include the -m option, the migtrustees command displays user exists errors if a User object being migrated is already present in the target eDirectory tree. In this case, no modifications are made to the User object in the target tree.

-p

--posix

Creates POSIX users and groups on the destination server. The default is LDAP.


--use-casa

Uses CASA to store and retrieve user names and passwords.


--destination-unsecure-ldap

Uses unsecure LDAP connection for all LDAP calls. By default, migfiles uses secure LDAP.


--destination-ldap-port

Uses the specified port for LDAP calls. By default, it uses port number 389 for unsecure LDAP and 636 for secure LDAP.

-c

--session-file

--progress

--progress-interval

--debug

--precheck

These options are explained in the Additional Migration Options.

-s

--specific-password

Specify the password for newly created users. You must note the password so that it can be forwarded to individual users.

If the specific password or random password option is not specified, then the users are created but locked until you assign a password.

-r

--random-password

Generate random passwords for new users created on the target server. When using this option, you must always pass the --newusers-password-file option so that the randomly generated passwords and user names are stored in the file.


--newusers-password-file

The newly created user names, along with passwords, are stored in the file specified with this option. This option must be passed with the --random-password option.

If the specified file exists, migtrustees appends the file; otherwise, it creates a new file with read-only permission.


inputfile

Indicates the output file produced from the maptrustees command or from stdin.

Examples

  • To migrate users and groups to a target tree, using an LDAP server with the IP address of 192.168.1.4 in the target tree:

    migtrustees -d 192.168.1.4 -s novell maptrustees.yaml

  • To audit the outcome of a trustee migration:

    migtrustees -d 192.168.1.4 -A -s novell maptrustees.yaml

  • To migrate users and groups to POSIX with verbose information:

    migtrustees -i -p -s novell maptrustees.yaml

migfiles

The migfiles command copies files from NetWare Traditional or NSS volumes, OES 1 Linux NSS volumes, OES 2 Linux NSS volumes, or OES 11 NSS volumes to OES 11 NSS, NCP, or POSIX paths. It uses the Novell Storage Management Services (SMS) framework to migrate file data and metadata.

When the migration is between two servers in the same eDirectory tree, migfiles copies the trustees and rights information along with the file data. When migrating data to a server in a different tree, migfiles copies only the file data. You must use other commands such as mls, maptrustees, migtrustees, maprights, and migrights to migrate the trustees and rights information.

Syntax

migfiles -s [-p] [-i] -v|-x -V|-X [--continue-after-failover] [--disable-login] [-P] [-e] [--exclude-path] [-c] [--no-trustees] [--trustees-only] [--delete-existing-trustees] [--use-casa] [--source-unsecure-ldap] [--source-ldap-port] [--debug] [--precheck] [--progress] [--progress-interval] [--demigrate-files] [--never-overwrite] [--update-ifnewer] [--modified-after] [--modified-before] [--accessed-after] [--accessed-before] [--usecodeset] [--no-dirquotas] [--no-userquotas] [--sync] [--delete] [--delete-file-on-restore-error] [--ignore-quota-checking] [--trustees-dirs-only]

General Options

Option

Long Form

Purpose

-s

--source-server

Specifies the source server’s IP address.

Example: -s 192.168.1.3

-p

--posix

Specifies that the target is a POSIX path. (If not specified, the default target type is NCP over POSIX.)

-i

--verbose

Prints verbose file migration status.

-V

--source-path

Specifies the source path, in VOLNAME or VOLNAME:/path format.

Example: -V NSSVOL -V VOL:apps/data -V winshare

@srcpathfile

Specifies the source file that includes multiple source paths and is prefixed with a symbol (@).

Example: -V @srcpathfile

-v

--destination-path

Specifies the volume on the target server where the files are copied. This option cannot be used with the -x option.

Example: -v VOL1

-x

--destination-full-path

Specifies the target path for copying NSS, NCP, or POSIX data. This option cannot be used with the -v option.

Example: -x /media/nss/TEST

@destpathfile

Specifies the target file that includes corresponding target paths and is prefixed with a symbol (@).

Example: -x @destpathfile

-X

--source-full-path

Specifies the source path for copying NSS, NCP, or POSIX data. This option cannot be used with the -V option.

Example: -X /media/nss/TEST


--continue-after-failover

Specifies that migfiles continue migration after a resource failover.


--disable-login

New logins to source server are disabled during data migration.

--never-overwrite

Do not overwrite files that already exist on the target server.

-e

--exclude

Sets an exclude filter on files to be copied. Use this option multiple times to exclude multiple file types.

Example: -e "*.mp3" -e "*.tmp"


--exclude-path

Excludes the directory with the specified source path from migration. Use this multiple times for excluding multiple directories or files.


--use-casa

Uses CASA to store and retrieve user names and passwords.


--source-unsecure-ldap

Uses unsecure LDAP connection for all LDAP calls. By default, migfiles uses secure LDAP.


--source-ldap-port

Uses the specified port for LDAP calls. By default, it uses port number 389 for unsecure LDAP and 636 for secure LDAP.

-c

--session-file

--progress

--progress-interval

--debug

--precheck

These options are explained in the Additional Migration Options.


--no-trustees

Do not migrate trustees.


--trustees-only

Migrate only the trustees. New trustees added to the source server are migrated to the target server.


--delete-existing-trustees

Trustees that do not exist on the source server are deleted from the target server. You must use this option with the --trustees-only option.


--demigrate-files

Migrates the data of HSM migrated files. By default, only stubs are migrated.


--update-ifnewer

Updates the file on the target server with the new data from the file on the source server.

-u

--modified-after

Migrates files that are modified after this date.


--modified-before

Migrates files that are modified before this date.


--accessed-after

Migrates files that are accessed after this date.


--accessed-before

Migrates files that are accessed before this date.


--usecodeset

Code page value of the source server. This option is applicable only for NetWare 5.1 server.


--no-dirquotas

Do not migrate directory quotas.


--no-userquotas

Do not migrate user quotas.


--sync

Synchronizes the source server and target server. Migrates files from the source server that are not available on the target server or is modified after the date given.

--delete

Synchronizes the source server and target server. You must use this option with the --sync option. Files that do not exist on the source server are deleted from the target server.


--delete-file-on-restore-error

Deletes partially restored or 0 byte files that are created during synchronization.


--ignore-quota-checking

Disables quota checking on the target server. When migration is completed, migfiles enables quota checking.

--trustees-dirs-only

Synchronizes trustees only at the directory level. Trustees for files are not synchronized. This option must be used only with the --trustees-only option or with the sync options.

NetWare to Linux Migration Options

The following options can be used only in NetWare-to-Linux migrations.

Option

Long Form

Purpose

-c

--session-file

Stores the migration’s progress, including the date and time of the migration, the source and target IP addresses, and the source and target volume names, in the specified session file.

Example: -c "status.log"

This file can be used to resume a previously halted migration job. If an absolute or relative path is not specified with the file name, migfiles searches the current working directory for the file. If the specified file does not exist, all files are migrated. See Multi-Session Migration for more information.

-u

--update

Migrates files newer than the date specified with this option. See Updating Modified Files for more information.

This option supports date/time inputs in the following formats:

"%d-%m-%Y %H:%M:%S"

"%d-%m-%Y %H:%M"

where d, m, Y, H, M, and S are format variables of standard Linux date/time implementations. The supported formats can be extended by using the DATEMSK environment variable. The DATEMSK environment variable must be sent to the file path pointing to the date/time formats to support. See getdate(1) and strptime(3) for more information on using DATEMSK.


--no-trustees

Excludes trustees while migrating file system data.


--demigrate files

Migrates the data of HSM-migrated files. By default, only stubs are migrated.


--update-ifnewer

Updates the file if the file on the source server is newer than the file on the target server. This option is applicable only for data migration.

Multiple Source Path Migration

This command migrates the source paths listed in the source file srcpathfile to corresponding target paths listed in the target file destpathfile. Pass the srcpathfile with -V and destpathfile with -x option prefixed with a symbol (@). The sample IP address is 192.168.1.3 of the source server.

Source Paths in srcpathfile

Target Paths in destpathfile

DATA:DEPT/finance

/media/nss/DATA/finance

DATA:DEPT/legal

/media/nss/DATA/legal

migfiles -s 192.168.1.3 -V @srcpathfile -x @destpathfile -i

Progress Indicator

While the migfiles command is running (without the -i option), a pound (#) character is displayed for every 100 files migrated.

Multi-Session Migration

The -c or --session-file option of the migfiles command allows you to stop the migration partway through and then continue it later from where it left off. This is especially useful when migrating large data volumes that might take several working days to copy and that must remain online during the migration.

For example, the following command stores the migration’s progress and other metadata in a session file named V1-to-V1 090907:

migfiles -s 192.168.1.3 -v VOL1 -V VOL1 -ni -c "V1-to-V1 090907"

To terminate the migration session at any time, press Ctrl+C. You can resume the session later by re-entering the migfiles command by passing the same session file, V1-to-V1 090907.

Updating Modified Files

Another useful option for the migfiles command is the -u or --update option. This option lets you specify a date and time, then migfiles copies only files that have been modified after this date and time. This option must be used after completing a multi-session migration described above to update all the files modified by users during the migration. The session file contains the date and time at which the migration started.

For example, the following command updates all the files on the target volume that have been modified at the source after 9 September 2014 at 12:30:

migfiles -s 192.168.1.3 -v V1 -V V1 -ni -u "9-09-2014 12:30"

maprights

The maprights command gleans file system rights information from the mls output and maps the rights to a specified volume or path on the OES 11 target server. You can specify a mapping to NSS, NCP, or POSIX rights.

If the target server is in a different tree and users and groups are in new containers, you can use the -k option to migrate the users and groups into a specified container in the target eDirectory tree.

Syntax

maprights -V [-p] -v|-x [-k] [--matchup-file] [-m] [--debug] [--precheck] [-c] [--progress] [--progress-interval] <inputfile>

Options

Option

Long Form

Purpose

-V

--source-path

Specifies the volume or directory path to use on the source server.

Examples: -V NSSVOL

-V VOL1:/apps/data

-p

--posix

Maps user rights to POSIX file system access rights.

-v

--destination-path

Specifies the volume on the OES 11 target server where the rights information is mapped. This option cannot be used with the -x option.

Example: -v NSSVOL

-x

--destination-full-path

Specifies the volume path on the OES 11 target server where the rights information is mapped. You must use -x in maprights if you used -x in migfiles.

-k

--destination-ldap-container

Specifies an eDirectory container where all users and groups are to be migrated. You must use -k in maprights, if you used -k in maptrustees.

Example: -k ou=users,o=company

--matchup-file

Specify a user matchup file as generated by migmatchup.

-m

--maptrustees-file

Specifies the name of the maptrustees file associated with this maprights migration (required for POSIX rights mapping).

Example: -m maptrustees.yaml

inputfile

Indicates the name of the output file produced from the mls command or from stdin.

-c

--session-file

--progress

--progress-interval

--debug

--precheck

These options are explained in the Additional Migration Options.

migrights

The migrights command uses input from maprights to set file rights on the target server. All details for setting rights are stated in the input file. migrights uses this information to set the rights appropriately on the target file system.

Syntax

migrights [-i] [-A] [-t] [-p] [--debug] [--precheck] [-c] [--progress] [--progress-interval] <inputfile>

Options

Option

Long Form

Purpose

-i

--verbose

Prints verbose rights migration status.

-A

--audit

Audits the results of the file rights migration.

-t

--test

Performs a test run of the rights migration operation.

-p

--posix

Indicates that the destination path is POSIX.

-c

--session-file

--progress

--progress-interval

--debug

--precheck

These options are explained in the Additional Migration Options.


inputfile

Indicates the output file produced by the maprights or from stdin.


--debug

Prints debug messages to the migrights log file located at /var/opt/novell/log/migration/.

Examples

  • To set rights on the target file system with verbose output:

    migrights -i maprights.yaml

  • To audit the outcome after setting rights on the target file system:

    migrights -i -A maprights.yaml

  • To perform a test run with the output from maprights and see if the files and users exist in the target tree (the test results are being directed to migrights-t.yaml):

    migrights -i maprights.yaml -t > migrights-t.yaml

migcred

The migcred command can be used to store, retrieve, and delete persistent credentials for the other file system migration commands. It uses CASA to store credential details of an identity. A migcred identity can be a server IP address. With each identity, a type of user name (for example, LDAP, NDS Distinguished Name, or email name) is stored along with an associated password.

Syntax

migcred -i -l|-n|-N|-c|-o|-e [-w] [-r] [-d] [--debug]

Options

Option

Long Form

Purpose

-i

--id

Specifies the identity or key to identify the credential.

Example: -i 192.168.1.3

-l

--ldap-dn

Specifies credential details in LDAP format.

Example: -l cn=admin,o=company

-n

--nds-dn

Specifies credential details in NDS_DN format.

Example: -n admin.company

-N

--nds-fdn

Specifies credential details in NDS_FDN format.

Example: -N cn=admin.o=company

-c

--cn

Specifies credential details in Common Name (CN) format.

Example: -c John Smith

-o

--other

Specifies credential details in a non-specified format.

-e

--email

Specifies credential details as an email address.

Example: -e admin@company.com

[-w]

[--password]

Retrieves a stored password.

[-r]

[--retrieve]

Retrieves credential details of an identity.

[-d]

[--delete]

Deletes the credentials of an identity.


[--debug]

Print debug messages to the migcred log file. The log file is located at /var/opt/novell/log/migration/

Examples

  • This example illustrates storing the credential details of identity 192.168.1.3 in LDAP format. The command prompts for credential details, which should be entered in LDAP format (cn=admin,o=mycompany):

    migcred -i 192.168.1.3 -l

  • This example illustrates retrieving credentials after they have been stored:

    migcred -i 192.168.1.3 -l -r

  • This example illustrates deleting credential details of identity 192.168.1.3:

    migcred -i 192.168.1.3 -d

16.6.5 Additional Migration Options

The OES 11 Migration Tool provides additional options to be executed with file system migration utilities.

You can execute these commands with file system migration utilities. Table 16-3 lists the additional options that are available for file system migrations.

Table 16-3 Additional Migration Options with File System Commands

Option

Description

--session-file

Stores migration progress. This file is used to continue the migration.

--progress

Displays the progress (in terms of percentage) of the command being executed.

--progress-interval

Specifies the time interval for displaying the progress of a command.

--debug

Executes the command in a debug mode and creates a log file.

--precheck

Validates the arguments passed in a command.

Session File

A session file stores the status of a command, checkpoint information of a command (the point at which the execution of command was stopped), and parameters for validating the session file. You can create a session file by executing a command with the --session-file option.

For example, to create a session file for the migfiles command:

migfiles -s 192.168.1.3 -iV src_volume -v dest_volume --session-file /home/migfiles_session.session

This command migrates data from the source NSS volume src_volume to the target NSS volume dest_volume. You can stop the command and re-execute it at a later stage. On executing the command at a later stage, the migfiles_session.session file is taken as an input and the migfiles command starts at the point when it was last stopped.

For example, your source volume contains 50 GB of data and after migrating 40 GB of data, migration was stopped. On re-executing the migfiles command, the remaining 10 GB of data is migrated.

Sample Session File:

src-server: 192.168.1.3
dest-server: 192.65.1.2
src-path: "DFS:"
dest-path: "/media/nss/VOL1/"
started-on: "18-7-2008 16:8:15"
status: stopped
stopped-at: "DFS:db/"
Bytes Processed: 22

Progress

The --progress command can be executed with any command to display the progress of the command being executed.

To view progress on executing the migtrustees command:

migtrustees -d 192.168.1.3 maptrustees.yaml -i --progress

Output of the command:

Created 200 trustees of 500

When you execute the migtrustees command with the --progress option, it displays the progress of trustee creation. You can set the time to display the progress by specifying the --progress-interval option.

Progress Interval

The --progress-interval option is used along with the --progress option to specify the time interval for displaying the progress of a command. The default time interval is 30 seconds for refreshing the progress of a command.

To view progress every 10 seconds on executing the migtrustees command:

migtrustees -d 192.168.1.3 maptrustees.yaml -i --progress --progress-interval 10

The migtrustees command refreshes the progress every 10 seconds.

Debug

The --debug option executes the command in debug mode and creates a log file in the /var/opt/novell/log/migration folder.

To execute the mls command in debug mode:

mls -s 192.168.1.3 -V src_volume --debug

This command creates an mls.log file that is stored in the /var/opt/novell/log/migration folder.

Precheck

The --precheck option validates the arguments passed in a command.

To execute the migfiles command:

migfiles -s 192.165.1.1 -iV src_volume -v dest_volume --precheck

On executing this command, the --precheck option validates the existence of the src_volume and dest_volume on the source server and the target server. The command authenticates to the source server and target server, and also verifies whether SMS is running on the target server.