A.0 Troubleshooting QuickFinder

This section provides some troubleshooting topics that can help you resolve search and print performance issues. It offers possible causes for issues you might encounter, as well as suggested actions for resolving them.

If the problem you are working with doesn’t appear in this section, visit the Novell Support Web site.

On Failure of Index Optimization

Possible Cause: Increased data when updating/optimizing the index.
Action: Regenerate the index. It should resolve the issue. It is recommended to do the following to avoid the problem in future.
  1. Schedule the index for update/optimize more frequently, for example, update once a day and optimize once or twice a week.

  2. If the size of the data to be indexed is more, split the single index into multiple small indexes. This helps in getting the index generation/optimization quickly.

On Failure of Synchronization, Indexing Fails in a Cluster Environment

Possible Cause: One of the server is down in the QuickFinder cluster setup causing failure of indexing. This results in the failure of the search task.
Action: Ensure all the servers are up and running in the cluster environment, then perform indexing.

Characters of descriptions or titles appear as unintelligible characters

Possible Cause: You’ve probably indexed documents written in multiple languages and encodings. QuickFinder can index most of the world’s languages and encodings. However, QuickFinder needs to know the encoding of each document.
Possible Cause: Some of your documents were probably not tagged with an encoding or were incorrectly tagged.
Action: Make sure all of your documents contain the correct Content-Type meta tag. If your international documents do not contain a Content-Type meta tag, either add it or use the Encoding (If Not in META Tags) index definition option to specify the default encoding.

For more information, see Section 14.0, Internationalizing Search Services.

Several titles or descriptions contain the same text

Possible Cause: If search results include duplicate titles or descriptions, your description fields (description, summary, or abstract) might include boilerplate information (that is, standardized information repeated in multiple locations.).
Action: The more accurate your meta tag description fields are, the better your search results are. Where possible, consider adding descriptions to your document’s meta tags.
Possible Cause: It could also be that you have indexed the same document more than once, or several links throughout your Web site might point to the same document but do so using different character cases each time.
Action: To solve the latter problem, try using the URLs Are Case Sensitive option to direct QuickFinder to turn off case-sensitive crawling. Also, remove any duplicate backup files you might have and exclude any backup directories from your index definition.

Some titles are returned as the URL of the document instead

Possible Cause: QuickFinder pulls document titles from within each document that it indexes. If your document doesn’t have a title, QuickFinder uses the URL or path of the document instead. If the URL is unavailable, a Title Unavailable message is returned.
Action: Make sure all of the documents you index have specifically defined titles.

QuickFinder Admin Login Fails Consecutively

Possible Cause: You have given incorrect credentials for login. The consecutive attempt to login fails if in the initial attempt you have specified the username in upper case, and the login failed. For example, if the username is test and the password is testing, and you specified the username in a different case, such as TEST, the login fails.
Action: When your login with upper case admin name and password failed, perform either of the following:
  • Run the Quickfinder setup from YAST again and reconfigure the Quickfinder. Clean the cookies from the browser and login to the Admin console.

  • Run the Admin setup command as given below with the password set in QF_ADMIN_PWD variable on the console. Then restart Tomcat and apache.

    /var/lib/qfsearch/bin/create-admin-user.sh 2 'admin' 'o=novell' 'o=novell'
    'cn=admin,o=novell'
    

    Clean the cookies from the browser and login to the Admin console.

Indexing Fails on NSS Volumes

Explanation: When the DNS (novell-named) service fails to start, the following error is encountered and is logged in to /var/opt/novell/log/named/named.run file:
dns/db: critical: NWCallsInit failed with error code:-1
Possible Cause: LUM is not configured properly, and the novlxsrvd and novlxtregd LUM users do not exist in the eDirectory as members of both the novlxtier and wwwrun groups.
Action: Perform the following steps:
  1. Reconfigure LUM

  2. Ensure LUM users exist in eDirectory, by running namuserlist novlxregd and namuserlist novlxsrvd from the command line.

  3. View the status of xregd user by entering the command:

    rcnovell-xregd status

    If the xregd user is not running, enter rcnovell-xregd start command.

Possible Cause: If novell-named service fails to start even after performing the above procedure, then the files in the xtier registry might not be generated properly.
Action: To verify the existence of registry content perform from step 7 to step 9 of the below procedure. If the content in the respective directories as mentioned in step 9 does not exist, perform the following steps to rebuild the xtier registry:
  1. Open the terminal console and stop the xregd user by entering the following command:

    rcnovell-xregd stop

  2. Navigate to /var/opt/novell/xtier/xregd/db/ and enter ls -l to verify that the folder db is empty. If the folder is empty, continue with step 4.

  3. If any files exist inside the db folder, move all the files to the temporary folder, for example /tmp.

  4. Generate files inside the xtier registry by using the following command:

    /opt/novell/xtier/bin/regutil -i /etc/opt/novell/xtier/xtier_registry.xml

  5. Navigate to /var/opt/novell/xtier/xregd/db/ and ensure that the following files are generated:

    xtier_registry.db

    xtier_registry.lck

    xtier_registry.rfl

  6. Start the xregd user by entering the following command:

    rcnovell-xregd start

  7. Navigate to the xtier registry by using the following command:

    /opt/novell/xtier/bin/regedit

  8. At the regedit prompt, execute the cd local_machine command and enter the ls -l command to view the content inside the directory. If the folder software is present in the local_machine directory, then the registry is rebuilt without any error.

  9. Similarly, enter the following commands in the listed sequence and enter the ls -l command to view the content in the respective directories:

    cd software

    cd Novell

    cd Xtier

    cd Configuration

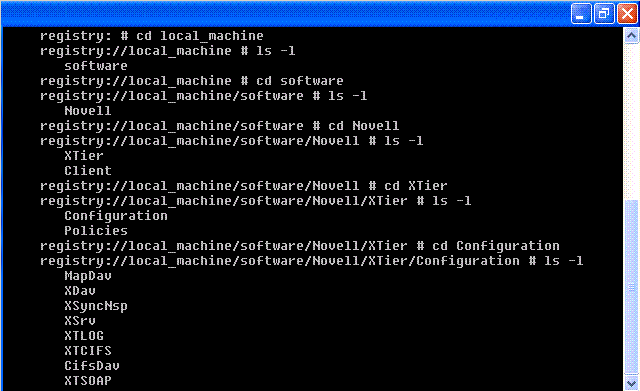
    If the content exist in all the respective directories, then the xtier registry is completely rebuilt.

  10. Enter exit.

  11. Restart the machine.

Losing Registry Information After an Upgrade From OES 2 SP2 to OES 2 SP3

Explanation: At times, after an upgrade from OES 2 SP2 to its latest support pack (SP3), the registry information is either lost or corrupted.
Action: Back up the registry before an upgrade and restore it. For more information, see Losing Registry Information After an Upgrade From OES 2 SP2 to OES 2 SP3 in the OES 11 SP3: NetStorage Administration Guide for Linux.