18.16 Exporting and Importing NSS Volumes for NFS Access
NSS volumes and their directories are NFSv3 exportable and accessible from remote systems. NFSv4 is not supported for NSS, but exports for other file systems using NFSv4 can coexist with NSS exports using NFSv3.
18.16.2 Exporting NSS Volumes for NFSv3
-
In a terminal console, log in as the root user.
-
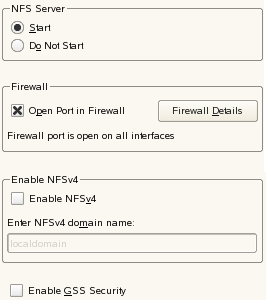
In YaST, select , then select to open the page.
-
If NFS Server is not started and enabled, you must configure the NFS Server.
-
NFS Server: Select .
-
Firewall: Select to allow access to the NFS service from remote computers, then click to specify the network interfaces where you want to open the port.
-
Enable NFSv4: Make sure that is not selected if you are exporting only via NFSv3.
IMPORTANT:NFSv4 is not supported for NSS, but exports for other file systems using NFSv4 can coexist with NSS exports using NFSv3. If you enable NFSv4, make sure that you enter the NSS directories for export with options that use non-zero settings for their FSIDs, and do not bind the NSS directories to paths in the pseudo-root file system that you set up for NFSv4 exports.
-
Enable GSS Security: To enable Kerberos secure access to the server, click . A prerequisite for this is to have Kerberos installed in your domain and both the server and the clients are kerberized.
-
Click to continue to the page.
-
-
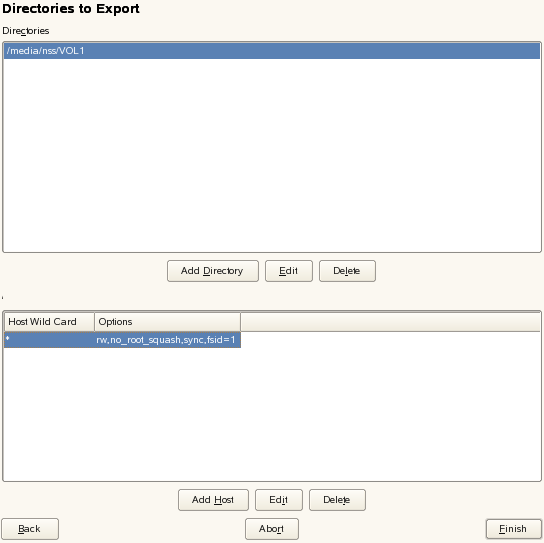
On the page, do the following for each NSS volume on the server that you want to export via NFSv3.
-
Under , click , to open a dialog box where you can configure the settings for a volume.
-
Specify the NSS volume that you want to export by typing the Linux path for the volume, or browse the Linux file system to locate and select the NSS volume, then click .
The default location of NSS volumes is /media/nss/volumename, such as /media/nss/VOL1.

-
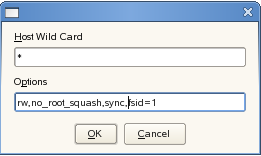
In the Host Wildcard field, specify the servers where you want to be able to mount the NSS volume via NFSv3.
A default asterisk (*) wildcard indicates all servers. You can specify a single host, netgroups, wildcards, or IP networks. For information, see Host Options.
-
Enter the following required mount options:
rw,no_root_squash,sync,fsid=valueFor NFSv3, make sure you do not include the fsid=0 or bind=/pseudo_rootdir/volumename options. Not using these options allows the export to be processed as an NSFv3 export.
For example:
rw,no_root_squash,sync,fsid=1
Separate the options with commands and no spaces. For information, see Mount Options for Export via NFSv3.
-
Click to save your settings and return to the page.
-
-
On the page, click to apply the settings.
18.16.3 Importing NSS Volumes
-
On the OES server where you want to import the NSS volume via NFS, open YaST.
-
In YaST, select , then select to open the page.
-
Near the bottom of the page, select to allow access to the NFS service from remote computers, then click to specify the network interfaces where you want to open the port
-
Do the following for each NSS volume on remote servers that you want to import via NFS.
-
Click to open a dialog box where you can specify the information for the volume you want to import.
-
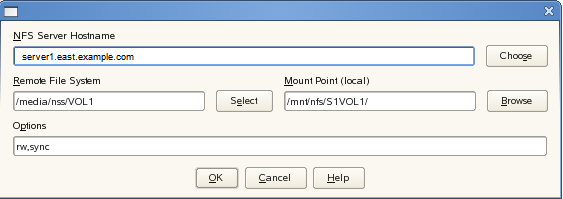
In , specify the remote server where the volume resides. Type the fully distinguished name (such as servername.ou_context.o_context.com), or click , select the NFS server from a list of servers, then click .
-
In , specify the path on the remote server where the volume resides. Type the full path such as /media/nss/VOL1, or click to open the Exported Directories dialog box, then select the path from the list of NFS exported directories on the selected server, then click .
-
In , specify the path on the server (the NFS Client location) where you want to mount the remote volume, such as /mnt/nfs/volumename, or click to locate and select the location.
The option allows you to create a new folder on the server for the target path.
-
Enter the following required mount options:
rw,sync
You can optionally specify the noatime option. For information, see Table 18-3 and the mount(8) man page.
-
Click to save your settings and return to the page.
The entry you just made should appear in the list.

-
When you are done adding volumes to be imported, continue with the next step.
-
-
On the page, click to apply the settings.