6.2 Installation Scenarios
DSfW can be installed in the following scenarios:
6.2.1 Installing DSfW in a Non-Name-Mapped Setup
Installing a Forest Root Domain
Prerequisites: Before proceeding with this non-name-mapped installation, review Installation Prerequisites For a Non-Name-Mapped Setup.
-
In the YaST install for OES from page, select pattern. Click .
Ensure that is selected along with .
Pattern deployment provides patterns for different services. Selecting a pattern automatically selects and installs its dependencies.
For information about the entire OES 2 Linux installation process, see the OES 2 SP3: Installation Guide.
-
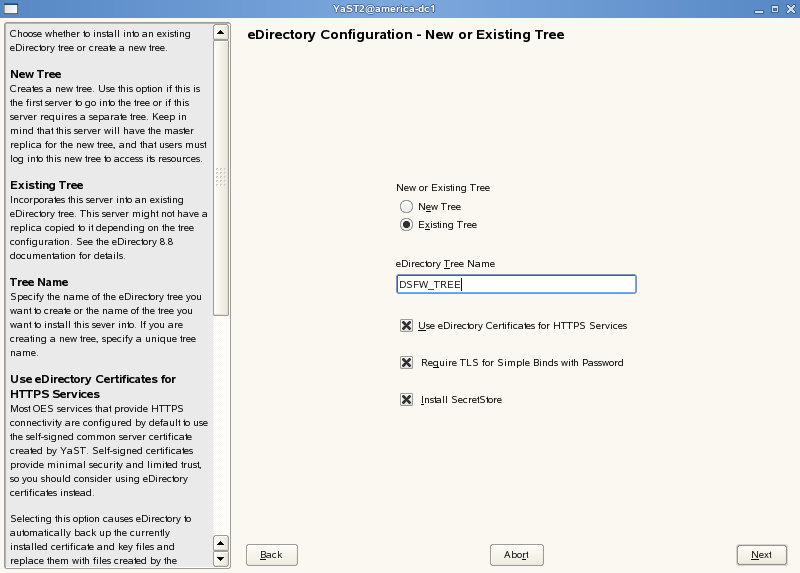
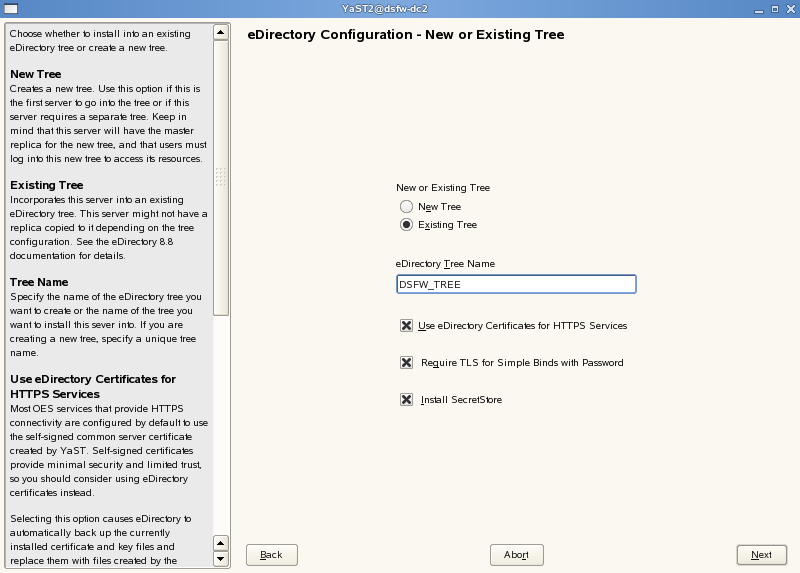
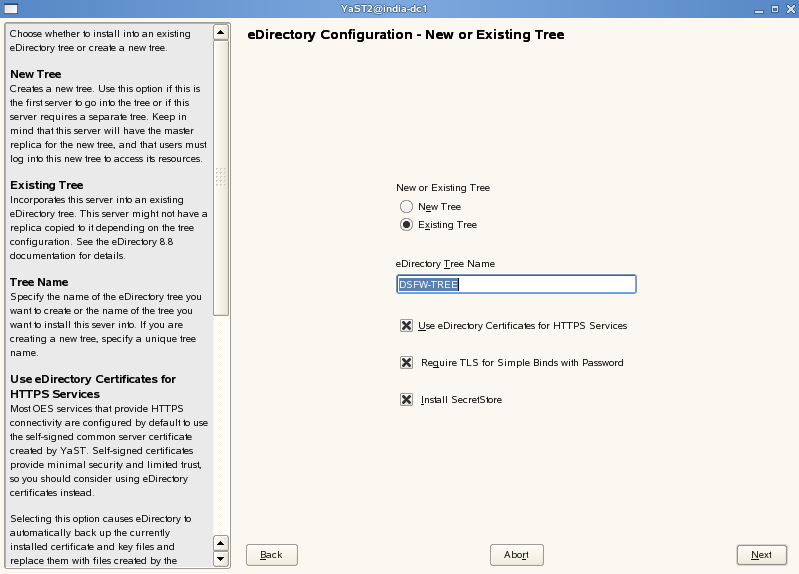
On the first eDirectory configuration page in YaST, select the option. This indicates that you are installing the first server in the tree:

-
Select and specify a name for the tree. For example, DSfW-TREE.
-
Select if you want your OES services that provide HTTPS connectivity to use the more secure eDirectory certificates instead of the self-signed certificates created by YaST. This option is selected by default.
-
Select theoption if you want to disallow clear passwords and other data.This option is selected by default.
-
Select if you want to eliminate the need to remember or synchronize all the multiple passwords required for accessing password-protected applications. This option is selected by default.
-
Click to continue.
-
-
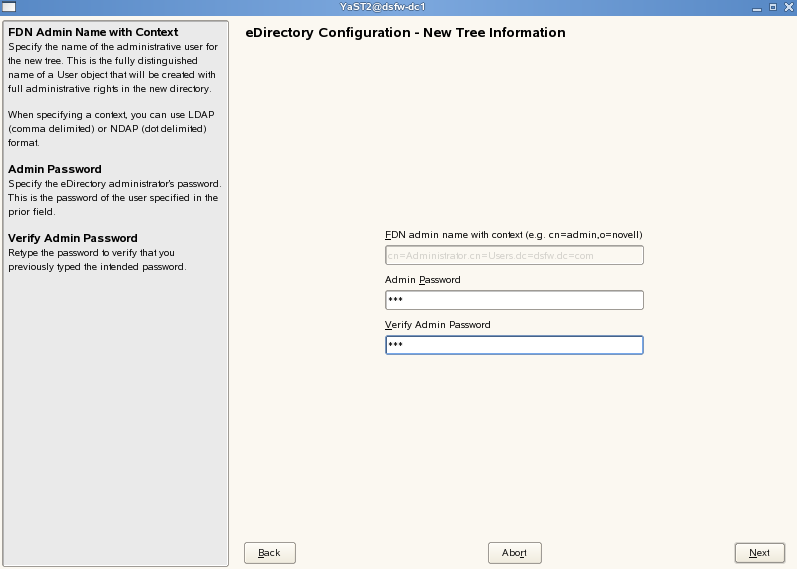
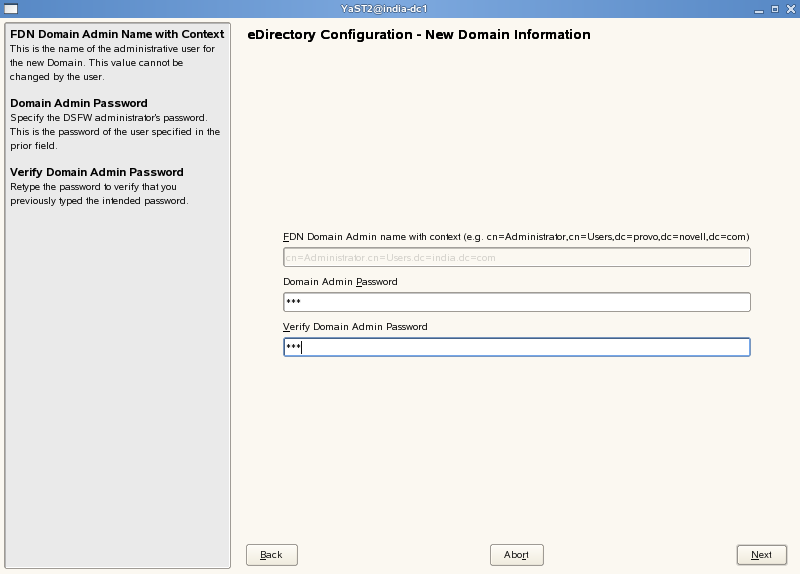
Specify the eDirectory administrator password in both fields, then click .
NOTE:The administrator name is hard-coded. However, after completing DSfW installation and configuration (post provisioning), you can modify administrator details such as the administrator name. For more information, see Section 8.2, Renaming Administrator Details Using MMC.
-
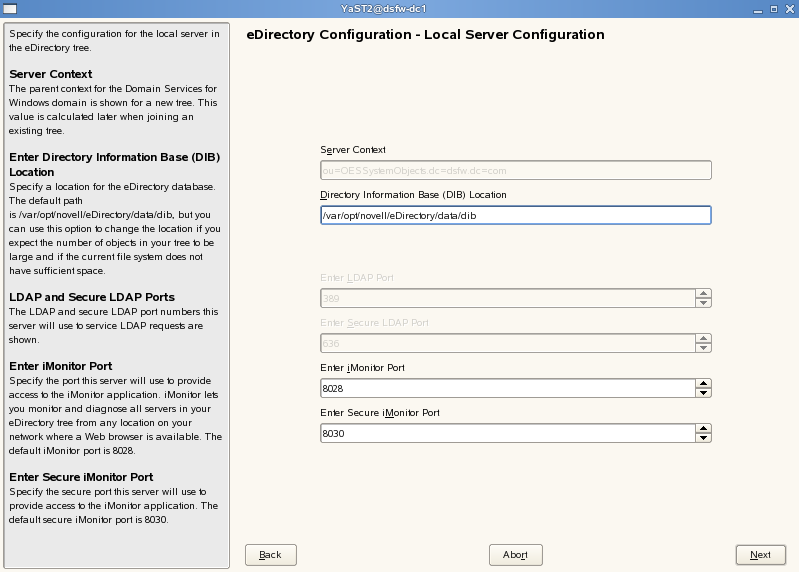
Specify the settings to configure the local server in the eDirectory tree.
-
Leave the location of the Directory Information Base (DIB) at the default setting.
-
Leave the settings at the defaults unless you need to change them to avoid port conflicts with other services.
-
Leave the settings at the defaults unless you need to change them to avoid port conflicts with other services.
-
Click to continue.
-
-
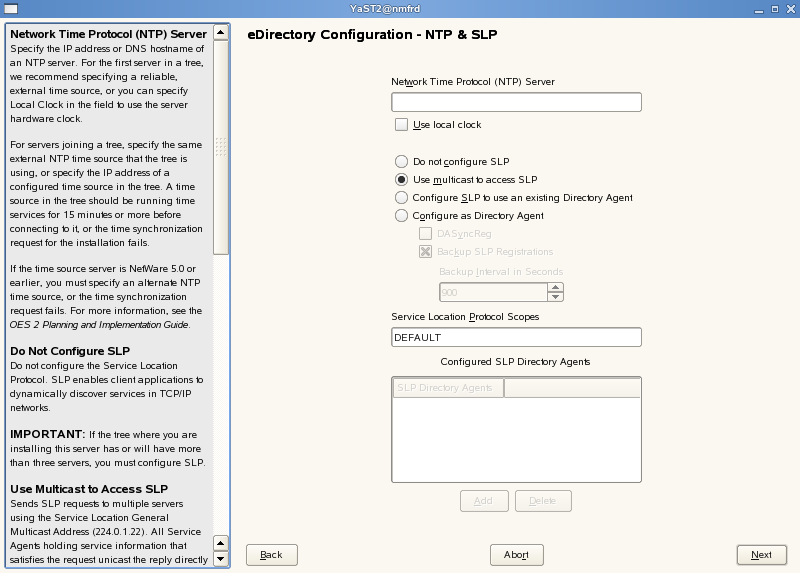
Specify details for NTP and SLP.
-
Specify a reliable Network Time Protocol (NTP) provider. Novell eDirectory requires that all servers in a tree be time-synchronized. In a single-server scenario, you can specify the local machine as the NTP provider.
-
Specify details to configure SLP:
-
If you do not want to configure the Service Location Protocol, select the option.
-
Select the option to request SLP information using multicast packet.
-
If you have more than three servers in your eDirectory tree, and you already have a Directory Agent running, select theoption.
-
Select the option if you want the local server to act as a directory agent.
-
Select the check box to enable SLP to query statically configured directory agents for registrations.
-
Select the Backup SLP Registrations check box to enable periodical backup of all registrations. In the field, specify the time interval (seconds) to perform the backup.
-
-
-
Click
-
-
Select the authentication service you want to install.
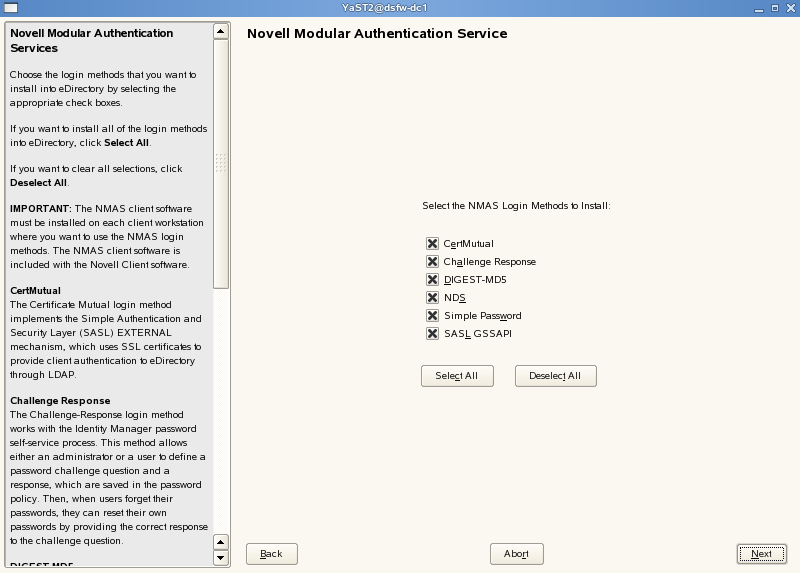
Click .
-
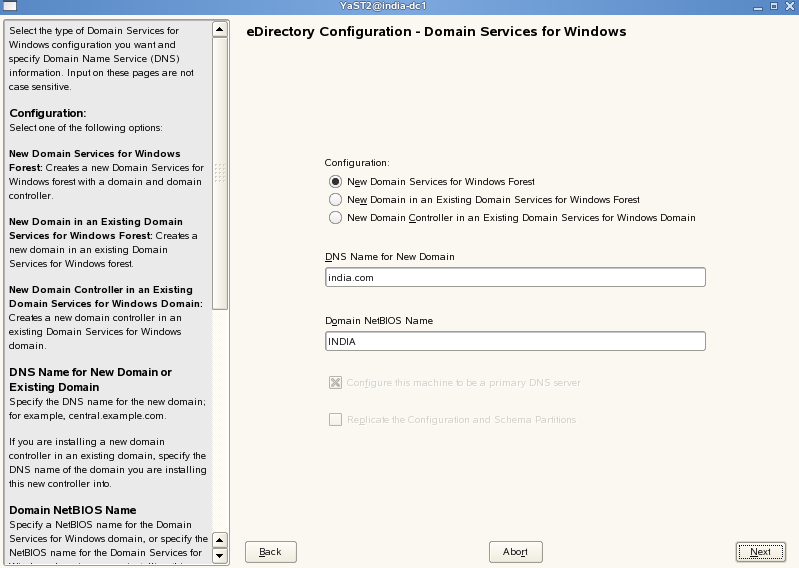
Specify details to configure DSfW on eDirectory.

-
Select the option. This indicates that you are installing a new DSfW forest.
-
The is by default taken from the entry in the /etc/hosts file. In case you need to change the domain name, make sure you follow the instructions in Domain Name and Name Server Configuration is Correct.
-
We recommend you to leave the NetBIOS name setting at the default, then click to continue.
For more information, see Section 5.11, Limitations
-
Click to continue.
-
-
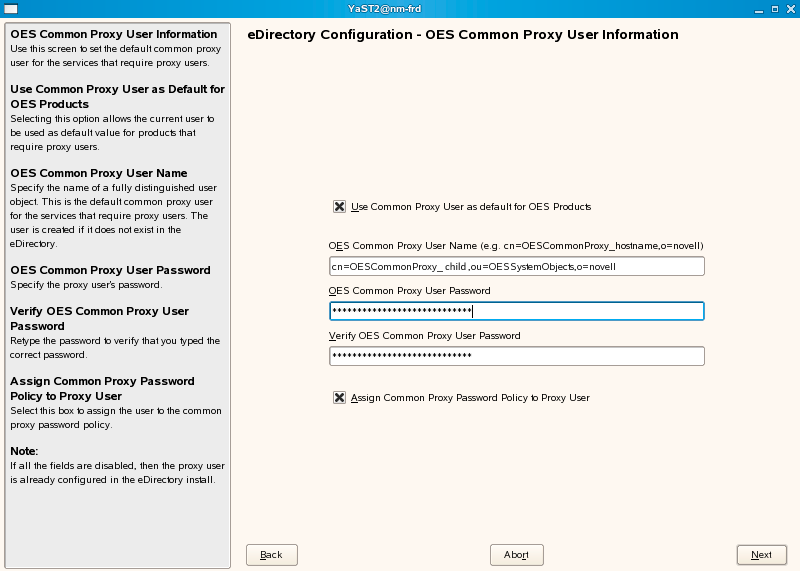
Specify common proxy details.

-
To use common proxy for DSfW, select the check box. When this check box is selected, the OES Common Proxy User Name and Password fields get enabled. These fields are populated with system generated user name and password. However, you can change these values. To change these values see Step 8.b.
or
If you do not want to use common proxy, clear the check box and click . Then continue with Step 9.
-
Specify the following information:
-
Common proxy user name in field. You must specify a fully distinguished name.
-
Proxy user password in field.
-
Retype the password in the field.
-
-
To assign common proxy password policy to proxy user, select the check box.
-
Click to continue.
-
-
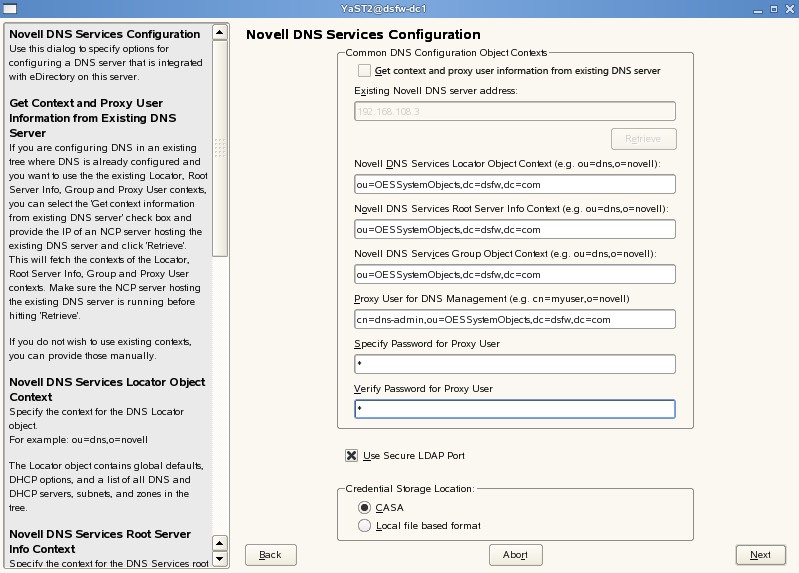
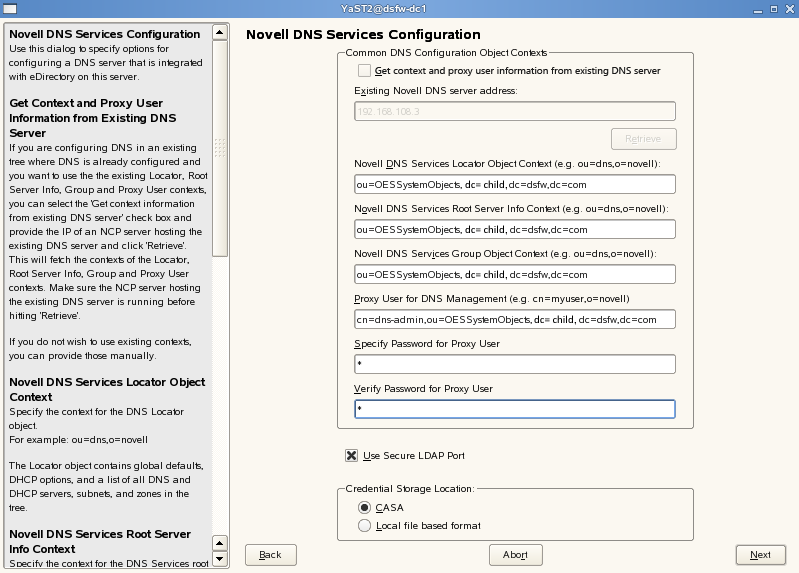
Specify details to configure the DNS server.
-
Specify the following information:
-
Specify the context of the DNS service locator object (for example, ou=OESSystemObjects,dc=dsfw,dc=com).
-
Specify the context of the DNS Root ServerInfo object (for example, ou=OESSystemObjects,dc=dsfw,dc=com).
-
Specify the context of the DNS Services Group object (for example, ou=OESSystemObjects,dc=dsfw,dc=com).
-
-
Specify the fully distinguished, typeful name of the proxy user that will be used for DNS Management. For example: cn=dns-admin,dc=dsfw,dc=com to authenticate to eDirectory during runtime for accessing information for DNS. The user must have eDirectory read, write, and browse rights under the specified context.
-
Specify the password of the proxy user that you specified for accessing DNS.
NOTE:If you have selected the check box in Step 8.a, then the proxy user and password fields are populated with common proxy user name and password.
-
option is selected by default to ensure that the data transferred by this service is secure and private. If you deselect this option, the data transferred is in clear text format.
-
Specify the as CASA.
-
Click to continue.
-
-
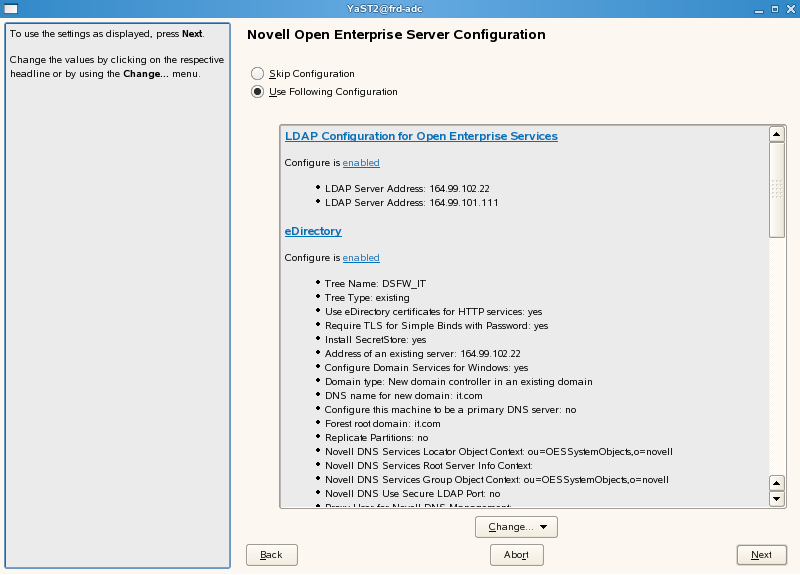
After the installation is completed, the OES Configuration Summary page is displayed. Review the settings made earlier. Click
-
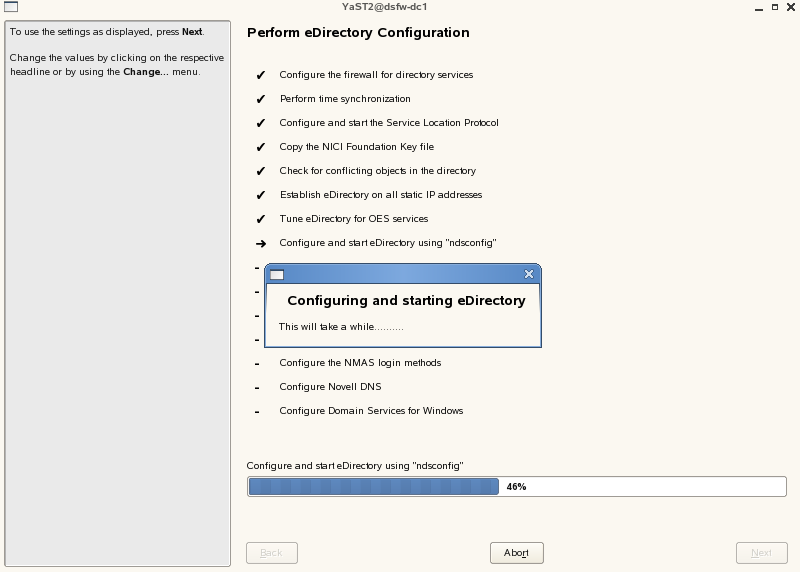
This starts the DSfW installation.When the installation is complete, click .
This completes the process of DSfW installation. But the server is not ready for use till you complete configuring DSfW and the supporting services through the process of provisioning.

-
To start provisioning, do one of the following:
-
From the terminal, run the /opt/novell/xad/sbin/provision_dsfw.sh script.
-
Launch YaST. The DSfW Provisioning Wizard is listed as an option.
To authenticate, enter the password of the current domain.
For more details on Provisioning, see Provisioning Domain Services for Windows
-
-
The DSfW server is now ready for use. Verify that eDirectory and DSfW have been installed and configured correctly by executing the instructions in Section 8.0, Activities After DSfW Installation or Provisioning.
Installing a Child Domain
Prerequisites: Before proceeding with this non-name-mapped installation, review Installation Prerequisites For a Non-Name-Mapped Setup.
-
In the YaST install for OES from page, select pattern. Click .
Ensure that is selected along with .
Pattern deployment provides patterns for different services. Selecting a pattern automatically selects and installs its dependencies.
For information about the entire OES 2 Linux installation process, see the OES 2 SP3: Installation Guide.
-
On the eDirectory configuration page in YaST, select the option. This indicates that you are installing the server into an existing eDirectory tree:
-
Select and specify the name of the tree. For example, DSFW_TREE.
-
Select if you want your OES services that provide HTTPS connectivity to use the more secure eDirectory certificates instead of the self-signed certificates created by YaST.
-
Select the option if you want to disallow clear passwords and other data.
-
Select if you want to eliminate the need to remember or synchronize all the multiple passwords required for accessing password-protected applications.
-
Click to continue.
-
-
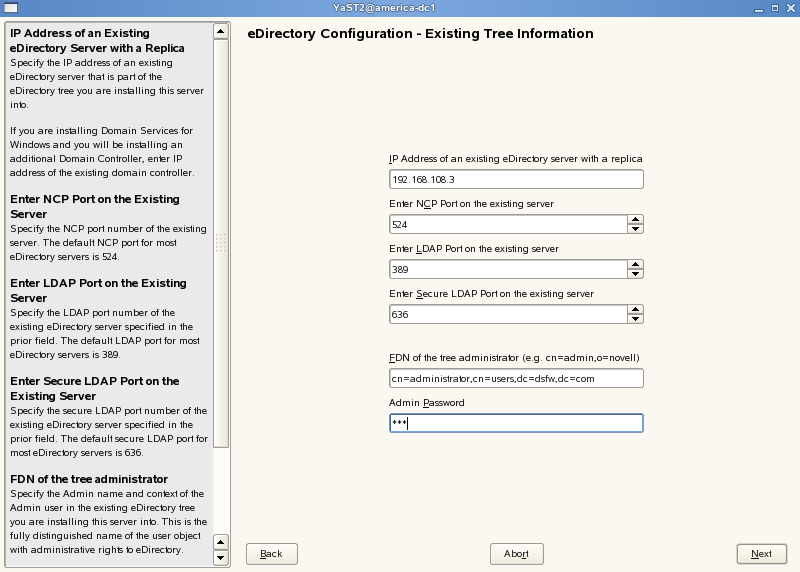
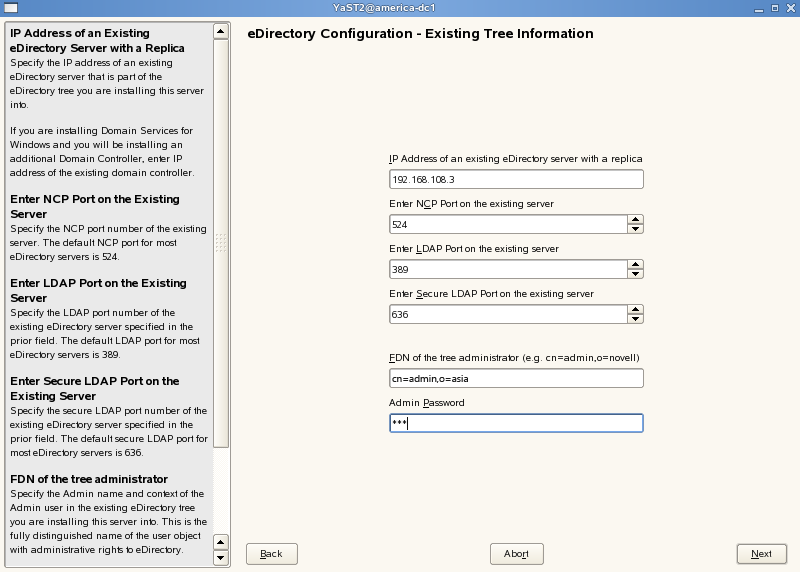
Specify information to access the existing eDirectory Tree.
-
Specify the IP address of the Forest Root Domain.
-
Do not change the NCP Port, LDAP Port and Secure LDAP Port information.
-
Specify the tree admin credentials for the administrator to log into the eDirectory tree.
-
Click .
-
-
Select the settings for the local server configuration:
-
Leave the location of the Directory Information Base (DIB) at the default setting.
-
Leave the iMonitor port settings at the defaults unless you need to change them to avoid port conflicts with other services.
-
Leave the Secure iMonitor Port settings at the defaults unless you need to change them to avoid port conflicts with other services.
-
Click to continue.
-
-
Specify details for NTP and SLP.
-
Specify a reliable Network Time Protocol (NTP) provider. Novell eDirectory requires that all servers in a tree be time-synchronized. In a single-server scenario, you can specify the local machine as the NTP provider.
-
Specify details to configure SLP:
-
If you do not want to configure the Service Location Protocol, select the option.
-
Select the option to request SLP information using multicast packet.
-
If you have more than three servers in your eDirectory tree, and you already have a Directory Agent running, select theoption.
-
Select the option if you want the local server to act as a directory agent.
-
Select the check box to enable SLP to query statically configured directory agents for registrations.
-
Select the Backup SLP Registrations check box to enable periodical backup of all registrations. In the field, specify the time interval (seconds) to perform the backup.
-
-
-
Click
-
-
Select the authentication service you want to install.
-
Click .
-
-
Specify details to configure DSfW on eDirectory.
-
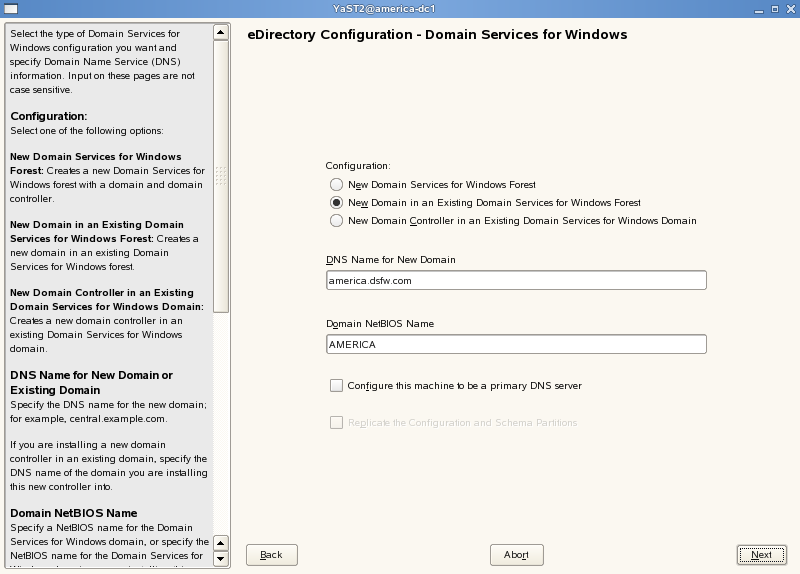
Select the option. This indicates that you are installing a new domain in an existing DSfW forest.
-
The is by default taken from the entry in the /etc/hosts file. In case you need to change the domain name, make sure you follow the instructions in Domain Name and Name Server Configuration is Correct.
-
Select if you want the machine being configured to function as a DNS server.
IMPORTANT:If you want to configure the child domain controller to act as a primary DNS server, ensure the DNS servers of the forest root domain and the child domain controller act as passive primary DNS servers of each other's zones, else the installation of an subsequent domain controller to the child domain controller fails.
Also make sure you configure the forward lookup zone and the reverse lookup zone for this DNS server. For more information, see
Zone Management
in the OES 2 SP3: Novell DNS/DHCP Administration Guide. -
We recommend you to leave the NetBIOS name setting at the default, then click to continue.
For more information, see Section 5.11, Limitations
-
Click to continue.
-
-
Specify the name of the forest root domain in which you want to create the child domain.

-
Specify the IP address of the parent domain, the administrator name and password.
NOTE:The is hard-coded. However, after completing DSfW installation and configuration (post provisioning), you can modify administrator details such as the administrator name. For more information, see Section 8.2, Renaming Administrator Details Using MMC.

-
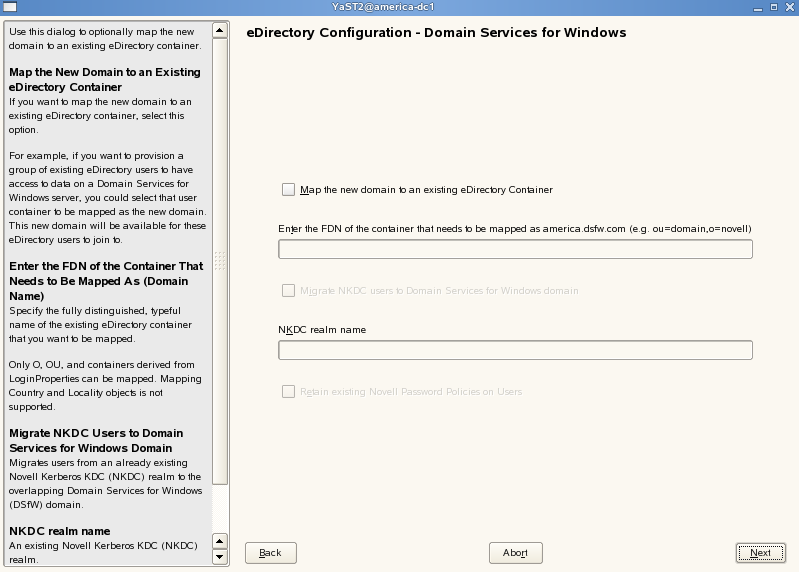
This screen is used when you need to map a new domain to an existing eDirectory container. As this is a non-name-mapped installation scenario, click to skip this screen.
NOTE:This screen is not displayed if the child domain is installed when the parent domain is on OES2 SP3.
-
Specify common proxy details.
-
To use common proxy for DSfW, select the check box. When this check box is selected, the OES Common Proxy User Name and Password fields get enabled. These fields are populated with system generated user name and password. However, you can change these values. To change these values see Step 11.b.
or
If you do not want to use common proxy, clear the check box and click . Then continue with Step 13.
-
Specify the following information:
-
Common proxy user name in field. You must specify a fully distinguished name.
-
Proxy user password in field.
-
Retype the password in the field.
-
-
To assign common proxy password policy to proxy user, select the check box.
-
Click to continue.
-
-
This screen is displayed if you have not selected the check box in Step 7.c. If you have selected this check box, continue with step Step 13.

-
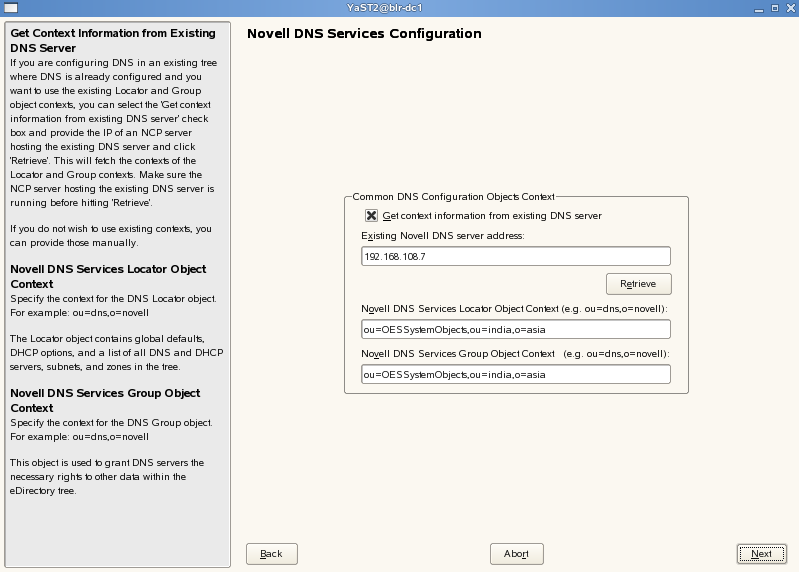
If you already have an DNS server configured in your tree, select the option and provide the IP address of an existing DNS server and select .
This will fetch the contexts of the existing Locator and Group objects. If you do not wish to use the existing contexts, you can manually enter the details.
-
Specify the context of the DNS Locator object.
-
Specify the context of the DNS Group object.
Click and proceed with Step 14.
-
-
Specify details to configure the DNS server.
-
If you are configuring DNS in an existing tree where DNS is already configured, select the check box. Specify the IP address of an NCP server hosting the existing DNS server and click . This will fetch the contexts of the Locator, Root Server Info, Group, and Proxy User contexts. However, the proxy user password is not retrieved. Therefore, you must first retrieve the proxy user password and then specify the password manually in the proxy user password field. To retrieve the proxy user password, run the following command from the existing novell DNS server:
/opt/novell/proxymgmt/bin/cp_retrieve_proxy_cred password
-
Specify the following information:
-
Specify the context of the DNS service locator object (for example, ou=OESSystemObjects,dc=dsfw,dc=com).
-
Specify the context of the DNS Root ServerInfo object (for example, ou=OESSystemObjects,dc=dsfw,dc=com).
-
Specify the context of the DNS Services Group object (for example, ou=OESSystemObjects,dc=dsfw,dc=com).
-
-
Specify the fully distinguished, typeful name of the proxy user that will be used for DNS Management. For example: cn=dns-admin,dc=dsfw,dc=com to authenticate to eDirectory during runtime for accessing information for DNS. The user must have eDirectory read, write, and browse rights under the specified context.
-
Specify the password of the proxy user that you specified for accessing DNS.
NOTE:If you have selected the check box in Step 11.a, then the proxy user and password fields are populated with common proxy user name and password.
-
option is selected by default to ensure that the data transferred by this service is secure and private. If you deselect this option, the data transferred is in clear text format.
-
Specify the as CASA.
-
Click to continue.
-
-
After the installation is completed, the OES Configuration Summary page is displayed. Review the settings made earlier. Click .
-
This starts the DSfW installation.When the installation is complete, click .
This completes the process of DSfW installation. But the server is not ready for use till you complete configuring DSfW and the supporting services through the process of provisioning.
-
To start provisioning, do one of the following: For details on Provisioning, see
-
From the terminal, run the /opt/novell/xad/sbin/provision_dsfw.sh script.
-
Launch YaST. The DSfW Provisioning Wizard is listed as an option.
To authenticate, enter the password of the current domain, the parent domain and the tree admin.
For more details on Provisioning, see Provisioning Domain Services for Windows.
-
-
The DSfW server is now ready for use. Verify that eDirectory and DSfW have been installed and configured correctly by executing the instructions in Section 8.0, Activities After DSfW Installation or Provisioning.
Installing DSfW as a Subsequent Domain Controller in a Domain
Prerequisites: Before proceeding with this non-name-mapped installation, review Installation Prerequisites For a Non-Name-Mapped Setup.
-
In the YaST install for OES from page, select pattern. Click .
Ensure that is selected along with .
Pattern deployment provides patterns for different services. Selecting a pattern automatically selects and installs its dependencies.
For information about the entire OES 2 Linux installation process, see the OES 2 SP3: Installation Guide.
-
On the first eDirectory configuration page in YaST, select the option. This indicates that you are installing the server into an existing eDirectory tree.
-
Select and specify the name of the tree. For example, DSfW-TREE.
-
Select if you want your OES services that provide HTTPS connectivity to use the more secure eDirectory certificates instead of the self-signed certificates created by YaST.
-
Select the option if you want to disallow clear passwords and other data.
-
Select if you want to eliminate the need to remember or synchronize all the multiple passwords required for accessing password-protected applications.
-
Click to continue.
-
-
Specify information to access the existing eDirectory Tree.
-
Specify the IP Address of the Forest Root domain.
-
Do not change the NCP Port, LDAP Port and Secure LDAP Port information.
-
Specify the tree admin credentials for the administrator to log into the eDirectory tree.
-
Click .
-
-
Specify the configuration for the local server in the eDirectory tree
-
Leave the location of the at the default setting.
-
Leave the settings at the defaults unless you need to change them to avoid port conflicts with other services.
-
Leave the settings at the defaults unless you need to change them to avoid port conflicts with other services.
-
Click to continue.
-
-
Specify details for NTP and SLP.
-
Specify a reliable Network Time Protocol (NTP) provider. Novell eDirectory requires that all servers in a tree be time-synchronized. In a single-server scenario, you can specify the local machine as the NTP provider.
-
Specify details to configure SLP:
-
If you do not want to configure the Service Location Protocol, select the option.
-
Select the option to request SLP information using multicast packet.
-
If you have more than three servers in your eDirectory tree, and you already have a Directory Agent running, select theoption.
-
Select the option if you want the local server to act as a directory agent.
-
Select the check box to enable SLP to query statically configured directory agents for registrations.
-
Select the Backup SLP Registrations check box to enable periodical backup of all registrations. In the field, specify the time interval (seconds) to perform the backup.
-
-
-
Click
-
-
Select the authentication service you want to install.
-
Click .
-
-
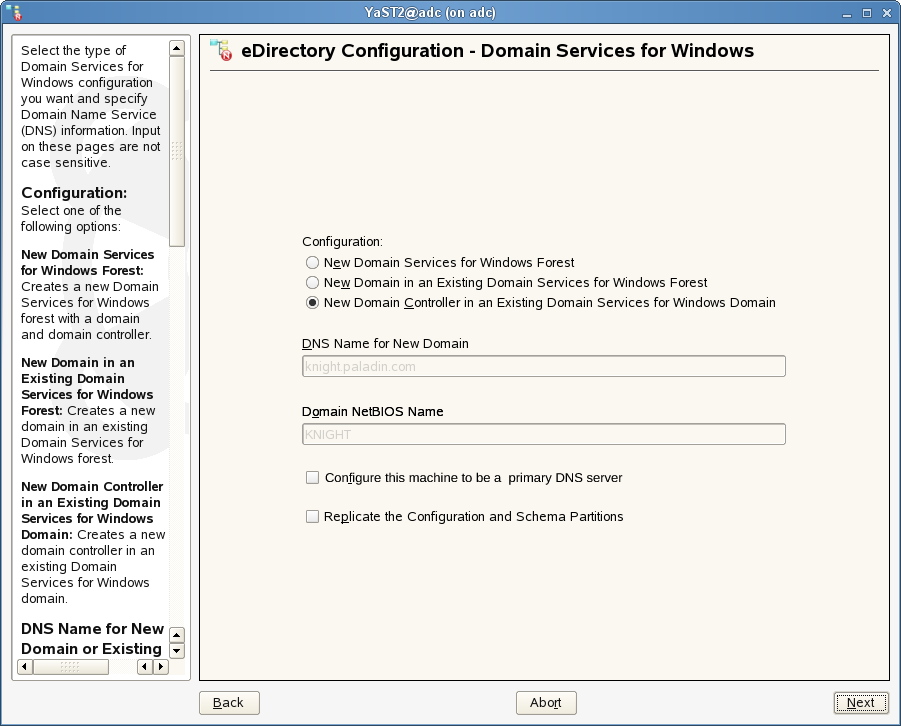
Specify details to configure DSfW on eDirectory
-
Select the option. This indicates that you are installing a new DSfW forest.
-
Select if you want the machine being configured to function as a DNS server.
IMPORTANT:If you want to configure DNS on an additional domain controller in a domain that already has a parent or a child domain, you must ensure that the additional domain controller’s DNS server and the parent or child domain's DNS server act as passive primary DNS server for each other's zones. This ensures that the additional domain controller is resolved from a parent or child domain's DNS server and the parent or child domain is resolved from the additional domain controller.
Also, make sure you configure the forward lookup zone and the reverse lookup zone for this DNS server. For more information, see
Zone Management
in the OES 2 SP3: Novell DNS/DHCP Administration Guide. -
The configuration partition is forest-specific and by default the first domain controller of every domain gets a replica. The subsequent domain gets the replica of this partition if you select the option.
NOTE:We recommend that you select this option to replicate the schema and configuration partition to the subsequent domain controller
-
-
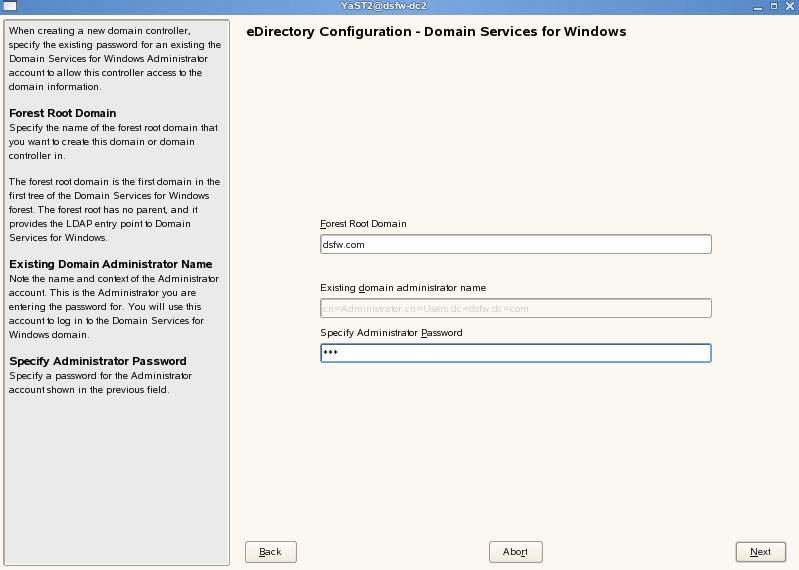
Specify administrator name and forest root domain details.
-
Specify the name of the forest root domain in which you want to create the domain controller.
-
Specify the password for the domain administrator.
-
Click .
-
-
Specify common proxy details.

-
To use common proxy for DSfW, select the check box. When this check box is selected, the OES Common Proxy User Name and Password fields get enabled. These fields are populated with system generated user name and password. However, you can change these values. To change these values see Step 9.b.
or
If you do not want to use common proxy, clear the check box and click . Then continue with Step 11.
-
Specify the following information:
-
Common proxy user name in field. You must specify a fully distinguished name.
-
Proxy user password in field.
-
Retype the password in the field.
-
-
To assign common proxy password policy to proxy user, select the check box.
-
Click to continue.
-
-
This screen is displayed if you have not selected the check box in Step 7.b. If you have selected this check box, continue with step Step 11.
-
If you already have an DNS server configured in your tree, select the option and provide the IP address of an existing DNS server and select .
This will fetch the contexts of the existing Locator and Group objects. If you do not wish to use the existing contexts, you can manually enter the details.
-
Specify the context of the DNS Locator object.
-
Specify the context of the DNS Group object.
Click and proceed with Step 12.
-
-
Specify details to configure the DNS server.
-
If you are configuring DNS in an existing tree where DNS is already configured, select the check box. Specify the IP address of an NCP server hosting the existing DNS server and click . This will fetch the contexts of the Locator, Root Server Info, Group, and Proxy User contexts. However, the proxy user password is not retrieved. Therefore, you must first retrieve the proxy user password and then specify the password manually in the proxy user password field. To retrieve the proxy user password, run the following command from the existing novell DNS server:
/opt/novell/proxymgmt/bin/cp_retrieve_proxy_cred password
-
Specify the following information:
-
Specify the context of the DNS service locator object (for example, ou=OESSystemObjects,dc=dsfw,dc=com).
-
Specify the context of the DNS Root ServerInfo object (for example, ou=OESSystemObjects,dc=dsfw,dc=com).
-
Specify the context of the DNS Services Group object (for example, ou=OESSystemObjects,dc=dsfw,dc=com).
-
-
Specify the fully distinguished, typeful name of the proxy user that will be used for DNS Management. For example: cn=dns-admin,dc=dsfw,dc=com to authenticate to eDirectory during runtime for accessing information for DNS. The user must have eDirectory read, write, and browse rights under the specified context.
-
Specify the password of the proxy user that you specified for accessing DNS.
NOTE:If you have selected the check box in Step 9.a, then the proxy user and password fields are populated with common proxy user name and password.
-
option is selected by default to ensure that the data transferred by this service is secure and private. If you deselect this option, the data transferred is in clear text format.
-
Specify the as CASA.
-
Click to continue.
-
-
After the installation is completed, the OES Configuration Summary page is displayed. Review the settings made earlier. Click .
-
This starts the DSfW installation.When the installation is complete, click .
This completes the process of DSfW installation. But the server is not ready for use till you complete configure DSfW and the supporting services through the process of provisioning.
-
To start provisioning, do one of the following:
-
From the terminal, run the /opt/novell/xad/sbin/provision_dsfw.sh script.
-
Launch YaST. The DSfW Provisioning Wizard is listed as an option.
To authenticate, enter the password of the current domain.
For more details on Provisioning, see Provisioning Domain Services for Windows
-
-
The DSfW server is now ready for use. Verify that eDirectory and DSfW have been installed and configured correctly by executing the instructions in Section 8.0, Activities After DSfW Installation or Provisioning.
6.2.2 Installing DSfW in a Name-Mapped Setup
Installing a Forest Root Domain
Prerequisites: Before proceeding with this name-mapped installation, review Installation Prerequisites for a Name-Mapped Setup
-
In the YaST install for OES from page, select Novell Domain Services for Windows pattern. Click .
Ensure that is selected along with .
Pattern deployment provides patterns for different services. Selecting a pattern automatically selects and installs its dependencies.
For information about the entire OES 2 Linux installation process, see the OES 2 SP3: Installation Guide.
-
On the eDirectory configuration page in YaST, select the option. This indicates that you are installing the server into an existing eDirectory tree:
-
Select and specify the name of the tree. For example, DSFW-TREE.
-
Select if you want your OES services that provide HTTPS connectivity to use the more secure eDirectory certificates instead of the self-signed certificates created by YaST.
-
Select the option if you want to disallow clear passwords and other data.
-
Select if you want to eliminate the need to remember or synchronize all the multiple passwords required for accessing password-protected applications.
-
Click to continue.
-
-
Specify information to access the existing eDirectory Tree.
-
Specify the IP address of the existing eDirectory server.
-
Do not change the NCP Port, LDAP Port and Secure LDAP Port information. However, if the administrator has configured existing eDirectory server with non-default ports then the installation will fail.
-
Specify the tree admin credentials for the administrator to log into the eDirectory tree.
-
Click .
-
-
Select the settings for the local server configuration:
-
Leave the location of the Directory Information Base (DIB) at the default setting.
-
Leave the iMonitor port settings at the defaults unless you need to change them to avoid port conflicts with other services.
-
Leave the Secure iMonitor Port settings at the defaults unless you need to change them to avoid port conflicts with other services.
-
Click to continue.
-
-
Specify details for NTP and SLP.
-
Specify a reliable Network Time Protocol (NTP) provider. Novell eDirectory requires that all servers in a tree be time-synchronized. In a single-server scenario, you can specify the local machine as the NTP provider.
-
Specify details to configure SLP:
-
If you do not want to configure the Service Location Protocol, select the option.
-
Select the option to request SLP information using multicast packet.
-
If you have more than three servers in your eDirectory tree, and you already have a Directory Agent running, select theoption.
-
Select the option if you want the local server to act as a directory agent.
-
Select the check box to enable SLP to query statically configured directory agents for registrations.
-
Select the Backup SLP Registrations check box to enable periodical backup of all registrations. In the field, specify the time interval (seconds) to perform the backup.
-
-
-
Click
-
-
Select the authentication service you want to install.
-
Click .
-
-
Specify details to configure DSfW on eDirectory.
-
Select the option. This indicates that you are installing a DSfW server in an existing forest.
-
The is by default taken from the entry in the /etc/hosts file. In case you need to change the domain name, make sure you follow the instructions in Domain Name and Name Server Configuration is Correct.
-
We recommend you to leave the NetBIOS name setting at the default, then click to continue.
For more information, see Section 5.11, Limitations
-
Click to continue.
-
-
Specify the password for the domain administrator in both fields, then click .
NOTE:The administrator name is hard-coded. However, after completing DSfW installation and configuration (post provisioning), you can modify administrator details such as the administrator name. For more information, see Section 8.2, Renaming Administrator Details Using MMC.
-
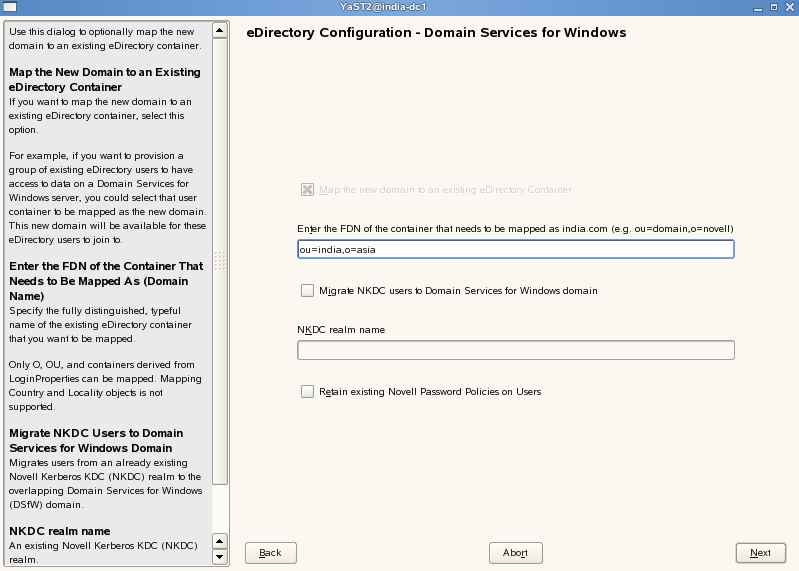
Specify details to map the existing eDirectory container to the new domain.
IMPORTANT:A DSfW domain can only be created in Organization (O), Organizational Unit (OU) and Domain Component (DC) containers. Installing a name-mapped domain to map Country and Locality containers is not supported. However, you can map O and OU under these containers.
-
Enter the Fully Qualified Domain Name of the existing eDirectory container that you want to be mapped to the new domain.
NOTE:The container that is being mapped should be partitioned.
-
Select thoption if you want to migrate the users from existing Novell KDC realm to DSfW domain. This facilitates the migration of existing eDirectory users who are using Novell KDC to the DSfW domain users keeping Novell KDC security identities (security principals and policies) intact. After the migration, the existing eDirectory users continue to use their own security settings in DSfW kerberos environment.
-
Specify the name of the from where you want to migrate the users to DSfW domain.
-
If you select the option the password policies assigned to the users within the container that is mapped to the new domain does not change. However the password policies outside the partition boundary is not carried forward. You need to create a fresh password policy assigned to the partition root. For details on creating a fresh password policy, see Creating Password Policies
-
-
Specify common proxy details.
-
To use common proxy for DSfW, select the check box. When this check box is selected, the OES Common Proxy User Name and Password fields get enabled. These fields are populated with system generated user name and password. However, you can change these values. To change these values see Step 10.b.
or
If you do not want to use common proxy, clear the check box and click . Then continue with Step 11.
-
Specify the following information:
-
Common proxy user name in field. You must specify a fully distinguished name.
-
Proxy user password in field.
-
Retype the password in the field.
-
-
To assign common proxy password policy to proxy user, select the check box.
-
Click to continue.
-
-
Specify details to configure the DNS server.

-
Specify the following information:
-
Specify the context of the DNS service locator object (for example, ou=OESSystemObjects,dc=dsfw,dc=com).
-
Specify the context of the DNS Root ServerInfo object (for example, ou=OESSystemObjects,dc=dsfw,dc=com).
-
Specify the context of the DNS group object (for example, ou=OESSystemObjects,dc=dsfw,dc=com).
-
-
Specify the fully distinguished, typeful name of the proxy user that will be used for DNS Management. For example: cn=dns-admin,dc=dsfw,dc=com to authenticate to eDirectory during runtime for accessing information for DNS. The user must have eDirectory read, write, and browse rights under the specified context.
-
Specify the password of the eDirectory user that you specified for accessing DNS.
NOTE:If you have selected the check box in Step 10.a, then the proxy user and password fields are populated with common proxy user name and password.
-
option is selected by default to ensure that the data transferred by this service is secure and private. If you deselect this option, the data transferred is in clear text format.
-
Specify the as CASA.
-
Click to continue.
-
-
After the installation is completed, the OES Configuration Summary page is displayed. Review the settings made earlier. Click .
-
This starts the DSfW installation.When the installation is complete, click .
This completes the process of DSfW installation. But the server is not ready for use till you complete configure DSfW and the supporting services through the process of provisioning.
-
To start provisioning, do one of the following:
-
From the terminal, run the /opt/novell/xad/sbin/provision_dsfw.sh script.
-
Launch YaST. The DSfW Provisioning Wizard is listed as an option.
To authenticate, enter the password of the current domain and the tree admin.
For more details on Provisioning, see Provisioning Domain Services for Windows
-
-
The DSfW server is now ready for use. Verify that eDirectory and DSfW have been installed and configured correctly by executing the instructions in Section 8.0, Activities After DSfW Installation or Provisioning.
Installing a Child Domain
Prerequisites: Before proceeding with this name-mapped installation, review Installation Prerequisites for a Name-Mapped Setup
-
In the YaST install for OES from page, select pattern. Click .
Ensure that is selected along with .
Pattern deployment provides patterns for different services. Selecting a pattern automatically selects and installs its dependencies.
For information about the entire OES 2 Linux installation process, see the OES 2 SP3: Installation Guide.
-
On the first eDirectory configuration page in YaST, select the option. This indicates that you are installing the server into an existing eDirectory tree:

-
Select Existing Tree and specify the name of the tree. For example, DSfW-TREE.
-
Select if you want your OES services that provide HTTPS connectivity to use the more secure eDirectory certificates instead of the self-signed certificates created by YaST.
-
Select the option if you want to disallow clear passwords and other data.
-
Select if you want to eliminate the need to remember or synchronize all the multiple passwords required for accessing password-protected applications.
-
Click to continue.
-
-
Specify the existing eDirectory configuration details.
-
Specify the IP address of the Forest Root domain.
-
Do not change the NCP Port, LDAP Port and Secure LDAP Port information.
-
Specify the existing tree admin credentials.
-
Click
-
-
Specify the configuration for the local server in the eDirectory tree
-
Leave the location of the Directory Information Base (DIB) at the default setting.
-
Leave the settings at the defaults unless you need to change them to avoid port conflicts with other services.
-
Leave the settings at the defaults unless you need to change them to avoid port conflicts with other services.
-
Click to continue.
-
-
Specify details for NTP and SLP.
-
Specify a reliable Network Time Protocol (NTP) provider. Novell eDirectory requires that all servers in a tree be time-synchronized. In a single-server scenario, you can specify the local machine as the NTP provider.
-
Specify details to configure SLP:
-
If you do not want to configure the Service Location Protocol, select the option.
-
Select the option to request SLP information using multicast packet.
-
If you have more than three servers in your eDirectory tree, and you already have a Directory Agent running, select theoption.
-
Select the option if you want the local server to act as a directory agent.
-
Select the check box to enable SLP to query statically configured directory agents for registrations.
-
Select the Backup SLP Registrations check box to enable periodical backup of all registrations. In the field, specify the time interval (seconds) to perform the backup.
-
-
-
Click
-
-
Select the authentication service you want to install.
-
Click .
-
-
Specify details to configure DSfW on eDirectory.

-
Select the option. This indicates that you setting up a new domain in an existing DSfW forest.
-
The is by default taken from the entry in the /etc/hosts file. In case you need to change the domain name, make sure you follow the instructions in Domain Name and Name Server Configuration is Correct.
-
We recommend you to leave the NetBIOS name setting at the default, then click to continue.
For more information, see Section 5.11, Limitations
-
Select if you want the machine being configured to function as a DNS server.
IMPORTANT:If you want to configure the child domain controller to act as a primary DNS server, ensure the DNS servers of the forest root domain and the child domain controller act as passive primary DNS servers of each other's zones, else the installation of an subsequent domain controller to the child domain controller fails.
Also make sure you configure the forward lookup zone and the reverse lookup zone for this DNS server. For more information, see
Zone Management
in the OES 2 SP3: Novell DNS/DHCP Administration Guide. -
Click to continue.
-
-
Specify details to configure the DSfW server.
-
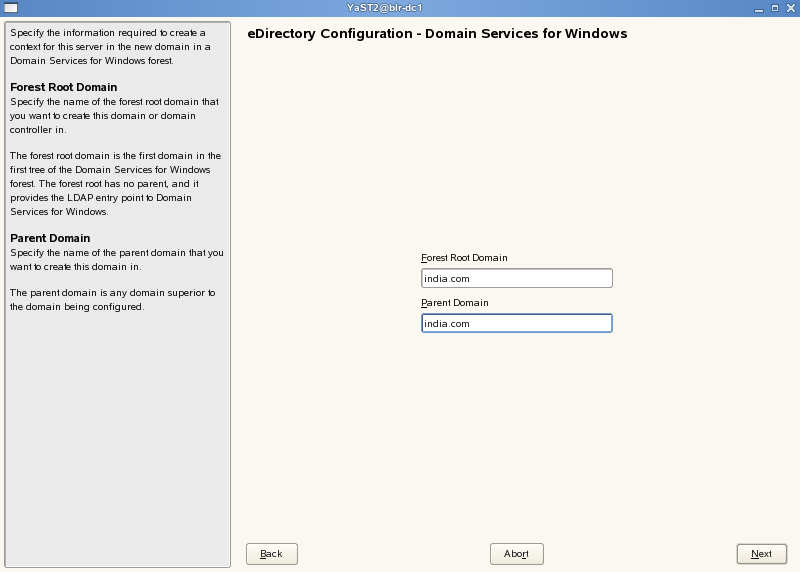
Specify the name of the Forest Root Domain in which you want to create the child domain.
-
Specify the parent domain in which you want to create the child domain.
-
Click .
-
-
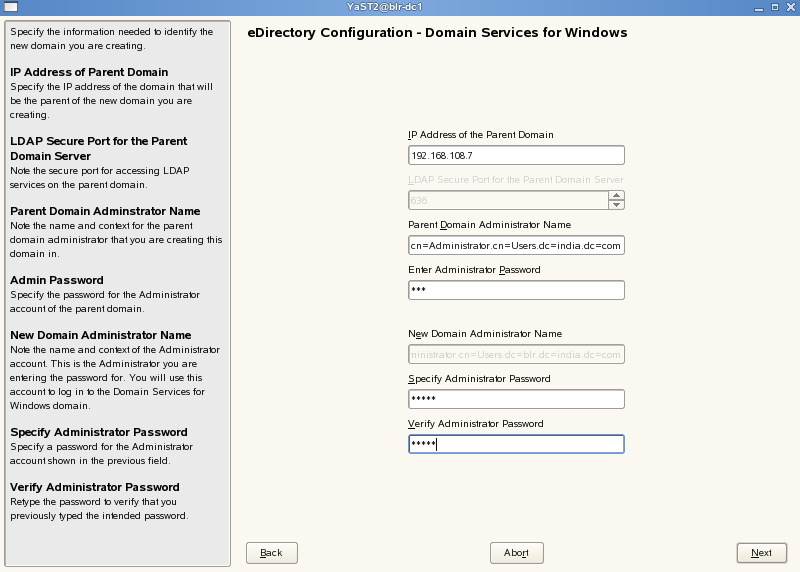
Specify the information needed to identify the child domain you are creating.
NOTE:The is hard-coded. However, after completing DSfW installation and configuration (post provisioning), you can modify administrator details such as the administrator name. For more information, see Section 8.2, Renaming Administrator Details Using MMC.
-
Specify the IP Address, name and context for the administrator of the parent domain.
-
Specify the password for the administrator of the new child domain. Retype the password to verify it.
-
Click .
-
-
Specify the information to map the new domain to an existing eDirectory container
IMPORTANT:A DSfW domain can only be created in Organization (O), Organizational Unit (OU) and Domain Component (DC) containers. Installing a name-mapped domain to map Country and Locality containers is not supported. However, you can map O and OU under these containers.
-
Select option.
-
Specify the fully distinguished typeful name of the existing eDirectory container
-
Specify the name of the realm where you have existing Kerberos users.
-
If you select the option the password policies assigned to the users within the container that is mapped to the new domain does not change. However the password policies outside the partition boundary is not carried forward. You need to create a fresh password policy assigned to the partition root. For details, see Creating Password Policies
-
Click .
-
-
Specify common proxy details.
-
To use common proxy for DSfW, select the check box. When this check box is selected, the OES Common Proxy User Name and Password fields get enabled. These fields are populated with system generated user name and password. However, you can change these values. To change these values see Step 11.b.
or
If you do not want to use common proxy, clear the check box and click . Then continue with Step 13.
-
Specify the following information:
-
Common proxy user name in field. You must specify a fully distinguished name.
-
Proxy user password in field.
-
Retype the password in the field.
-
-
To assign common proxy password policy to proxy user, select the check box.
-
Click to continue.
-
-
This screen is displayed if you have not selected the check box in Step 7.d. If you have selected this check box, continue with step Step 13.
-
If you already have an DNS server configured in your tree, select the option and provide the IP address of an existing DNS server and select .
This will fetch the contexts of the existing Locator and Group objects. If you do not wish to use the existing contexts, you can manually enter the details.
-
Specify the context of the DNS Locator object.
-
Specify the context of the DNS Group object.
Click and proceed with Step 14.
-
-
Specify details to configure the DNS server.
-
If you are configuring DNS in an existing tree where DNS is already configured, select the check box. Specify the IP address of an NCP server hosting the existing DNS server and click . This will fetch the contexts of the Locator, Root Server Info, Group, and Proxy User contexts. However, the proxy user password is not retrieved. Therefore, you must first retrieve the proxy user password and then specify the password manually in the proxy user password field. To retrieve the proxy user password, run the following command from the existing novell DNS server:
/opt/novell/proxymgmt/bin/cp_retrieve_proxy_cred password
-
Specify the following information:
-
Specify the context of the DNS service locator object (for example, ou=OESSystemObjects,dc=dsfw,dc=com).
-
Specify the context of the DNS Root ServerInfo object (for example, ou=OESSystemObjects,dc=dsfw,dc=com).
-
Specify the context of the DNS Services Group object (for example, ou=OESSystemObjects,dc=dsfw,dc=com).
-
-
Specify the fully distinguished, typeful name of the proxy user that will be used for DNS Management. For example: cn=dns-admin,dc=dsfw,dc=com to authenticate to eDirectory during runtime for accessing information for DNS. The user must have eDirectory read, write, and browse rights under the specified context.
-
Specify the password of the proxy user that you specified for accessing DNS.
NOTE:If you have selected the check box in Step 11.a, then the proxy user and password fields are populated with common proxy user name and password.
-
option is selected by default to ensure that the data transferred by this service is secure and private. If you deselect this option, the data transferred is in clear text format.
-
Specify the as CASA.
-
Click to continue.
-
-
After the installation is completed, the OES Configuration Summary page is displayed. Review the settings made earlier. Click .
-
This starts the DSfW installation.When the installation is complete, click .
This completes the process of DSfW installation. But the server is not ready for use till you complete configure DSfW and the supporting services through the process of provisioning.
-
To start provisioning, do one of the following:
-
From the terminal, run the /opt/novell/xad/sbin/provision_dsfw.sh script.
-
Launch YaST. The DSfW Provisioning Wizard is listed as an option.
To authenticate, enter the password of the current domain, the parent domain, and the tree/container admin.
For more details on Provisioning, see Provisioning Domain Services for Windows
-
-
The DSfW server is now ready for use. Verify that eDirectory and DSfW have been installed and configured correctly by executing the instructions in Section 8.0, Activities After DSfW Installation or Provisioning.
Installing DSfW as a Subsequent Domain Controller in a Domain
Prerequisites: Before proceeding with this name-mapped installation, review Section 5.5.2, Installation Prerequisites for a Name-Mapped Setup.
-
In the YaST install for OES from page, select pattern. Click .
Ensure that is selected along with .
Pattern deployment provides patterns for different services. Selecting a pattern automatically selects and installs its dependencies.
For information about the entire OES 2 Linux installation process, see the OES 2 SP3: Installation Guide.
-
On the first eDirectory configuration page in YaST, select the option. This indicates that you are installing the server into an existing eDirectory tree:
-
Select and specify the name of the tree. For example, DSfW-TREE.
-
Select if you want your OES services that provide HTTPS connectivity to use the more secure eDirectory certificates instead of the self-signed certificates created by YaST.
-
Select the option if you want to disallow clear passwords and other data.
-
Select if you want to eliminate the need to remember or synchronize all the multiple passwords required for accessing password-protected applications.
-
Click to continue.
-
-
Specify information to access the existing eDirectory Tree.
-
Specify the IP Address of the Forest Root domain.
-
Do not change the NCP Port, LDAP Port and Secure LDAP Port information.
-
Specify the tree admin credentials for the administrator to log into the eDirectory tree.
-
Click .
-
-
Specify the configuration for the local server in the eDirectory tree
-
Leave the location of the at the default setting.
-
Leave the settings at the defaults unless you need to change them to avoid port conflicts with other services.
-
Leave the settings at the defaults unless you need to change them to avoid port conflicts with other services.
-
Click to continue.
-
-
Specify details for NTP and SLP.
-
Specify a reliable Network Time Protocol (NTP) provider. Novell eDirectory requires that all servers in a tree be time-synchronized. In a single-server scenario, you can specify the local machine as the NTP provider.
-
Specify details to configure SLP:
-
If you do not want to configure the Service Location Protocol, select the option.
-
Select the option to request SLP information using multicast packet.
-
If you have more than three servers in your eDirectory tree, and you already have a Directory Agent running, select theoption.
-
Select the option if you want the local server to act as a directory agent.
-
Select the check box to enable SLP to query statically configured directory agents for registrations.
-
Select the Backup SLP Registrations check box to enable periodical backup of all registrations. In the field, specify the time interval (seconds) to perform the backup.
-
-
-
Click
-
-
Select the authentication service you want to install.
-
Click .
-
-
Specify details to configure DSfW on eDirectory
-
Select the option. This indicates that you are installing DSfW in an existing eDirectory tree.
-
Select if you want the machine being configured to function as a DNS server.
IMPORTANT:If you want to configure DNS on an additional domain controller in a domain that already has a parent or a child domain, you must ensure that the additional domain controller’s DNS server and the parent or child domain's DNS server act as passive primary DNS server for each other's zones. This ensures that the additional domain controller is resolved from a parent or child domain's DNS server and the parent or child domain is resolved from the additional domain controller.
Also, make sure you configure the forward lookup zone and the reverse lookup zone for this DNS server. For more information, see
Zone Management
in the OES 2 SP3: Novell DNS/DHCP Administration Guide. -
The configuration partition is forest-specific and by default the first domain controller of every domain gets a replica. The subsequent domain gets the replica of this partition if you select the option.
NOTE:We recommend that you select this option to replicate the schema and configuration partition to the subsequent domain controller
-
-
Specify administrator name and forest root domain details
-
Specify the name of the domain in which you want to create the domain controller.
-
Specify the password for the domain administrator.
-
Click .
-
-
Specify common proxy details.
-
To use common proxy for DSfW, select the check box. When this check box is selected, the OES Common Proxy User Name and Password fields get enabled. These fields are populated with system generated user name and password. However, you can change these values. To change these values see Step 9.b.
or
If you do not want to use common proxy, clear the check box and click . Then continue with Step 11.
-
Specify the following information:
-
Common proxy user name in field. You must specify a fully distinguished name.
-
Proxy user password in field.
-
Retype the password in the field.
-
-
To assign common proxy password policy to proxy user, select the check box.
-
Click to continue.
-
-
This screen is displayed if you have not selected the check box in Step 7.b. If you have selected this check box, continue with step Step 11.
-
If you already have an DNS server configured in your tree, select the option and provide the IP address of an existing DNS server and select .
This will fetch the contexts of the existing Locator and Group objects. If you do not wish to use the existing contexts, you can manually enter the details.
-
Specify the context of the DNS Locator object.
-
Specify the context of the DNS Group object.
Click and proceed with Step 12.
-
-
Specify details to configure the DNS server.
-
If you are configuring DNS in an existing tree where DNS is already configured, select the check box. Specify the IP address of an NCP server hosting the existing DNS server and click . This will fetch the contexts of the Locator, Root Server Info, Group, and Proxy User contexts. However, the proxy user password is not retrieved. Therefore, you must first retrieve the proxy user password and then specify the password manually in the proxy user password field. To retrieve the proxy user password, run the following command from the existing novell DNS server:
/opt/novell/proxymgmt/bin/cp_retrieve_proxy_cred password
-
Specify the following information:
-
Specify the context of the DNS service locator object (for example, ou=OESSystemObjects,dc=dsfw,dc=com).
-
Specify the context of the DNS Root ServerInfo object (for example, ou=OESSystemObjects,dc=dsfw,dc=com).
-
Specify the context of the DNS Services Group object (for example, ou=OESSystemObjects,dc=dsfw,dc=com).
-
-
Specify the fully distinguished, typeful name of the proxy user that will be used for DNS Management. For example: cn=dns-admin,dc=dsfw,dc=com to authenticate to eDirectory during runtime for accessing information for DNS. The user must have eDirectory read, write, and browse rights under the specified context.
-
Specify the password of the proxy user that you specified for accessing DNS.
NOTE:If you have selected the check box in Step 9.a, then the proxy user and password fields are populated with common proxy user name and password.
-
option is selected by default to ensure that the data transferred by this service is secure and private. If you deselect this option, the data transferred is in clear text format.
-
Specify the as CASA.
-
Click to continue.
-
-
After the installation is completed, the OES Configuration Summary page is displayed. Review the settings made earlier. Click .
-
This starts the DSfW installation.When the installation is complete, click .
This completes the process of DSfW installation. But the server is not ready for use till you complete configure DSfW and the supporting services through the process of provisioning.
-
To start provisioning, do one of the following:
-
From the terminal, run the /opt/novell/xad/sbin/provision_dsfw.sh script.
-
Launch YaST. The DSfW Provisioning Wizard is listed as an option.
To authenticate, enter the password of the current domain.
For more details on Provisioning, see Provisioning Domain Services for Windows
-
-
The DSfW server is now ready for use. Verify that eDirectory and DSfW have been installed and configured correctly by executing the instructions in Section 8.0, Activities After DSfW Installation or Provisioning.