13.6 Creating a Virtual Server Object for the Linux POSIX Volume Cluster Resource
When you cluster-enable the Linux POSIX volume, a virtual server object is not created automatically as it is when you cluster-enable an NSS pool. You can assign a virtual server name to the cluster resource by using the /opt/novell/ncs/bin/ncs_ncpserv.py script to create an NCS:NCP Server object for it. Having a virtual server object allows the Linux POSIX volume cluster resource to be viewed in the panel in iManager. You can also bind the virtual server name to the IP address to allow users to access the resource via an assigned name in addition to its IP address
The NCS:NCP Server object does not give users NCP access to the data on a Linux POSIX volume. An NCP volume is required to do that.
IMPORTANT:If you are creating NCP volumes on the shared Linux POSIX volume, do not follow the procedure in this section. Go to Creating a Shared NCP Volume on the Linux POSIX Cluster Resource
in the OES 2 SP3: NCP Server for Linux Administration Guide, then follow the instructions there.
The virtual server name is stored in Novell eDirectory in an NCS:NCP Server object under the Cluster object where you created the resource. You must add a line to the load and unload scripts that identifies the name of this virtual server and a line that binds or unbinds the name to the IP address of the Linux POSIX cluster resource.
13.6.1 Creating the Virtual Server Object
You use the /opt/novell/ncs/bin/ncs_ncpserv.py script to create a virtual server object (NCS:NCP Server) in eDirectory for the Linux POSIX volume cluster resource. If the resource does not have NCP volumes on it, you do not use the -v option. For information about the ncs_ncpser.py script, see Section A.5, ncs_ncpserv.py Script.
-
On the master cluster node, open a terminal console, then log in as the root user.
-
In the console, use the cd command to go to the /opt/novell/ncs/bin directory.
-
At the terminal console prompt, enter
./ncs_ncpserv.py -c lx_volumename -i resource_ip_address
Replace the lx_volumename and resource_ip_address with the information for your particular solution.
Do not use periods in cluster resource names. Novell clients interpret periods as delimiters. If you use a space in a cluster resource name, that space is converted to an underscore.
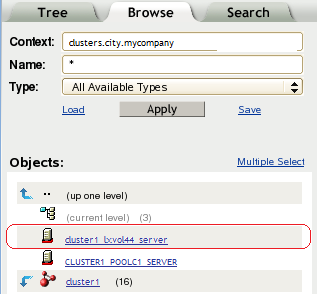
For example, to create the NCS:NCP Server object for the lxvol44 cluster resource where the IP address is 10.10.10.44 and the cluster context is ou=clusters,ou=city,o=mycompany, enter
./ncs_ncpserv.py -c lxvol44 -i 10.10.10.44
The confirmation message is displayed:
NCP Server 'cn=cluster1_lxvol44_server,ou=clusters,ou=city,o=mycompany' created.
-
Continue with Section 13.6.2, Modifying the Load Script
13.6.2 Modifying the Load Script
After you have created an NCS:NCP Server object, you must modify the load script so that it binds the NCS:NCP Server object to the resource.
-
In iManager, select > , then select the cluster.
-
Click the name link of the Linux POSIX cluster resource to open its Cluster Resource Properties page.
-
Click the tab to open the script.
-
In the definition area, add the following lines to define the virtual NCP server name:
# define NCP server name
NCP_SERVER=cluster1_lxvol44_server
Replace the NCP server name with the name for your virtual NCP server.
-
Under the mount line, add a line to bind the NCP server name to the resource IP address:
# bind the NCP volume
exit_on_error ncpcon bind --ncpservername=$NCP_SERVER --ipaddress=$RESOURCE_IP
-
Click to save your changes.
The script changes are not active until the next time the cluster resource is taken offline, and then brought online. Do not active the script changes at this time.
-
Continue with Section 13.6.3, Modifying the Unload Script.
13.6.3 Modifying the Unload Script
After you have created an NCS:NCP Server object, you must modify the unload script so that it unbinds the NCS:NCP Server object from the resource.
-
In iManager, select > , then select the cluster.
-
Click the name link of the Linux POSIX cluster resource to open its Cluster Resource Properties page.
-
Click the tab, then click to open the script.
-
In the definition area, add the following lines to define the virtual NCP server name:
# define NCP server name
NCP_SERVER=cluster1_lxvol44_server
Replace the NCP server name with the name for your virtual NCP server. Use the same value for variable that you did in the load script.
-
Under the definition, add a line to unbind the NCP server name from the resource IP address:
# unbind the NCP server name
ignore_error ncpcon unbind --ncpservername=$NCP_SERVER --ipaddress=$RESOURCE_IP
-
Click to save your changes.
The script changes are not active until the next time the cluster resource is taken offline, and then brought online.
-
Continue with Section 13.6.4, Activating the Script Changes.
13.6.4 Activating the Script Changes
The script changes are not active until the next time the cluster resource is taken offline, and then brought online.
-
In iManager, select > , then select the cluster.
-
Select the check box next to the Linux POSIX cluster resource, then click .
Wait until the resource is reports an Offline status before continuing.
-
Select the check box next to the Linux POSIX cluster resource, then click .
Wait until the resource is reports an Online status before continuing.
-
Continue with Section 13.6.5, Verifying the Virtual Server.
13.6.5 Verifying the Virtual Server
Verify that an NCS:NCP Server object appears in the panel in iManager.
-
In the iManager toolbar, click the icon.
-
In the left panel, click .
-
Browse to the Cluster container to see the virtual server object for the cluster resource, such as cluster1_lxvol44_server.