10.10 Configuring Resource Mutual Exclusion Groups
Beginning in OES 2 SP3, the Resource Mutual Exclusion (RME) Groups feature allows you to define sets of resources that must not run on the same node at the same time. You might need to use RME Groups for resources when an application does not want its resource to run concurrently on the same node as other applications. You can also use RME Groups if you run multiple instances of a service in the same cluster and they should run on different nodes.
For example, because of the designs and supported configurations of Novell iPrint and GroupWise, the GroupWise and iPrint resources should not run on the same node at the same time. In addition, multiple iPrint server instances cannot be hosted on the same node. To avoid resource assignment conflicts, you could create an RME Group that consists of the GroupWise resource and the multiple iPrint resources.
10.10.1 Understanding Resource Mutual Exclusion
Resource Mutual Exclusion is the practice of letting a node run only one of the resources in an RME Group at a time. The resources can run concurrently on different nodes.
How RME Groups Work
When RME Groups exist, Novell Cluster Services does the following:
-
It does not allow resources that are members of the same RME Group to run on the same node at the same time.
-
It evaluates the exclusions together, but separately enforces each group of exclusions.
Rules for Node Assignment
When a resource is brought online, Cluster Services honors the resource settings in the following order:
-
Resource Follows Master
-
Resource Mutual Exclusion Group
-
Preferred Nodes list
When onlining, migrating, or failing over a resource onto a node, Cluster Services evaluates RME settings to check if the resource is a member of any RME Groups, then assesses whether any one of the other resources in the RME Groups that the resource belongs to is already running there. If another resource from the same RME Group is running on the node, the situation is handled as if the node was not on the resource’s Preferred Nodes list. The checking process repeats itself with another node as a candidate until a suitable node is found, or until the resource’s Preferred Nodes list is exhausted.
Resources that are not members of any of the RME Groups are not restricted. They are allowed to run at any time and in any combination on any node in their Preferred Nodes lists.
Examples
If you try to cluster migrate a resource to a node where another member of its RME group is running, the resource is not migrated and remains in the Running state on the node where it is currently loaded. Only one resource in the group is allowed to run on the node at a time.
If you try to cluster migrate multiple resources in an RME Group to the same node, the resources are brought online on different nodes. Only one of the resources (randomly selected) is brought online on the specified node. The other resources are migrated to different nodes in their Preferred Nodes lists.
Planning for RME Groups
An RME Group can contain any combination of the resources that are available to the cluster. Resources that are members of the same group are not allowed to run concurrently on a node. A resource can be a member of more than one group.
You can define up to four groups (Group A, Group B, Group C, and Group D). The group names are fixed; they cannot be customized.
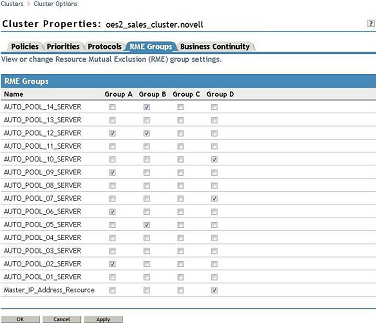
For example, the following image shows an RME Groups page where three groups (A, B, and D) have been defined. The selected check boxes in a column indicate which resources belong to that group. Group A has four member resources, and Group B and Group D have three members each. The AUTO_POOL_12_SERVER resource belongs to Group A and Group B. It has mutually exclusive relationships with two different sets of resources, and each exclusion is managed separately.
Figure 10-1 Sample RME Groups for an OES 2 SP3 Cluster
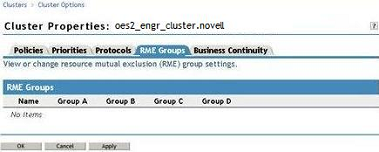
RME Groups are supported when all cluster nodes are running OES 2 SP3 or later. If you are managing an older version of Novell Cluster Services (without the RME code) from a new Clusters plug-in in iManager, the tables on the RME Groups page are shown as . You cannot set up RME Groups for clusters running on older platforms.
Figure 10-2 Sample RME Groups Page for an Unsupported Platform
If you are upgrading from an OES 2 SP2 Linux or earlier version of Novell Cluster Services where RMS Groups are not available, you should wait until the rolling cluster upgrade to OES 2 SP3 Linux or later has been completed on all nodes before you define RME Groups. If you define RME Groups while the cluster is in a mixed-node condition, the RME Groups are honored only if the resource fails over to a cluster node where OES 2 SP3 Linux or later is running.
10.10.2 Setting Up RME Groups
To define sets of resources that must not be assigned to the same node at the same time:
-
In iManager, click , then click .
-
Browse to locate and select the Cluster object of the cluster you want to manage.
-
Click , then click the tab.
The RME Groups page lists the resources in the cluster and columns for four possible RME Groups for the cluster. In each Group’s column, the check boxes correspond to the resources listed at the left.
If you are managing an older version of Novell Cluster Services (without the RME code) from a new Clusters plug-in in iManager, the tables are shown as . You cannot set up RME Groups for clusters running on older platforms.
-
To set up the members in a group, select the check boxes in the same column for two or more resources that must not be assigned on the same node at the same time.
The selected resources in a column are not allowed to run concurrently on a node. A resource can be a member of more than one group. You can define up to four groups (A, B, C, and D).
-
Click or to save your changes.
10.10.3 Viewing RME Group Settings
The RME Groups settings are displayed in the following locations:
Cluster Report
The Cluster Report has an RME Groups section that lists the member resources of each group.
-
In iManager, click , then click .
-
Browse to locate and select the Cluster object of the cluster you want to manage.
-
Click , then scroll down to view the .
The RME Groups section lists only the resources in the cluster that are members in each of the RME Groups.
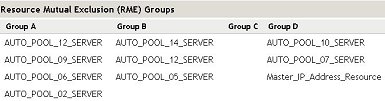
For example, the following report shows the members for Groups A, B, and D. Group C has no defined members. The AUTO_POOL_12_SERVER resource belongs to two RME Groups. It has mutually exclusive relationships with two different groups of resources. These exclusions are managed separately.
RME Groups Configuration Page
The RME Groups configuration page displays all possible resources, and indicates membership by the check boxes that are selected in the same column under the RME Group Name.
-
In iManager, click , then click .
-
Browse to locate and select the Cluster object of the cluster you want to manage.
-
Click , then click the tab.
The RME Groups configuration page lists the all of the resources in the cluster. The selected check boxes in the same group column indicate their memberships in the four possible RME Groups.