12.15 Expanding the Size of a Clustered Pool
NSS pools are made up of segments of space from one or more devices up to a maximum total size of 8 TB (terabytes). Each device can be up to 2 TB in size if a DOS partitioning scheme is used, or up to 8 TB in size if a GPT partitioning scheme is used. You can expand a pool by adding more space from the same device or from a different shared device. If you extend the size of a LUN device that is currently being used by the pool, you must make the extended size visible to all nodes in the cluster before you add the newly available space to the clustered pool. If you add a new shared LUN device, you must make the device visible to all nodes in the cluster before you add space from the device to the clustered pool.
12.15.1 Planning to Expand a Clustered Pool
Consider the guidelines in this section when you plan to expand the size of a clustered NSS pool.
Free Space on a Shared Device
To expand the size of a pool, you need free unpartitioned space on the same shared device or on other shared devices that can be failed over to the same node in a cluster. To extend the size of an existing LUN, the free unpartitioned space must immediately follow the LUN on the same shared device.
Extending a LUN Might Require a Service Outage
Novell Cluster Services and NSS allow you to perform an online extension of a LUN that is used by a clustered pool without taking the resource offline or stopping Cluster Services. However, not all SAN storage arrays and vendor-specific storage drivers fully support transparent online extension of LUNs. Refer to the third-party vendor documentation for information about how to extend a LUN. We recommend that you test the specific hardware environment and hardware configuration to confirm that it behaves correctly before you perform an online LUN extension.
IMPORTANT:To prevent any chance of data loss or corruption, we recommend that you back up the volumes before you expand a LUN.
After you extend the LUN size on the SAN storage array, you must scan for devices on each node to update the node’s storage map with its new size information before you expand the pool size on the active node, or allow the pool cluster resource to fail over to other nodes. If the device has multiple I/O paths, you must also update each node’s multipath map. Depending on your SAN storage array, device driver, and server hardware, a server restart might be required to force the node to recognize the extended LUN size.
Adding a LUN Might Require a Service Outage
Novell Cluster Services and NSS allow you to add a LUN to a clustered pool without taking the resource offline or stopping Cluster Services. The LUN must be able to be failed over to the same node in a cluster as the pool cluster resource. Refer to the third-party vendor documentation for information about how to add a LUN.
After you create a new LUN on the SAN storage array and assign it to all nodes, you must scan for devices on each node to update the node’s storage map with the new device before you expand the pool size on the active node, or allow the pool cluster resource to fail over to other nodes. If the device has multiple I/O paths, you must also update each node’s multipath map. Depending on your SAN storage array, device driver, and server hardware, a server restart might be required to force the node to recognize the new LUN.
Multipath I/O Devices
Consider the following requirements and guidelines as you work with devices that have multiple I/O paths:
-
The procedures in this section assume that you use the Linux Device Mapper - Multipath I/O (DM-MPIO) software to manage the multiple I/O paths for devices. You must modify the instructions accordingly if you are using a third-party multipath solution.
-
Before you expand the pool size on the active node or allow the pool cluster resource to fail over to other nodes, you must update the multipath map on each node in the cluster so that DM-MPIO recognizes the LUN changes:
-
Extend the LUN size: On each node, you can restart the multipathd daemon, or you can use the multipathd command to resize the multipath map for the LUN.
-
New LUN: On each node, use the multipath -v2 command to rebuild the node’s multipath map.
-
-
For a device with multiple I/O paths, use the device’s multipath device name (such as mpathb) or device ID.
-
Steps in this section that pertain only to multipath I/O devices are preceded by the keyword
MPIO
.
12.15.2 Increasing the Size of a Clustered Pool by Extending the Size of Its LUN
One way to increase the size of a clustered pool is to add space to its LUN device on the SAN storage array, and then increase the size of the pool to use the newly available space. Before you extend the size of a LUN, ensure that you understand the cautions in Extending a LUN Might Require a Service Outage.
Extending the Size of a LUN
You can extend the size of the LUN if there is free unpartitioned space on the device that immediately follows the LUN. If the LUN has multiple I/O paths, special handling is required to update the device size reported in the multipath map on each node. These steps are marked with the keyword MPIO
.
-
Identify the device that is used by the pool cluster resource:
-
In iManager, go to > , then select the Cluster object of the cluster.
-
In the Pools list, select the pool, then view the device name of the LUN under the pool area.
For example, a device with a single path has a device node name such as sdb. A device with multiple I/O paths has a multipath device name such as mpathb.
-
-
(Offline LUN extension only) If the SAN storage array or vendor-specific storage driver does not support online LUN extension, take the pool cluster resource offline. Open a terminal as the root user, then at the command prompt, enter:
cluster offline <resource_name> -
On the SAN storage array, use the third-party vendor tools to extend the size of the existing LUN.
Devices can be up to 2 TB in size with the DOS partitioning scheme. Devices can be up to 8 TB in size with the GPT partitioning scheme.
For example, increase the size of the existing LUN from 100 GB to 150 GB.
-
Beginning with the active node, perform the following steps on each node in turn in order to update the node’s storage map with the new LUN size:
-
Log in to the node as the root user, then open a terminal console.
-
Scan for devices to recognize the new size for the LUN. At the command prompt, enter:
/bin/rescan-scsi-bus.sh -forcerescan [--luns=XX]Use the --luns=XX option if you want to scan only for the extended LUN. You can use the lsscsi(8) command to locate the LUN number for the device. Information for each device is output on a single line. The first entry is four numbers separated by colons that represent the Host:Bus:Target:LUN of the SCSI device.
For information about other rescan-scsi-bus.sh options, see
Scanning for New Devices without Rebooting
in the SUSE Linux Enterprise Server 11 Storage Administration Guide. -
(MPIO) If the device has multiple I/O paths, do one of the following methods to update the multipath map with the new size information for the extended LUN:
-
Flush and rebuild the multipath maps: At the command prompt, enter the following commands:
multipath -F

multipath -v2
-
Restart the multipathd daemon: At the command prompt, enter one of the following commands:
rcmultipathd restart

/etc/multipathd restart
-
-
(MPIO) Verify that the new size of the LUN is correctly reported to DM-MPIO. At the command prompt, enter:
multipath -ll
The -ll option shows the current multipath topology from all available information (sysfs, the device mapper, path checkers, and so on).
For example, the mpathb device reports a new size of 150 GB.
mpathb (36001438005de9b8d0000800007520000) dm-1 HP,HSV450 [size=150G][features=1 queue_if_no_path][hwhandler=0] \_ round-robin 0 [prio=100][active] \_ 4:0:1:7 sdae 65:224 [active][ready] \_ 2:0:1:7 sdu 65:64 [active][ready] \_ round-robin 0 [prio=20][enabled] \_ 4:0:0:7 sdv 65:80 [active][ready] \_ 2:0:0:7 sdg 8:96 [active][ready] -
Scan for EVMS storage object changes. At the command prompt, enter:
evms_activate
-
Repeat Step 4.a through Step 4.e on each node in the cluster.
Depending on your SAN storage array, device driver, and server hardware, a server restart might be required to force a node to recognize the extended LUN size.
-
-
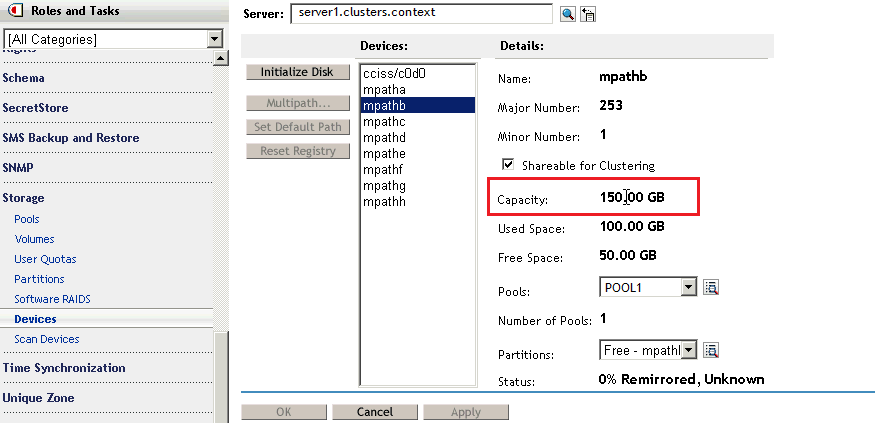
In iManager, verify that the new device size is reported correctly to NSS:
-
In iManager, go to > , then select the Cluster object of the cluster.
-
Select the device (such as mpathb), then view the device capacity under the device’s area.
For example, the mpathb device’s field reports a size of 150 GB.
-
If the new LUN size is reported correctly, continue to Step 6. If the size is not reported correctly, repeat Step 4, then check again.
-
-
(Offline LUN extension only) If you took the pool cluster resource offline in Step 2, you can now bring pool cluster resource online. Open a terminal as the root user, then at the command prompt, enter:
cluster online <resource_name> -
After the new LUN size has been recognized by all nodes, continue with Increasing the Pool Size by Using Free Space on the Same LUN.
Increasing the Pool Size by Using Free Space on the Same LUN
The pool size is not automatically expanded to use the new free space on the LUN. After you have expanded the size of the existing LUN and the new size is recognized by all nodes in the cluster, you can increase the size of the pool by allocating space from the newly available free space.
-
In iManager, go to > , then select the Cluster object of the cluster.
-
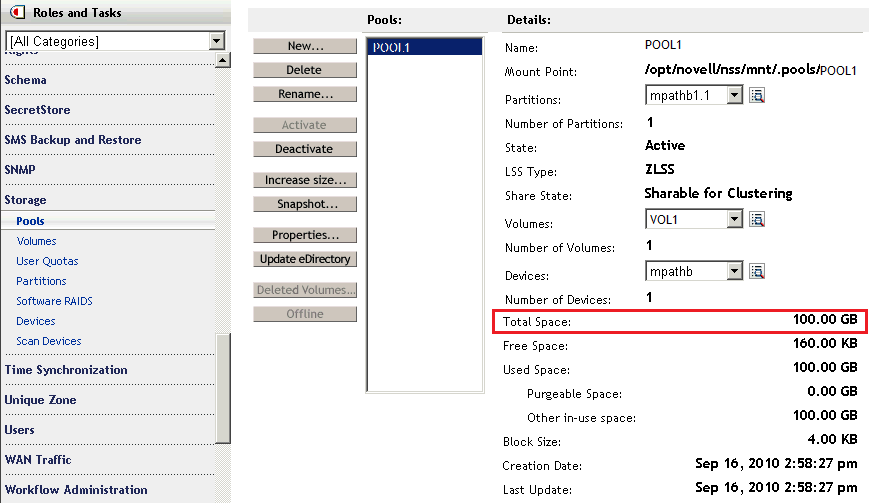
On the Pool page, select the pool, then view the pool’s current size in the area.
The for the pool reports only the amount of space that has been allocated to the pool. The pool size is not automatically expanded to use the new free space on the LUN.
-
Increase the size of the pool by adding space from the same LUN:
-
On the Pool page, select the pool, then click .
The Expand a Pool wizard opens and presents all devices with available free space.
-
In the list of devices, select the check box for the newly expanded LUN, such as mpathb, then specify the amount of space to add in MB.
Typically, this is the reported amount of free space available. For example:
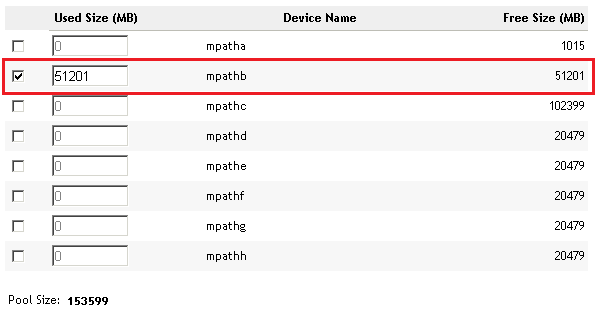
-
Click to save and apply the change.
-
-
On the Pool page, select the pool, then verify that the field reports the new size.
For example, the new size of POOL1 is 150 GB.
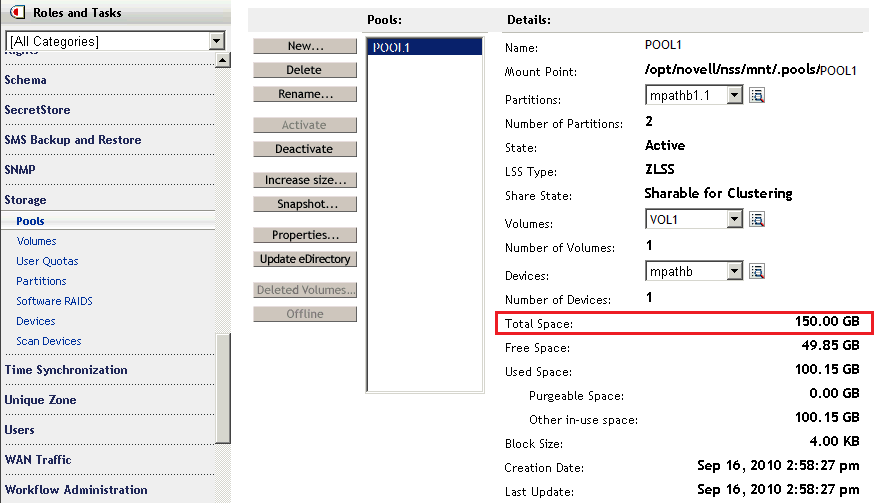
-
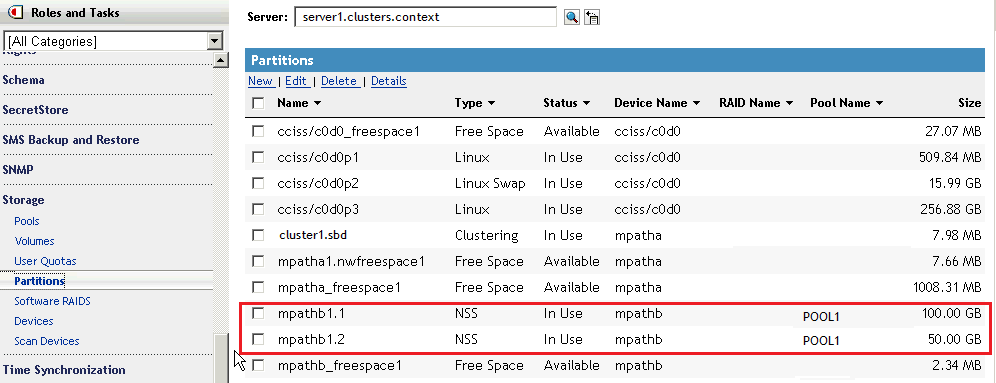
Go to > , then verify that a new partition exists for the LUN and is assigned to the pool.
For example, the partitions mpathb1.1 and mpathb1.2 are allocated to POOL1.
-
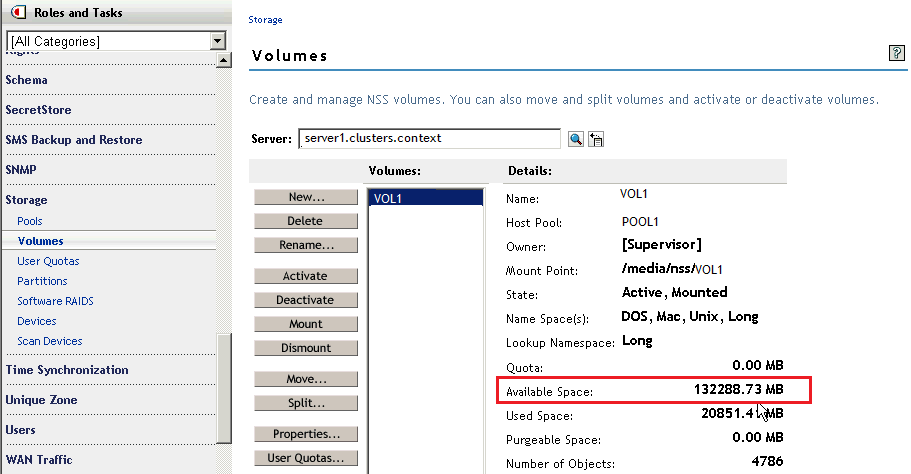
For each volume on the pool, if the volume quota is set to , the volume can grow to the size of the pool. Go to > , select the volume, then verify that its field has increased by the amount of space that was added to the pool.
For example, by increasing the pool size by 50 GB, the available space for VOL1 increased from about 82 GB to about 132 GB.
-
Continue with Verifying the Expanded Pool Cluster Resource on All Nodes.
12.15.3 Increasing the Size of a Clustered Pool by Adding Space from a Different Shared LUN
You can increase the size of a clustered pool by adding space to the pool from a different shared LUN device that can be failed over with the resource. Before you add a LUN, ensure that you understand the cautions in Adding a LUN Might Require a Service Outage.
Creating and Sharing a New LUN Device
If you do not have a shared device that can be failed over with the resource, you can create a new LUN and share it with all nodes in the cluster. If the LUN has multiple I/O paths, special handling is required to add the device to the multipath map on each node. These steps are marked with the keyword MPIO
.
-
Use third-party tools for the SAN storage array to create a new shared LUN device, and assign it to each cluster node.
-
Beginning with the active node, perform the following steps on each node in turn in order to update the node’s storage map and multipath map with the new device:
-
Log in to the node as the root user, then open a terminal console.
-
Scan for devices to help the OS recognize the new LUN. At the command prompt, enter:
/bin/rescan-scsi-bus.sh -forcerescan
For information about other rescan-scsi-bus.sh options, see
Scanning for New Devices without Rebooting
in the SUSE Linux Enterprise Server 11 Storage Administration Guide. -
Use the lsscsi command to verify that the LUN is seen by the OS. At the command prompt, enter:
lsscsi
Information for each device is output on a single line. The first entry is four numbers separated by colons that represent the Host:Bus:Target:LUN of the SCSI device. In the sample output below, the /dev/sdc and /dev/sde devices are two individual paths for LUN 2.
# lsscsi
[4:0:0:0]    disk    DGC      RAID 5           0216  /dev/sdb
[4:0:0:1]    disk    DGC      RAID 5           0216  /dev/sdf
[4:0:0:2]    disk    DGC      RAID 5           0216  /dev/sdc
[4:0:1:0]    disk    DGC      RAID 5           0216  /dev/sdd
[4:0:1:1]    disk    DGC      RAID 5           0216  /dev/sdg
[4:0:1:2]    disk    DGC      RAID 5           0216  /dev/sde
If the LUN is not seen, repeat this step using different lsscsi command line parameters to scan for all devices (such as -w -c -l). For information about command options, see the lsscsi(8) man page.
If the LUN is still not seen by the OS, a server restart might be required.
-
Scan for EVMS storage object changes. At the command prompt, enter:
evms_activate
-
(MPIO) If the device has multiple I/O paths, rebuild the multipath map. At the command prompt, enter:
multipath -v2
-
(MPIO) Verify that the new LUN is reported to DM-MPIO. At the command prompt, enter:
multipath -ll
The -ll option shows the current multipath topology from all available information (sysfs, the device mapper, path checkers, and so on).
-
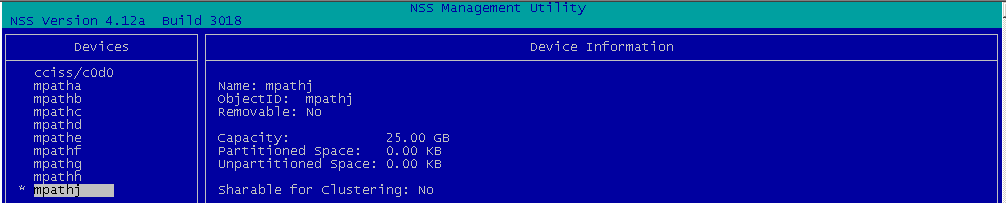
Verify that the LUN is now visible to NSS on the node. In NSSMU, go to the Devices page, then verify that the new LUN is listed.
For example, the new device is mpathj on the active node. Remember that a multipath device might have a different multipath device name on each node.
-
Repeat Step 2.a through Step 2.g on each node in the cluster.
Depending on your SAN storage array, device driver, and server hardware, a server restart might be required to force a node to recognize the new LUN.
-
-
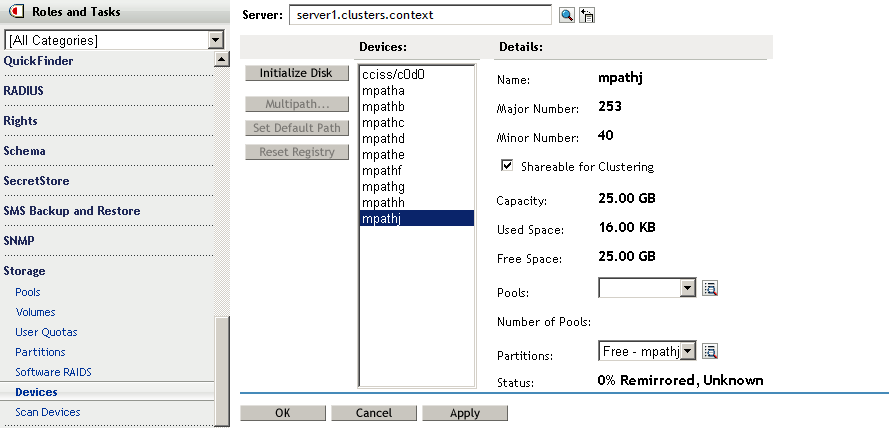
In iManager, initialize the new LUN, then mark it as shareable for clustering:
-
In iManager, go to >
-
On the Devices page, select the Cluster object of the cluster.
Selecting the Cluster object connects you to the current master node of the cluster.
-
In the Devices list, select the newly added LUN device.
WARNING:Ensure that you select the correct device. Initializing a device destroys all data on it.
-
Click , then click to confirm that you want to initialize the device.
If you are prompted for the partitioning scheme, specify your preferred partitioning scheme as DOS (up to 2 TB in size) or GPT (up to 8 TB in size).
-
In the Devices list, select the new LUN device.
-
In the area, select the check box, then click .
-
-
After the new LUN is recognized by all nodes, and has been initialized and shared, continue with Increasing the Pool Size by Adding Free Space from a Different LUN.
Increasing the Pool Size by Adding Free Space from a Different LUN
After you have set up a different shared device that can be failed over with the pool cluster resource, you can increase the size of the pool by allocating space from it.
-
In iManager, go to > , then select the Cluster object of the cluster.
Selecting the Cluster object automatically connects you to the current master node of a cluster.
-
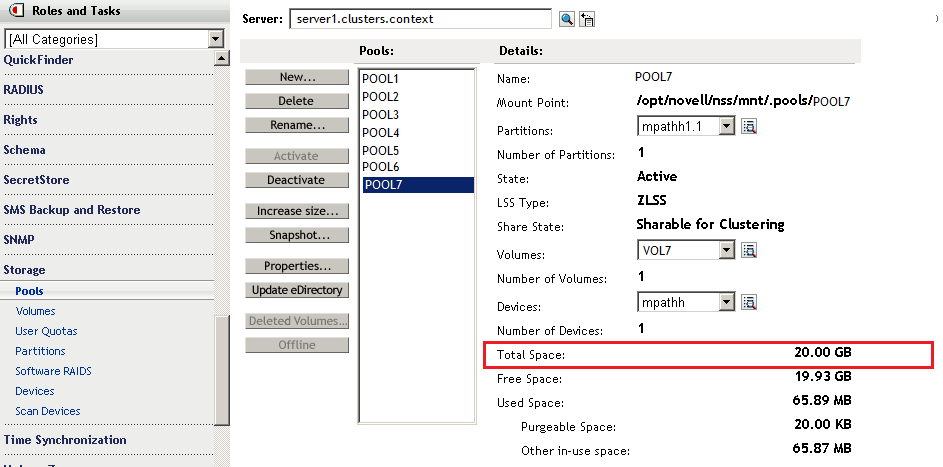
Select the pool, then view the pool’s current size.
The for the pool reports only the amount of space that has been allocated to the pool. For example, Pool7 is 20 GB in size.
-
Increase the size of the pool by adding space from a different LUN:
-
On the Pool page, select the pool, then click .
The Expand a Pool wizard opens and presents all devices with available free space.
-
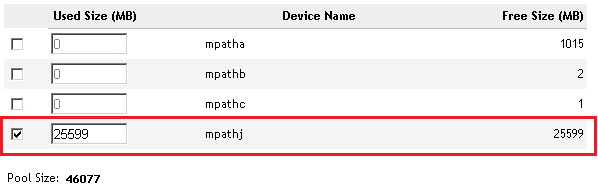
In the list of devices, select the check box for the new LUN, such as mpathj, then specify the amount of space to add in MB.
Typically, this is the reported amount of free space available. For example, mpathj has 25599 MB available:
-
Click to save and apply the change.
-
-
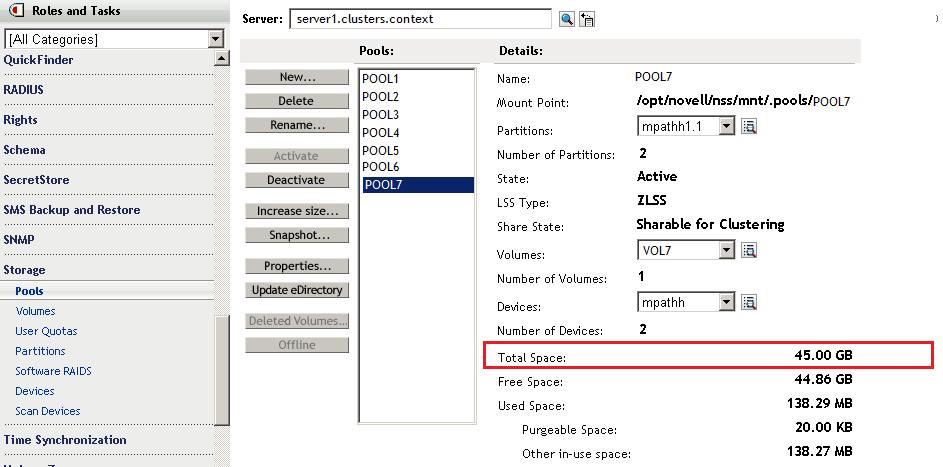
On the Pool page, select the pool, then verify that the field reports the new size.
For example, POOL7 has increased in size from 20 GB to about 45 GB.
-
For each volume on the pool, if the volume quota is set to , the volume can grow to the size of the pool. Go to > , select the volume, then verify that a volume’s field has increased by the amount of space that was added to the pool.
-
After the pool size is increased, continue with Section 12.15.4, Verifying the Expanded Pool Cluster Resource on All Nodes.
12.15.4 Verifying the Expanded Pool Cluster Resource on All Nodes
Verify that the expanded pool size is reported correctly on each node in the cluster.
-
Log in to a node as the root user, then open a terminal console.
-
Cluster migrate the pool cluster resource to each node in turn, and use NSSMU to verify that the devices, partitions, pool, and volumes show the correct information on that server:
-
Cluster migrate the pool cluster resource.
cluster migrate resource_name node_name
-
Launch NSSMU by entering
nssmu
-
On the Devices page, select the device and verify that the new size is reported.
-
On the Partitions page, select each partition for the device, then verify that the partitions are shown for the expanded pool.
-
On the Pools page, select the pool, then verify the total space available.
-
On the Volumes page, select each volume that has no quota set, then verify that the available space has increased by the amount of space added to its pool.
-
If the information is incorrect, wait a few minutes to allow time for the system to recognize the new partitions, then try again.
-
-
Repeat the previous validation for each node in the cluster.