10.2 Using Cluster Resource Templates
Templates simplify the process of creating similar or identical cluster resources. For example, templates are helpful when you want to create multiple instances of the same resource on different servers. Several templates are provided for you. You can also create templates for any server application or resource you want to add to your cluster.
10.2.1 Default Resource Templates
Table 10-1 identifies the cluster resource templates that Novell Cluster Services provides for use on physical servers and Xen virtual machine (VM) guest servers (DomU). You can also create your own templates or personalize the default templates by using iManager. For information, see Section 10.2.2, Creating a Resource Template. Third-party templates might also available for third-party applications; see the vendor documentation.
Table 10-1 Cluster Resource Templates for Physical Servers and Xen VM Guest Servers
|
Cluster Resource Template |
OES 2 Linux Product |
|---|---|
|
AV |
|
|
DHCP |
Novell Dynamic Host Configuration Protocol using an NSS pool Novell Dynamic Host Configuration Protocol using a Linux POSIX File System |
|
DNS |
|
|
Generic File System (Generic_FS) |
|
|
Generic IP Service |
This template can be modified to create cluster resources for certain server applications that run on your cluster. |
|
iFolder |
|
|
iPrint |
|
|
MySQL |
Novell MySQL |
|
Samba |
|
|
Third-party templates |
See your vendor documentation. |
Novell Cluster Services provides the following templates for use by the Xen VM host server (Dom0). They are the only two templates supported for the host, and they are not supported for use by a VM guest server.
Table 10-2 Cluster Resource Templates for Xen-Based Virtualization Host Environments
|
Cluster Resource Template |
Use |
|---|---|
|
Xen |
Automatically configure the cluster resource for the virtual machine. |
|
XenLive |
Automatically configure the cluster resource for the virtual machine. Provides an additional function to allow a virtual machine resource migration (manual) without the need to boot or bring up the virtual machine on the cluster node where the virtual machine has been migrated. |
To view the default templates in iManager:
-
Start your Internet browser and enter the URL for iManager.
The URL is http://server_ip_address/nps/imanager.html. Replace server_ip_address with the IP address or DNS name of an server in the cluster that has iManager installed.
-
Enter your Administrator user name and password.
-
In , click , then click .
-
Browse to locate and select the Cluster object of the cluster you want to manage.
A list of available resources and resource templates are displayed.
You can also view the templates outside of iManager. They are cached as /var/opt/novell/ncs/*_Template.* files on the master node of the cluster.
10.2.2 Creating a Resource Template
Templates help ensure that all of the necessary definition information, dependent services to be loaded and unloaded, and the shared service or storage are entered correctly when you are configuring multiple servers and clusters. You can use the default templates as a guide for what types of information to include in your personalized template.
-
Start your Internet browser and enter the URL for iManager.
The URL is http://server_ip_address/nps/imanager.html. Replace server_ip_address with the IP address or DNS name of an server in the cluster that has iManager installed.
-
Enter your Administrator user name and password.
-
In , click , then click .
-
Browse to locate and select the Cluster object of the cluster you want to manage.
-
Click the link.
-
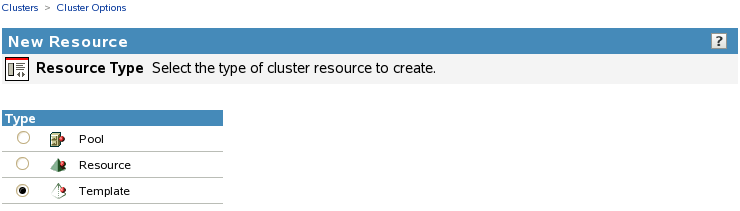
Specify as the resource type you want to create by clicking the radio button, then click .
-
In , specify the name of the template you want to create.
-
If desired, in , browse to the Cluster object and select the existing resource template in the Cluster container that you want to personalize for the new template.
-
Ensure that the check box is selected, then click to continue to the Load Script page.
-
On the Load Script page, configure the load script for the cluster resource template.
-
Edit or add variables with example values for your template configuration, such as the mount point, IP address, container name, file system type, and device.
-
Edit or add any lines to the load script that are required to load dependent services such as Web servers or file access protocols.
-
Edit or add the necessary commands to the script to load the resource on the server.
For example, this might include bind command for the NCP service and the mount commands for the shared disks and file systems.
-
Specify the default value, then click to continue to the Unload Script page.
The timeout value determines how much time the script is given to complete. If the script does not complete within the specified time, the resource becomes comatose. Cluster Services marks the process as failed right after the defined timeout expires, but it must wait for the process to conclude before it can start other resource operations.
-
-
On the Unload Script page, configure the unload script for the cluster resource template.
-
Edit or add variables with example values for your template configuration, such as the mount point, IP address, container name, file system type, and device.
-
Edit or add the necessary commands to the script to unload the resource from the server.
For example, this might include unbind command for the NCP service and the dismount commands for the shared disks and file systems.
-
Edit or add any lines to the unload script that are required to unload the dependent services that are loaded by this cluster resource.
-
Specify the default value, then click to continue to the Monitor Script page.
The timeout value determines how much time the script is given to complete. If the script does not complete within the specified time, the resource becomes comatose when migrating to another node. Cluster Services marks the process as failed right after the defined timeout expires, but it must wait for the process to conclude before it can start other resource operations.
-
-
On the Monitor Script page, configure the monitor script for the cluster resource template.
-
Edit or add the variables with example values for your template configuration, such as the mount point, IP address, container name, file system type, and device.
-
Edit or add the necessary commands to the script to monitor the resource on the server.
You can use the same commands that are used at the Linux terminal console.
The resource templates included with Novell Cluster Services for Linux include resource monitoring scripts that you can customize.
-
Specify the default value, then click .
The timeout value determines how much time the script is given to complete. If the script does not complete within the specified time, the failure action the administrator chooses for monitoring (comatose, migrate, or reboot) initiates. Cluster Services marks the process as failed right after the defined timeout expires, but it must wait for the process to conclude before it can start other resource operations.
-
-
On the Resource Policies page, specify the default , , and modes, then click
-
On the Resource Preferred Nodes page, specify the node assignments for the resource template, then click .
The template you created is saved to the Cluster container of the cluster you selected. If you personalized an existing template, both the old template and the new template are in the container.
10.2.3 Synchronizing Locally Modified Resourse Templates with eDirectory
Typically, you update the templates by using the Clusters plug-in to iManager. However, if you add new template files or modify the files locally on a cluster node, you must synchronize those changes with the resource templates and scripts that are held in eDirectory .
To synchronize the locally modified resource templates with those held in the Cluster container in eDirectory,
-
Log in to the master node of the cluster, then open a terminal console.
-
Enter the following commands:
/opt/novell/ncs/bin/ncstempl.py

/opt/novell/ncs/bin/ncs-configd.py -init