5.6 DFS Junction Support in CIFS Linux
CIFS must be configured to support DFS junctions. By default, DFS junction support is disabled. You must enable it on host (server that hosts the junction) and target (server that is pointed by the junction) servers in order for the junctions to work. The junctions that point to subdirectories are also supported with CIFS Linux.
5.6.1 Prerequisites
-
Unicode must be enabled.
-
DFS must be enabled for CIFS on all the host and target servers.
-
Both host and target CIFS servers must be running.
-
The VLDB server must be running.
IMPORTANT:The CIFS clients accessing DFS junctions must be DFS aware. smbclient on Linux may not work appropriately in case of junctions as it is not DFS aware.
5.6.2 Enabling DFS Support
Use the instructions in this section to enable DFS junction support in CIFS Linux:
-
In iManager, click > .
-
Browse to locate and select the server you want to manage.
Figure 5-6 Enabling DFS Support
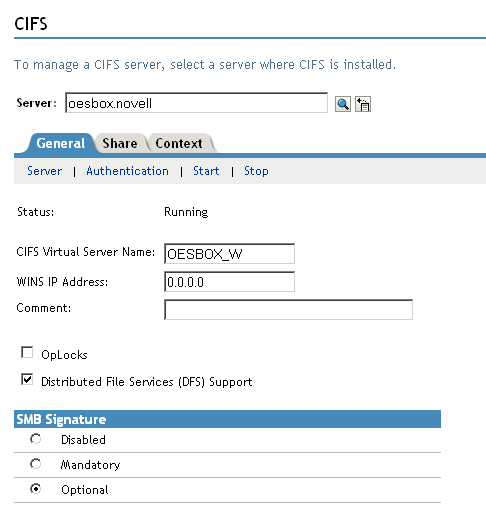
-
Select the check box for to enable the DFS support in CIFS Linux.
-
Click .
5.6.3 Limitations
-
Junctions in NetWare cannot point to volumes in Linux and vice versa, that is, junctions are not supported across platforms.
-
DFS is available only if Unicode (UTF8 format) is enabled.
-
Only CIFS shares are enabled with DFS support.
5.6.4 Problems Following DFS Junctions with CIFS in Windows 2000/XP Releases
Windows Unable to Resolve the NetBIOS Name of the CIFS Server
Clients using Windows 2000 Service Pack 4 and Windows XP Service Pack 2 might have problems following DFS junctions over CIFS because of a defect in Windows. (This problem exhibits itself in a pure Windows environment.) When using DFS with CIFS, the CIFS server and Windows clients are on different IP subnets. In this case, the client must have a way to resolve the CIFS server name in order for DFS to work. This is a Microsoft/CIFS requirement, not a CIFS Linux requirement.
NOTE:This problem does not affect Windows clients that use the Novell Client.
There are multiple ways the client can resolve the CIFS server name:
-
Configure both the client and server for the same WINS server
-
Configure both the client and server to use the same DNS server
-
Modify the hosts file for all client computers with appropriate entries for any volumes on OES servers that use DFS junctions
To modify the hosts file on a client:
-
In a text editor, open the hosts file and modify the hosts file.
-
Windows 2000: c:\WINNT\system32\drivers\etc\hosts
-
Windows XP: c:\windows\system32\drivers\etc\hosts
If you do not have hosts file, create the file.
-
-
For all the host and target servers, add a line at the end of the file that identifies the IP address and NetBIOS name of the data server.
192.168.1.1 servername_W
Replace 192.168.1.1 with the actual IP address and servername with the name of your server.
IMPORTANT:Modifying the CIFS server name of the virtual server using iManager is not allowed. However, it is possible to modify the CIFS server name for a physical server.
We recommend that you do not modify the CIFS server name of the physical server that is the DFS target.
For example, suppose you have the following server:
-
Server IP address: 10.10.1.1. If the DFS target is a cluster resource, then mention <Cluster IP address> or <Cluster Resource IP address>
-
Server name: USERSVR
-
NetBIOS server name: USERSVR_W
If the target of the junction is a cluster resource, mention the <Cluster IP address> or <Cluster Resource IP address> and instead of server name, mention the cluster resource name.
The line you add to the hosts file is:
10.10.1.1 USERSVR_W
NOTE:The string length of the NetBIOS name should not exceed 15 chars. The hostname or the last 13 characters from the hostname, whichever is shorter is considered and appended with _W at the end to frame the standard NetBIOS name.
-
-
Save and close the hosts file.
-
If necessary, repeat Step 1 to Step 3 on each client computer, or create a hosts file and distribute it to the client machines.
-
On each client, map a network drive to the user’s data volume.
Continuing the example above, the user could map to \\10.10.1.1\VOL1 or to \\USERSVR_W\VOL1.
-
In the Windows Explorer file manager, click .
-
In the field, type one of the following:
\\192.168.1.1\volumename
\\servername_W\volumename
Replace 192.168.1.1 with the actual IP address or servername with the hostname of your server.
-
Select .
-
Click .
-
After Modifying the Junction Target, Accessing the Junction Still Leads to the Old Target
Windows does not prompt the server everytime to resolve the junction every time the junction is accessed. It prompts the server only for the first time and then caches it. When the junction is accessed the next time, Windows does not prompt CIFS server to resolve the junction but it makes use of the target location it received previously.
On restarting the Windows machine, if the same mapping is done, it points to correct location. Because there is no cached value, it prompts the CIFS server to provide the location of the target that the junction points to and gets the latest value from CIFS server.