4.2 Adding/Configuring OES Services on an Existing Server
IMPORTANT:If you are not using the administrator account that originally installed the OES server you are adding services to, see Section 2.5, Installing and Configuring OES as a Subcontainer Administrator and then follow the instructions in Section 4.3, Adding/Configuring OES Services on a Server That Another Administrator Installed.
To add/configure OES 2 SP3 services on an existing OES 2 SP3 server or SLES 10 SP4 server:
-
Open YaST.
-
If an OES 2 SP3 installation source has not been added to the server, continue with this step. Otherwise, skip to Step 3.
-
Click > .
-
Click .
-
In the Add-On Product Media dialog box, click > .
If you are using an alternate installation source, click the appropriate option that matches your installation source selection.
-
In the Insert the Add-On Product CD dialog box, select the appropriate drive where you want to insert the CD labeled Open Enterprise Server 2 SP3 CD 1.
-
Click .
-
Insert the CD labeled Open Enterprise Server 2 SP3 CD 1, then click .
-
Read and accept the Novell Open Enterprise Server 2 license agreement, then click .
-
Confirm that the Add-On Product Installation page shows the correct path to the OES media, then click .
-
Skip to Step 4.
-
-
If an OES installation source has already been added to the server, click > .
-
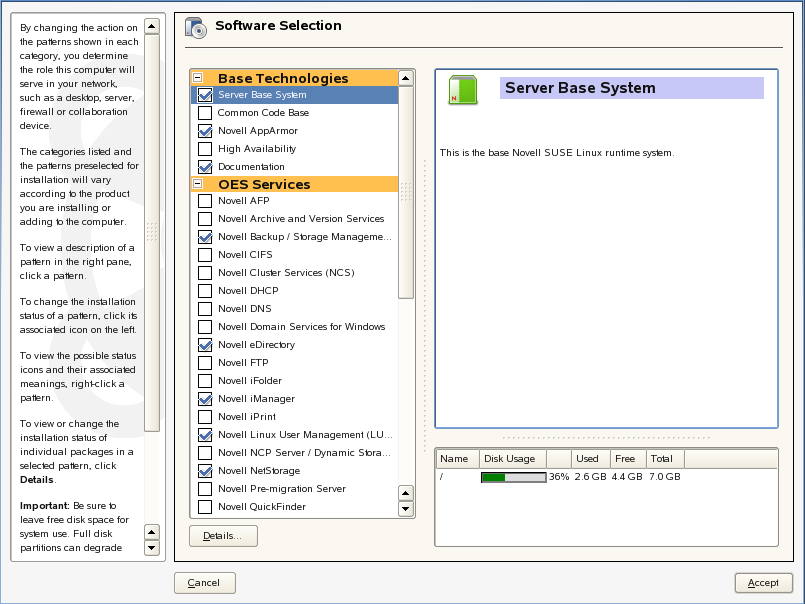
On the Software Selection page, select the OES components that you want to install or configure.
Services that you have already installed are indicated by a blue check mark in the status check box next to the service.
IMPORTANT:You cannot uninstall an OES service by deselecting it. For more information about removing service functionality from the server, see Section 13.0, Disabling OES 2 Services.
-
If you are only configuring or reconfiguring services that are already installed, click , then skip to Step 9.
Not all OES components require eDirectory to be installed on the local server. Components that have a dependency on eDirectory being installed locally will prompt you to install eDirectory if it is not already installed.
IMPORTANT:If you need to reconfigure eDirectory, we recommend that you use tools provided by eDirectory, such as iMonitor or iManager, rather than using YaST to change the configuration. The configuration provided in YaST is only for the initial eDirectory installation and configuration.
If you need to reconfigure eDirectory and OES services due to database corruption, go to Section 14.0, Reconfiguring eDirectory and OES Services and follow the instructions there.
-
After selecting the services to install, click .
-
If package changes are required for your selections, select .
-
Insert any media required to install the new packages.
-
Change the default configuration information as required.
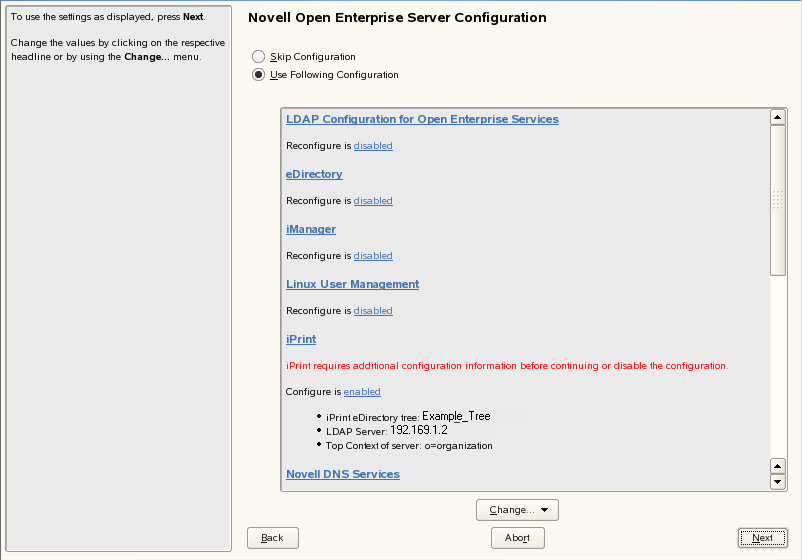
In most cases, the default configuration is acceptable. You need to change the configuration at the following times:
-
When the installation displays the following message to indicate that more information (often the administrator password) is required:
service_name service requires additional configuration information before continuing or disable the configuration.
-
When you want to change the default configuration settings, such as enabling services for LUM.
-
When you want to reconfigure a service that has already been configured.
-
To change the configuration of a newly installed service or a service that has already been configured, change its configuration status to , then click the service heading link to access the configuration dialog box for that service.
Newly installed services that have not been configured have the status of Configure is enabled.
Services that have already been configured have a status of Reconfigure is disabled.
-
To enable the configuration status of any disabled service configuration, click the link to change the status to .
-
To delay the configuration of newly installed services to a later time, click the link to change the status to Configure is disabled.
For configuration guidelines, see Section 3.6.11, Configuration Guidelines for OES Services; or, if you are reading online, click a link below:
-
-
When all the services have complete configuration information and the configuration or reconfiguration status is set to for the services that you want to configure, click to continue with the configuration process.
-
After the service configuration process has run and is finalized, click .
-
If you are installing on an existing OES server, you can quit the installation at this point.
If you are installing OES services for the first time on this server, see Section 3.6.5, Specifying Novell Customer Center Configuration Settings for help with registering OES and updating the software.