15.3 Using the Migrate Windows Shares Utility
When you install an OES 2 Linux server or later, the Migrate Windows Share utility is automatically installed through YaST. This utility lets you perform basic data migrations from Windows to OES 2 Linux by using a graphical user interface (GUI) instead of command line tools.
To migrate Windows data shares:
-
Prepare the source and target servers as instructed in Section 15.1, Prerequisites.
-
On the target server, access the utility from the desktop by selecting > > > .
-
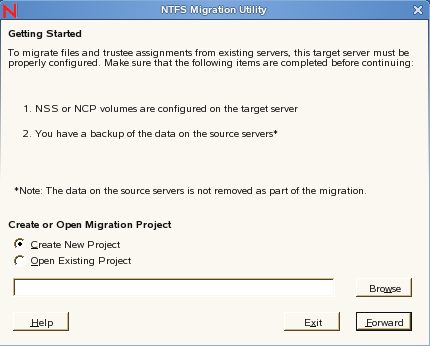
(Optional) Create a new migration project:
-
Select .
-
Specify the path to where you want the project file to be saved, or click and select the path.
The default path is /root/Desktop/ and the default project name is newProject.xml. You can change the path and project name as necessary.
A subdirectory with the same name as the project is created in the specified path. The associated output and log files for the project are stored in this subdirectory.
If a project with the same name already exists in the specified path, you are prompted whether you want to replace the old file. If you click , the new project overwrites the old one.
-
Click .
-
Skip to Step 5.
-
-
(Optional) Open an existing migration project. Select , click , select a project file (project_name.xml), then click .
If a selected file is not a valid migration project file, an error is displayed and you are prompted to select a valid project file.
-
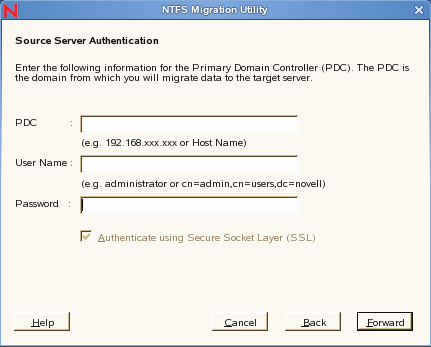
Authenticate to the source Windows domain:
-
In the (Primary Domain Controller) field, specify the IP address or DNS name of the PDC server.
-
In the field, specify the fully distinguished, typeful name of an Active Directory user with admin rights, or the Windows administrator of the source server.
Use either the simple form (Administrator) or the LDAP comma-delimited format (cn=admin,cn=users,dc=novell).
-
In the field, specify the password for the user.
The option is unavailable for Windows source servers.
-
Click .
-
-
Authenticate to the target tree.
-
In the field, specify the IP address or DNS name of the target server.
-
In the field, specify the fully distinguished, typeful name of a user with admin rights in the target tree.
Use the LDAP (comma-delimited) format. For example: cn=admin,o=novell
-
In the field, specify the password for the user.
-
Decide whether to use a secure connection.
-
To use a secure connection for LDAP authentication, make sure the option is selected (the default setting).
When this option is selected, you must also ensure that TLS is enabled for LDAP on the source server. In iManager, click > > > and verify that is selected (it is selected by default).
-
If you do not want to use a secure connection, deselect the option.
You must also disable TLS for LDAP on the source server by using iManager > > > > and deselecting .
Failure to set these options as instructed can result in unpredictable system behavior.
-
-
Click .
-
-
Select the source and target volumes.
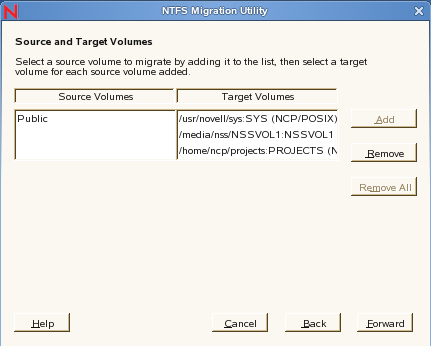
-
Click .
-
In the column, select the source share you want to migrate.
In the column, select the corresponding target volume.
The target volume type is displayed after the volume path:
-
NSS indicates a Novell Storage Services volume.
-
NCP/POSIX indicates a NetWare Core Protocol volume on a Linux POSIX file system, such as EXT3 or XFS.
If no entry is selected for the source or target volume, the first volume listed in the respective column is selected by default.
-
-
If necessary, click to clear the source and target volume entries and start over.
The button is not functional in this release.
-
When you have selected the desired source and target volumes, click .
-
-
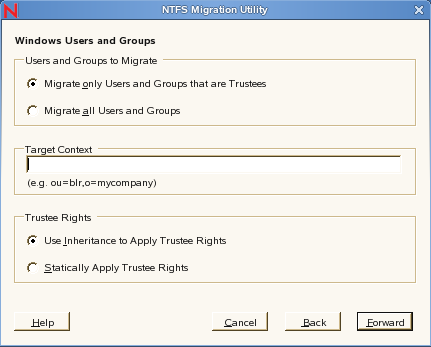
Specify the settings for migrating the Windows users and groups.
-
The setting determines which users and groups to migrate from the Windows domain. Select one of the following options:
-
Select (the default) to migrate only users and groups that have been assigned permissions to the data.
-
Select to migrate all users and groups in the Windows domain regardless of whether they have been assigned permissions to the data.
-
-
In the field, specify the container in the target eDirectory tree where you want User and Group objects to be created for the migrated Windows users and groups.
Use LDAP (comma-delimited) format. For example: ou=blr,o=mycompany.
If the specified context does not exist, it is created in the target tree.
-
The setting specifies whether or not you want to use inheritance to apply trustee rights.Select one of the following options:
-
Select (the default) if you want the migrated data to take advantage of the Novell rights model, which allows rights set at one level to flow down to lower levels in the file system hierarchy.
-
Select if you want trustee rights to be explicitly assigned at each level in the file system hierarchy.
In this release of the OES migration tool, selecting has no effect. The migration always uses the default setting.
-
-
Click .
-
-
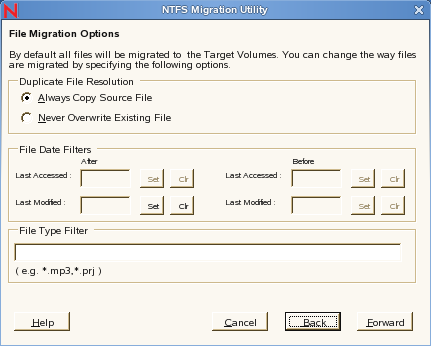
Specify the file migration options you want to use for this migration project.
-
The setting determines what action should occur when a file is being copied from the source server and a file with the same name and path exists on the target server. Select one of the following options:
-
Select (the default) if you want the source files to overwrite files with the same name on the target server.
-
Select if you do not want the source files to overwrite files with the same name on the target server.
-
-
Select the filter options you want.
The let you set date ranges for and to filter the files that are migrated from the source server.
Only the Last Modified After filter is functional in this release of the OES migration tool.
-
If no filters are set, files are migrated regardless of their Last Accessed and Last Modified dates.
-
If you specify a date in the column, only files accessed or modified after the specified date are migrated.
-
If you specify a date in the column, only files accessed or modified before the specified date are migrated.
-
If you set both an and a date, only files accessed between the two specified dates are migrated.
For each date filter setting, click to select a date from a calendar, or type a date in DD-MM-YYYY hh:mm:ss format. If necessary, click to remove the date.
The File Date Filters are inclusive in nature, meaning all files that fall within the specified date ranges are migrated.
-
-
(Optional) Select File Type filter options.
The lets you exclude all files of a specific type, as well as individual filenames.
Enter filenames or extensions. Wildcard (*) specifications are permitted. For example, entering *.mp3 excludes all files with an extension of .mp3 from being migrated. Entering samplefile.txt excludes any files with this name from being migrated. Use a comma to separate multiple entries; for example: *.mp3, *.mov, *.tmp
The File Type Filter is exclusive in nature, meaning all files that match the filter patterns are not migrated.
-
When you have finished selecting your migration options, click .
-
-
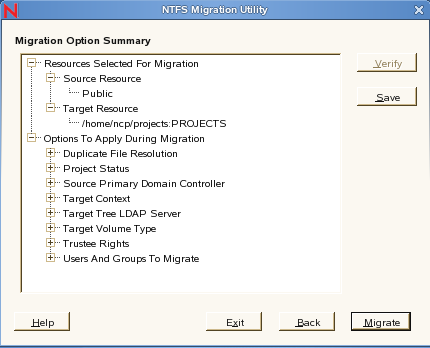
Review the migration option summary:
-
Expand the entries to verify that you have made the correct selections.
-
Take the appropriate action:
-
If needed, click to go back through the previous pages and change the migration settings.
-
If you do not want to start the migration now, click to save the settings to the migration project file. You can open and continue the migration project later.
-
Click to exit the project without performing the migration.
-
Click to start the migration process. Continue with Step 11.
The button is enabled only after the migration has completed (see Step 14).
-
-
-
Monitor the progress of the migration project.
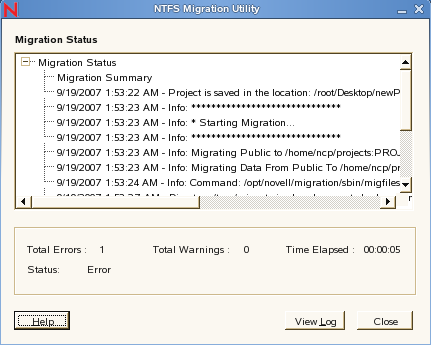
The Migration Status window displays the progress of the migration, and the field below shows the total number of errors and warnings, the time elapsed, and a status message.
-
When the migration finishes or if it stops prematurely, click to open the log file (project.log in the project folder) in a text editor.
The log file records everything displayed in the Migration Status window. You should review the log to verify the success of the migration.
If errors occurred, the messages recorded in the log file can help you determine what needs to be corrected before you attempt the migration again.
-
Click to close the Migration Status window.
-
(Conditional) To ensure that everything was migrated correctly, click and review the log file again.
-
Click to exit the utility.