7.3 Configuring Services Settings
Services Settings lets you control all new and existing virtual search servers. For example, when you disable a feature such as e-mail services, the e-mail services feature is removed from the virtual search server configuration pages, making it impossible for the virtual search server administrator to access it.
You can also perform other administrative tasks, such as checking for software updates and configuring QuickFinder synchronization.
Services Settings are meant for global QuickFinder server administrators, giving them global control of the QuickFinder server and all virtual search servers, including the ability to completely disable a virtual search server. Services Settings also let the administrator control the overall performance of the QuickFinder server.
Unlike the Default Settings, changes made here affect both new and existing virtual search servers. For example, if the e-mail feature is enabled from the Default General Settings page (accessed from the Global Settings page), and on the General Settings page of a virtual search server, the global administrator can disable it from General Services Settings. When that is done, the e-mail feature is disabled and its settings are removed from all other configuration pages.
7.3.1 Configuring General Services Settings
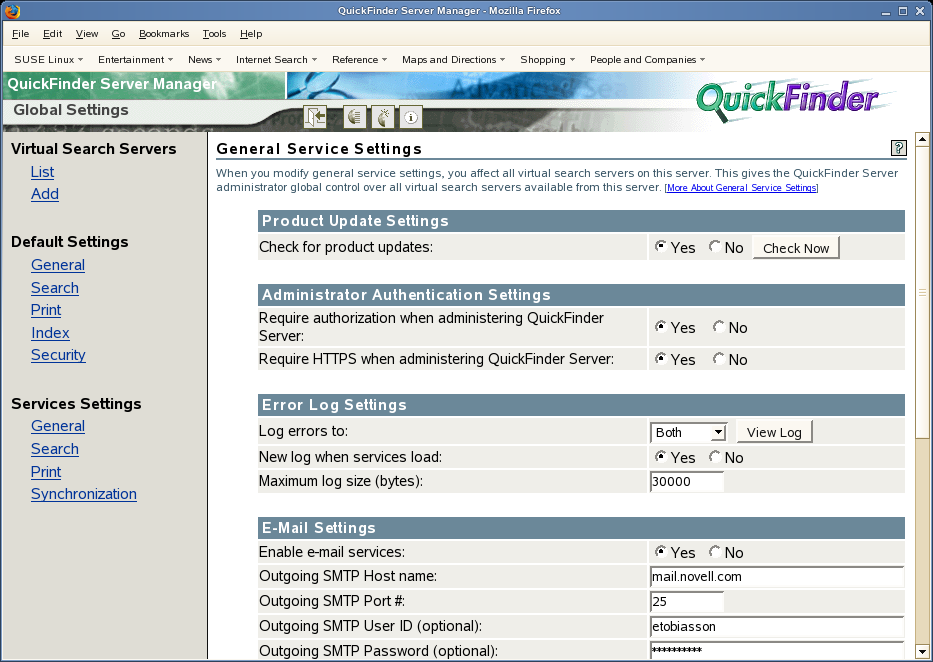
General Services Settings let you configure product update, error log, and e-mail settings. If you disable a feature here, it is disabled on all virtual search servers and removed from their configuration pages. If you re-enable the feature, it reappears on all configuration pages with the same settings used before it was disabled by the global administrator.
Modifying Product Update Settings
-
On the QuickFinder Server Manager’s Global Settings page, click under .
-
(Optional) Under , click next if you want QuickFinder to regularly check for software updates and notify you when updates are available.
For more information, see Section 7.4, Updating QuickFinder Server Software.
-
Click to save any changes you have made.
Clicking causes any unsaved changes to be lost.
-
To check for software updates immediately, click .
-
Click .
Modifying Administrator Authentication Settings
-
On the QuickFinder Server Manager’s Global Settings page, click under .
-
Under , choose from the following options:
-
Require authorization when administering QuickFinder Server: Click to require a login name and password when accessing QuickFinder Server Manager.
-
Require HTTPS when administering QuickFinder Server: Click to require the use of the secure HTTP protocol (HTTPS) when accessing QuickFinder Server Manager.
-
-
Click .
Modifying Error Log Settings
-
On the QuickFinder Server Manager’s Global Settings page, click under .
-
Under , select where you want log results displayed by choosing one of the following options from the drop-down list:
-
File: When this option is selected, you can click next to the drop-down list to display the log results in your browser.
-
Console: When this option is selected, the error log settings writes the logs to /var/opt/novell/tomcat5/logs/catalina.out file.
-
Both: Displays results in both your browser and at the system console.
You can access the log file directly by going to /var/lib/qfsearch/Errors.log.
-
-
To start a new log file each time you restart the QuickFinder server, click next to .
You can also delete the log file at the path specified above. The log file is re-created on the first instance of a new error, statistics, etc.
-
To limit the size of the log file, specify a file size (in bytes) in the field.
The number you specify here is divided evenly between two log files. For example, if you specify 30000, each log file allows up to 15000 bytes of logged data. This ensures that you always have at least 15000 bytes of logged synchronization data.
-
Click .
Modifying E-Mail Settings
-
On the QuickFinder Server Manager’s Global Settings page, click under .
-
Under , click next to if you want QuickFinder to generate an e-mail message whenever errors occur during the generation (or regeneration) of your virtual search server’s indexes, or when your indexes are being synchronized with other QuickFinder servers.
-
In the field, specify the SMTP hostname of the mail server that handles e-mail requests (for example, mail.novell.com).
-
In the field, specify the SMTP port number for the mail server specified above.
Typically, the port number for mail servers is 25.
-
(Optional) If your SMTP server requires authentication the, specify your user ID in the field.
-
(Optional) Specify the matching password for your SMTP user account in the field.
-
(Optional) Specify an e-mail address in the field.
-
Click .
Modifying Server Management Settings
-
On the QuickFinder Server Manager’s Global Settings page, click under .
-
Under , specify a number in the field to limit the number of indexing jobs that can run simultaneously.
Any indexing jobs beyond the number you specify here are placed in a queue until one of the original indexing jobs is completed.
Each server’s performance varies because of hardware configuration and the amount of user traffic, so you should experiment with how many indexing jobs you can run simultaneously without negatively affecting the performance of your server. Also, you might consider using the feature to regenerate indexes after business hours. See Section 8.9, Automating Index and Server Maintenance for more information.
-
In the field, specify the path where you want all virtual search server files to be stored, including index and configuration files.
Changing this setting won’t move existing sites to the new default location, but all new virtual search servers are placed here.
-
To direct QuickFinder to reload configuration files modified manually, outside of QuickFinder Server Manager, click next to the field.
If you make changes outside of QuickFinder Server Manager, such as modifying configuration or properties files or any of the templates, QuickFinder re-reads those files as often as you indicate in the field.
If you modify the adminservlet.properties file, you must reboot your server in order for the changes to take effect. This is the only file that cannot be re-read by using the feature.
-
In the field, specify how often QuickFinder should check for manual changes (changes made outside of QuickFinder Server Manager) to the configuration files.
-
To direct QuickFinder to reload QuickFinder templates that have been modified, click next to the field.
After making a change to a template from within your HTML editing tool and saving it on your server, QuickFinder re-reads the template as often as you specify in the field. This means you can test your changes almost immediately.
-
In the field, specify how often QuickFinder should reload search, print, results, and error templates.
-
Click .
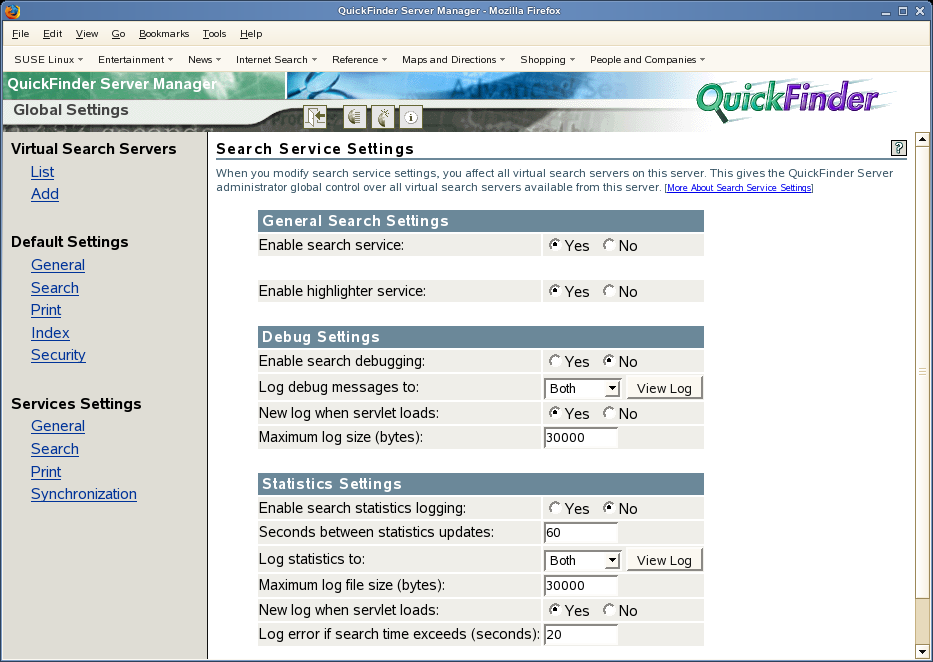
7.3.2 Configuring Search Services Settings
Search Services Settings let you turn search capabilities on or off and manage debugging and statistics settings.
Modifying General Search Services Settings
-
On the QuickFinder Server Manager’s Global Settings page, click under .
-
Under , click next to to enable search services for all virtual search servers on your QuickFinder server.
-
To enable the highlighter, click next to .
-
Click .
Modifying Search Debug Settings
-
On the QuickFinder Server Manager’s Global Settings page, click under .
-
Under , click next to if you want to keep a log of all searches and query results going to all virtual search servers.
IMPORTANT:We recommend that you use this feature only while setting up or troubleshooting your search services because the log file can grow in size very quickly. In addition, logging query and response details can slow down searches.
-
Specify where you want log results displayed by selecting one of the following options from the drop-down list:
-
File: When this option is selected, you can click next to the drop-down list to display the log results in your browser.
-
Console: When this option is selected, the debug settings writes the logs to /var/opt/novell/tomcat5/logs/catalina.out file.
-
Both: Displays results in both your browser and at the system console.
-
-
To start a new log file each time you restart the QuickFinder server, click next to .
-
To limit the size of the log file, specify a file size (in bytes) in the field.
The number you specify here is divided evenly between two log files. For example, if you specify 30000, each log file allows up to 15000 bytes of logged data. This ensures that you always have at least 15000 bytes of logged synchronization data.
-
Click .
Modifying Search Statistics Settings
-
On the QuickFinder Server Manager’s Global Settings page, click under .
-
Under , click next to if you want an updated log file containing statistics about searches performed against all virtual search servers on your QuickFinder server.
-
In the field, specify a number (in seconds) that should elapse between updates of the statistics log file.
-
Specify where you want log results displayed by selecting one of the following options from the drop-down list:
-
File: When this option is selected, you can click next to the drop-down list to display the log results in your browser.
-
Console: When this option is selected, the statistics settings writes the logs to /var/opt/novell/tomcat5/logs/catalina.out file.
-
Both: Displays results in both your browser and at the system console.
-
-
To limit the size of the log file, specify a file size (in bytes) in the field.
The number you specify here is divided evenly between two log files. For example, if you specify 30000, each log file allows up to 15000 bytes of logged data. This ensures that you always have at least 15000 bytes of logged synchronization data.
-
To start a new log file each time you restart the QuickFinder server, click next to .
-
In the field, specify a number (in seconds) before QuickFinder should record the current search as exceeding the specified time limit on the statistics display.
This appears as the portion of the statistics display.
-
Click .
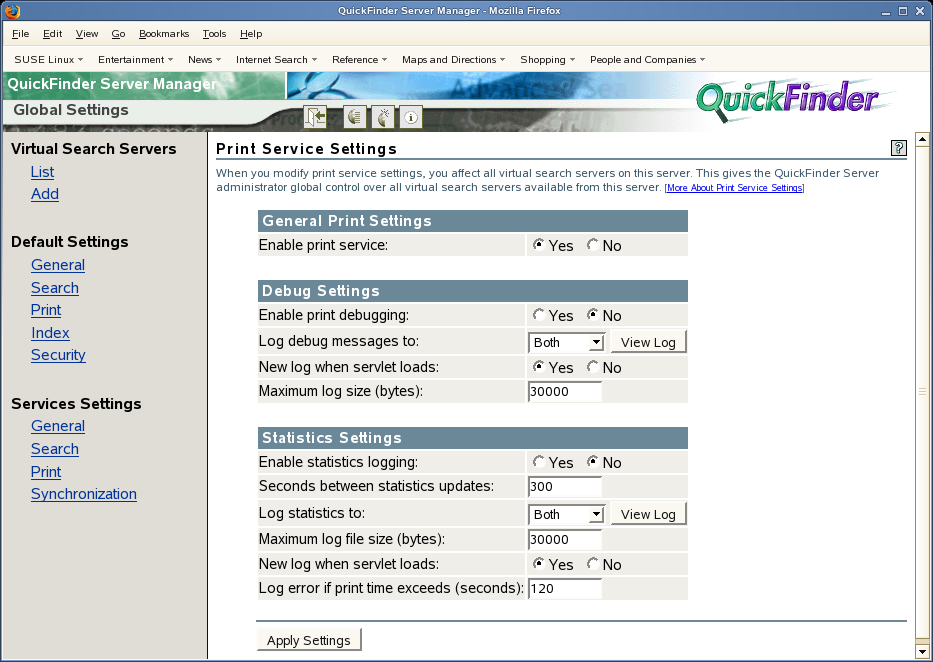
7.3.3 Configuring Print Services Settings
Modifying General Print Services Settings
-
On the QuickFinder Server Manager’s Global Settings page, click under .
-
Under , click next to to enable print services for all virtual search servers on your QuickFinder Server.
-
Click .
Modifying Print Debug Settings
-
On the QuickFinder Server Manager’s Global Settings page, click under .
-
Under , click next to if you want print debugging turned on.
IMPORTANT:We recommend that you use this feature only while setting up or troubleshooting your search services because the log file can grow in size very quickly. In addition, logging query and response details can slow down searches.
-
Specify where you want log results displayed by selecting one of the following options from the drop-down list:
-
File: When this option is selected, you can click next to the drop-down list to display the log results in your browser.
-
Console: When this option is selected, the debug settings writes the logs to /var/opt/novell/tomcat5/logs/catalina.out file.
-
Both: Displays results in both your browser and at the system console.
-
-
To start a new log file each time you restart the QuickFinder server, click next to .
-
To limit the size of the log file, specify a file size (in bytes) in the field.
The number you specify here is divided evenly between two log files. For example, if you specify 30000, each log file allows up to 15000 bytes of logged data. This ensures that you always have at least 15000 bytes of logged synchronization data.
-
Click .
Modifying Print Statistics Settings
-
On the QuickFinder Server Manager’s Global Settings page, click under .
-
Under , click next to if you want an updated log file containing statistics about print requests performed on your QuickFinder server.
-
In the field, specify a number (in seconds) that should elapse between updates of the statistics log file.
-
Specify where you want log results displayed by selecting one of the following options from the drop-down list:
-
File: When this option is selected, you can click next to the drop-down list to display the log results in your browser.
-
Console: When this option is selected, the statistics settings writes the logs to /var/opt/novell/tomcat5/logs/catalina.out file.
-
Both: Displays results in both your browser and at the system console.
-
-
To limit the size of the log file, specify a file size (in bytes) in the field.
The number you specify here is divided evenly between two log files. For example, if you specify 30000, each log file allows up to 15000 bytes of logged data. This ensures that you always have at least 15000 bytes of logged synchronization data.
-
To start a new log file each time you restart the QuickFinder server, click next to .
-
In the field, specify a number (in seconds) before QuickFinder should record the current print job as exceeding the specified time limit on the statistics display.
This appears as the portion of the statistics display.
-
Click .
7.3.4 Configuring Synchronization
QuickFinder Synchronization lets you designate one QuickFinder server as the search master from which updated indexes, templates, and configuration settings are systematically sent out to all other QuickFinder servers defined as part of a QuickFinder Synchronization cluster.
For more information about setting up and configuring QuickFinder Synchronization, see Synchronizing Data Across Multiple QuickFinder Servers.