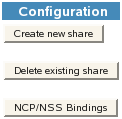
9.4 Configuring the NCP/NSS Bindings for an NSS Volume
The NCP/NSS Bindings parameter for an NSS volume governs whether the volume is automatically mounted on system restart in NCP Server. When the parameter is enabled, the NSS volume is automatically mounted for NCP Server. When it is disabled, the NSS volume is not mounted for NCP Server. The NCP/NSS Bindings parameter is enabled by default, making the volume NCP accessible.
NSS volumes are automatically mounted by default on system restart, first in NSS, then in NCP Server. This is the desired behavior for all independent NSS volumes that are not in shadow volumes, and for NSS volumes that you use as primary storage locations in a DST shadow volumes. When an NSS volume is used as the secondary storage area in a DST shadow volume, you want the NSS volume to be mounted in NSS, but not in NCP Server. This allows DST to control access to the secondary storage area via the primary storage area. Files in the secondary storage area cannot be directly accessed by users.
After you remove a shadow volume, the NCP/NSS Bindings parameter for the NSS volume that was used as the secondary storage area remains disabled until you enable it. You must enable the bindings and mount the volume in order to enable users to access the now independent volume.
9.4.1 Disabling the NCP/NSS Bindings for an NSS Volume
The volume’s NCP/NSS Bindings parameter must be disabled for NSS volumes that you use as secondary storage locations in a DST shadow volumes.
-
In Novell Remote Manager for Linux, select > .
-
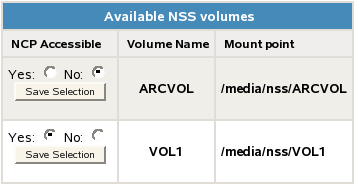
In the area of the NCP Shares page, click .
-
In the list, locate the NSS volume that you want to disable.
-
In the column, click to make the NSS volume not accessible to NCP so that it is not mounted in NCP after it is mounted in NSS.
-
Beneath the volume’s setting for , click to save and apply the new setting.
-
Verify that the NSS volume is not available for NCP by selecting > to view a list of active volumes.
If the NCP/NSS Bindings parameter is successfully disabled, the NSS volume should not appear in the list.
9.4.2 Enabling the NCP/NSS Bindings for an NSS Volume
The volume’s NCP/NSS Bindings parameter must be enabled for NSS volumes that you use as primary storage locations in a DST shadow volumes, and for all independent NSS volumes that are not in shadow volumes. This is the default.
-
In Novell Remote Manager for Linux, select > .
-
In the area of the NCP Shares page, click to open the NCP/NSS Bindings page.
-
In the list, locate the NSS volume that you want to enable.
-
If the volume’s setting is , click to make the NSS volume accessible to NCP so that the volume is automatically mounted in NCP after it is mounted in NSS.

-
Beneath the volume’s setting for , click to save and apply the new setting.
The volume appears in the list on the NCP Shares page.
-
Verify that the NSS volume is available for NCP by selecting > to view a list of active volumes.
If the NSS/NCP Bindings parameter is enabled, the NSS volume appears in the list, and a button is displayed next to it.
-
Click .
When the volume is successfully mounted, the volume’s name is hyperlinked, and an button is displayed next to it.
9.4.3 Enabling or Disabling NCP/NSS Bindings by Editing the /etc/opt/novell/ncp2nss.conf File
When the NCP/NSS bindings parameter is disabled for a volume, NCP Server adds an EXCLUDE_VOLUME entry to the /etc/opt/novell/ncp2nss.conf file. You can manually disable or enable the NSS volume’s NCP/NSS bindings parameter by adding or removing this entry from the file, then restarting the NCP2NSS daemon.
-
Open the /etc/opt/novell/ncp2nss.conf configuration file in a text editor.
-
Do one of the following:
-
Disable the NCP/NSS Binding: Add an EXCLUDE_VOLUME entry for the volume you plan to use as secondary NSS volume in order to exclude the volume from being automatically mounted for NCP Server.
EXCLUDE_VOLUME nss_volumenameReplace nss_volumename with the name of the NSS volume. For example, to disable the bindings for the NSS volume named ARCVOL:, add the following line. Note that you do not include the colon after the volume name.
EXCLUDE_VOLUME ARCVOL
-
Enable the NCP/NSS Binding: Locate the EXCLUDE_VOLUME entry for the NSS volume, then remove that line from the file.
-
-
Save the file.
-
Restart the Novell eDirectory daemon by entering the following commands:
rcndsd stop
rcndsd start
-
Restart the NCP/NSS IPC daemon to synchronize the changes you made to the /etc/opt/novell/ncp2nss.conf file:
-
At the terminal console prompt, enter
/etc/init.d/ncp2nss restart
-
If the NCP/NSS IPC daemon restarts successfully, the following messages are displayed in the terminal console:
Shutting down Novell NCP/NSS IPC daemon...
Exited
Starting the Novell NCP/NSS IPC daemon.
-