23.2 Configuring the Purge Behavior for NSS
23.2.1 Setting the Purge Delay for All Deleted Volumes
The Purge Delay setting for the NSS volume determines the amount of time (in seconds) that you can still access the deleted volume before it is removed from the system. The default value for the Purge Delay setting is 345600 seconds (4 days). The volume name is changed during delete so that a new volume with the same name can be immediately created. The management tool used to delete the volume should clean up any Novell eDirectory Storage objects at delete time. Use NSSMU or the Storage plug-in to iManager to purge or salvage the deleted volume before the Purge Delay time elapses.
To configure the Purge Delay time, enter the following at the server console:
nss /LogicalVolumePurgeDelay=value
In this command, replace value with the actual number of seconds to delay the purge. For example, if you want to change the Purge Delay time from the default of 4 days to 1 day, set the value to 86400 by entering:
nss /LogicalVolumePurgeDelay=86400
The Purge Delay change command is not permanent when entered from the command line. You must enter the command each time you restart the server. To make the new setting permanent, add the command to the /etc/opt/novell/nss/nssstart.cfg file.
23.2.2 Setting the Immediate Purge of Deleted Files for All NSS Volumes
The salvage capability for directories and files can be turned on and off for NSS at the server level by using the /(No)ImmediatePurgeOfDeletedFiles flag. By default, the setting is disabled (set to NoImmediatePurgeOfDeletedFiles). You might want to enable this setting if you have Salvage enabled for multiple volumes, but want to disable salvage across all of them without separately changing the volumes’ Salvage attribute settings.
This server-level salvage setting overrides the settings for the volume-level Salvage attribute. It does not affect deleted NSS volumes.
Table 23-3 Server-Level Salvage Parameter
|
Parameter |
Description |
|---|---|
nss /NoImmediatePurgeOfDeletedFiles nss /ImmediatePurgeOfDeletedFiles |
Supported Values: Enabled or disabled (default) If this parameter is enabled, it overrides the Salvage attribute setting for individual NSS volumes so that the directories and files are immediately purged on deletion. |
23.2.3 Setting the Low and High Salvage Watermarks for Automatically Purging Deleted Directories and Files
Salvage watermarks are parameters associated with the salvage feature of NSS pools. Automatic purging of deleted files begins when the pool’s low watermark is reached and continues until its high watermark is reached, or until all existing deleted files and directories have been purged. Files and directories are purged on a first-deleted, first-purged bases. If you have deleted volumes in the pool, any deleted files and directories that existed when the volume was deleted are considered for this space-based purge, but the deleted volume is not.
When free space in the pool falls below a low watermark, NSS begins autopurging the deleted files. When enough files are purged so that the free space increases to a percentage equal to or greater than the high watermark, the autopurge stops. The autopurge also stops before the high watermark is reached if there are no more deleted files or directories to be purged. Autopurging does not start again until free space again drops below the low watermark.
Figure 23-1 How Autopurging Works
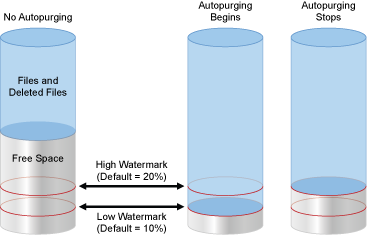
The high and low watermarks can be configured only at a pool level. The default low watermark is 10% of the maximum pool size. The default high watermark is 20% of the maximum pool size. The low watermark’s percentage can range from a minimum of 0% to a maximum of 98%. The high watermark’s percentage can range from a minimum 2% to a maximum of 100%. The high and low watermarks must be at least 2% apart from each other.
IMPORTANT:The pool’s watermark settings are enforced only at the pool level. Volume-level watermarks are not supported. The Storage plug-in to iManager displays default values for volume watermarks, but they have no effect. In order for a volume to benefit from the watermark protection, set the volume’s size to grow to the size of the pool.
At the minimum setting of 0%, the low watermark activates the autopurge only when the pool is totally out of free space. If the watermark is set this low, users are likely to get out-of-space errors when they try to save files. Setting the low watermark to a percentage a little higher than 0% guarantees that autopurging begins before free space is completely used, and users are less likely to get out-of-space errors.
The low and high salvage watermarks for a pool are set on boot to the default levels. Commands to modify the watermarks can be issued from the command line or placed in a startup file. Settings in the startup file persist across server reboots. Commands issued at the command line persist until the next reboot, or until the command is issued again, whichever occurs first.
Use the following commands to configure the high and low watermarks for pools. Issue the commands in the NSS Console (nsscon) as the root user from within a terminal console.
nss /PoolHighWaterMark=poolname:Percent/MB/GB
nss /PoolLowWaterMark=poolname:Percent/MB/GB
Replace the poolname with the name of an individual pool or with All to set the value for all pools. For example, to set the low watermark to 5% and the high watermark to 10% for pool p_users, enter
nss /PoolHighWaterMark=p_users:10%/MB/GB
nss /PoolLowWaterMark=p_users:5%/MB/GB
23.2.4 Setting the Purge Immediate Attribute for a Directory or File
The Purge Immediate file-system attribute flags a directory or file to be erased from the system as soon as it is deleted. Purged directories and files cannot be recovered. When this attribute is enabled, it overrides the salvage settings at the volume and server level. When it is disabled, the server and volume salvage settings apply. In order to modify this setting, you must be the administrator user or a user who is a trustee with the Erase right.
-
In iManager, select .
-
Click the icon to locate and select the directory or file you want to manage.
-
Click the tab to view the properties for the selected directory or file.
-
Scroll down to view the section, then select the attribute to enable the selected directory or file to be purged immediately on deletion, or deselect it to allow the salvage settings to control the fate of the deleted directory or file.
-
Click or to save your changes.