5.2 Upgrading CIFS File Services to OES
5.2.1 About CIFS File Services in OES 2
Starting with OES 2, the CIFS file services that were previously available only on NetWare through the Native File Access Protocols (NFAP) service have now been ported to OES as Novell CIFS.
The Novell CIFS service lets users on Windows workstations access and store files on OES 2 servers with NSS volumes without installing any additional software, such as the Novell Client (see Figure 5-2).
Figure 5-2 How Novell CIFS Works
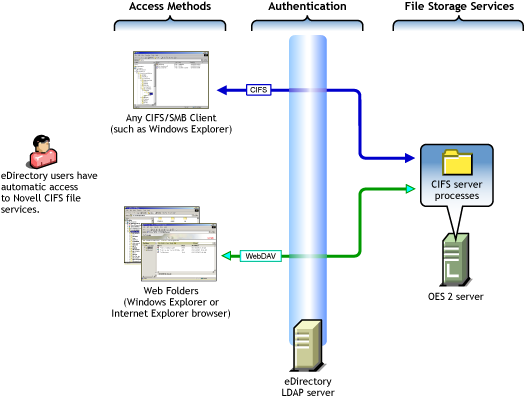
The following table explains the information illustrated in Figure 5-2.
|
Access Methods |
Authentication |
CIFS File Services |
|---|---|---|
|
eDirectory users on Windows workstations have two native Windows file access options:
|
All file service access is controlled by LDAP-based authentication through the eDirectory LDAP server. Although it is shown separately, eDirectory could be installed on the OES 2 server. |
Of course, the same files can also be accessed through other OES file services (such as NetStorage) that connect to NSS volumes. |
5.2.2 Platform Differences in CIFS File Services
The differences in CIFS services on NetWare and OES 2 are summarized in the following table.
Table 5-3 CIFS services on NetWare and OES 2
|
Service |
NetWare |
OES 2 |
|---|---|---|
|
64-Bit Support |
No |
Yes |
|
Distributed File Services for NSS Volumes |
Yes |
Future |
|
OpLocks |
Yes |
Yes |
|
Cross Protocol Locking |
Yes |
Future |
|
NSS Support |
Yes |
Yes |
|
CIFS-enabled shared NSS pool/volume in a NetWare-to-NetWare or OES-to-OES cluster |
Yes |
Yes |
|
CIFS-enabled shared NSS pool/volume in a mixed NetWare-to-OES cluster |
No |
No |
|
iManager Support and Administration tool |
Yes |
Yes |
|
File and Record Locking |
Yes |
Yes |
|
Domain Emulation |
Yes |
Future |
|
Monitoring |
No |
Future |
|
Xen Virtualized Host Server Environment |
NA |
No |
|
Xen Virtualized Guest Server Environment |
Yes |
Yes |
|
Multi-processor/Multicore Server Support |
No |
Yes |
|
Multi-File System Support |
No |
Future |
|
NTLMv2/Kerberos |
No |
Future |
5.2.3 Planning to Upgrade CIFS Services
The OES 2 SP3 Migration Tool supports transferring CIFS file services from NetWare to OES 2. The upgrade process is quite straightforward, but there are, of course, some planning steps that you must take to ensure success.
Requirements
Table 5-4 CIFS Source and Target Server Requirements
|
Source Server |
Target Server |
|---|---|
|
NetWare 5.1 or later |
OES 2 SP3. |
|
The Novell CIFS service pattern is installed but not configured. |
|
Data can be moved independently of the service. Users can always see what they have rights to see. |
Limitations
Cross-Tree Migration Not Supported
The OES 2 SP3 Migration Tool does not support transferring CIFS services across eDirectory trees. However, CIFS services can be effectively transferred by first moving the data to an OES 2 SP3 target server in the other tree, and then configuring CIFS on the target server.
For details, see Migrating Data to a Server in a Different Tree
in the OES 2 SP3: Migration Tool Administration Guide and Installing and Setting Up AFP
in the OES 2 SP3: Novell AFP For Linux Administration Guide.
Server Configuration Information Not Transferred with Consolidation
The CIFS shares configuration and CIFS Users contexts are transferred by using both migration types (Consolidate and Transfer ID), but the server configuration information is transferred only with a Transfer ID migration.
Upgrading Novell Samba Not Supported
The OES 2 SP3 Migration Tool does not support Novell Samba as a source service for transferal to Novell CIFS.
Universal Password
A Universal Password policy is required for Novell CIFS.
5.2.4 Upgrading CIFS
You can use either of the two migration types offered by the Migration Tool to transfer CIFS file services from NetWare to OES 2:
-
Consolidate: If you want to move just the CIFS shares and associated data to an OES 2 SP3 server, you can perform a consolidation migration. The CIFS server configuration is not transferred. For more information, see Section A.1.1, Consolidating Selected Data or Services.
-
Transfer ID: If you are transferring an entire NetWare server, including the CIFS service and associated data, to an OES 2 SP3 server, then you should perform a Transfer ID migration. For more information, see Section A.1.2, Transferring an Entire NetWare Server.
To upgrade Novell CIFS from NetWare to OES 2, follow the instructions in Migrating CIFS from NetWare to OES 2 SP3 Linux
in the OES 2 SP3: Migration Tool Administration Guide.
5.2.5 Post-Upgrade Checks
Restarting CIFS
After the CIFS service is transferred, restart CIFS at a terminal prompt by using the following command:
rcnovell-cifs restart
Verifying Success
Be sure to complete the instructions in Verifying the Migration
in the OES 2 SP3: Migration Tool Administration Guide.