17.1 Configuring Group Policies
To create a new Group Policy, you can use the Active Directory Users and Computers tool.
NOTE:If you have installed the Group Policy Management Console from Microsoft, the tab options described below are no longer accessible. Refer to the Microsoft Windows Server 2003 documentation for instructions on how to use the Group Policy Management Console to manage Group Policies.
To Configure a new Group Policy
-
Start Active Directory Users and Computers.
-
In the console tree, right-click the Domain Services for Windows domain, and then select .
-
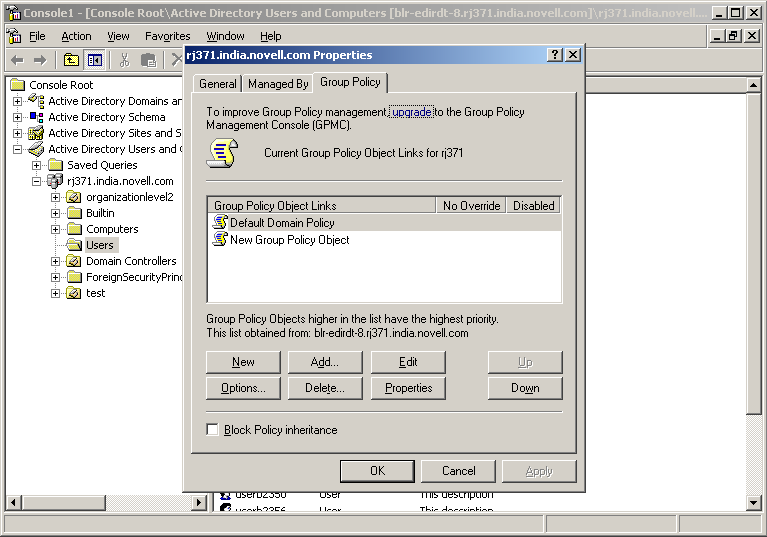
Click the tab, then click to create a new Group Policy.
-
Specify a name for the new Group Policy, then click OK
The policy settings you define are linked to the domain, which means the policy settings you define are applied to the domain according to the inheritance and preference options used by Active Directory.
These additional Group Policies can be associated to an Organization Unit under the domain.
Editing an Existing Group Policy
To modify Group Policy settings within Group Policy objects (GPOs), you can use the Group Policy Object Editor which is a Microsoft Management Console (MMC) snap-in used for configuring and modifying Group Policy settings. It operates as an extension to Group Policy Management Console (GPMC).
If GPMC is not available, you can use the Active Directory Users and Computers snap-in or the Active Directory Sites and Services snap-in.
To edit and existing group policy, follow the instructions in How To Use the Group Policy Editor to Manage Local Computer Policy
NOTE:If you are not able to edit the Group Policy, it is because the DFS cache is pointing to a server that is not holding the PDC Emulator role. To set the DFS link to point to the server holding the PDC Emulator role, execute the steps in Setting the DFS Referral of the Server Holding the PDC Emulator Role as Active on the Workstation.
Setting the DFS Referral of the Server Holding the PDC Emulator Role as Active on the Workstation
To set the DFS link of the server holding the PDC Emulator role as active, execute the following procedure:
-
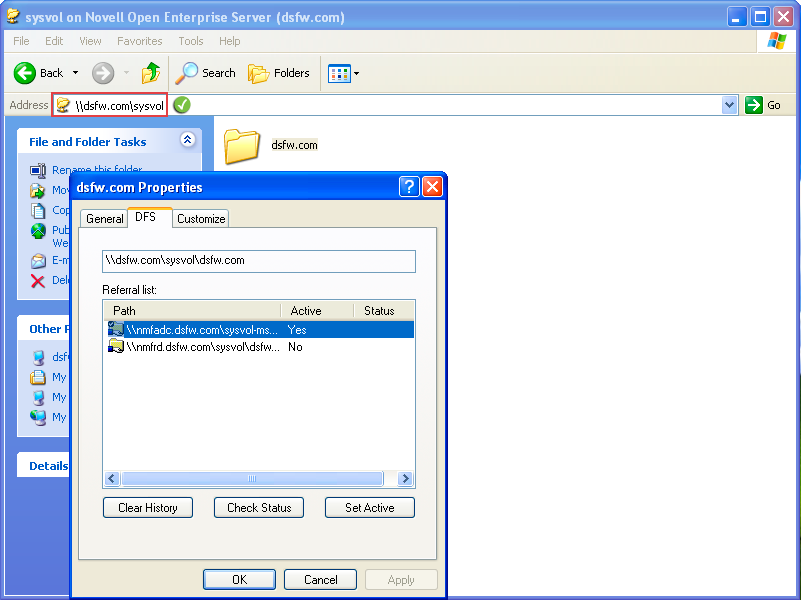
Browse to the SYSVOL folder by typing \\domain.tld\sysvol\ or \\ ipadress\sysvol in the file explorer. Select the domain.tld folder.
-
Right click the domain.tld folder to view the properties. Click the tab. It will list two referrals.
-
Select the link of the server holding the PDC Emulator role and set it as active.
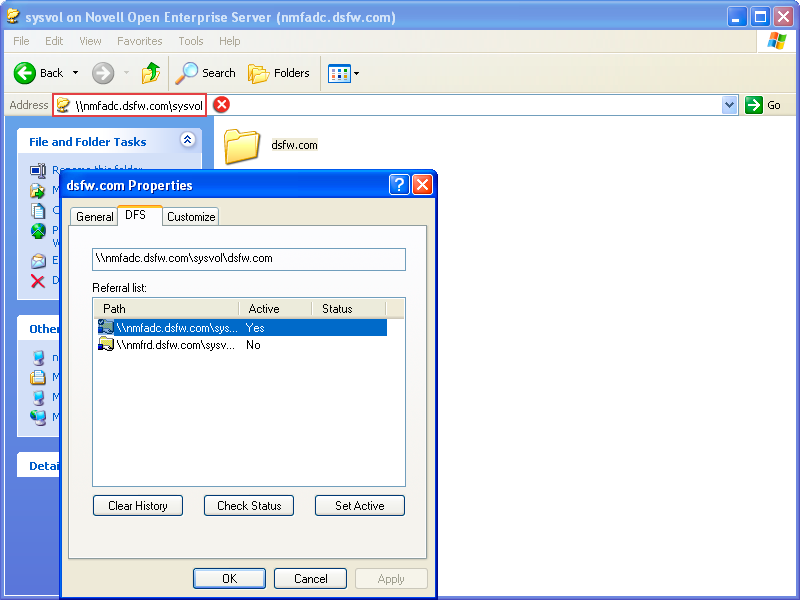
This procedure of settings the DFS referral can be used even if there are multiple domain controllers in a domain. However, while setting the DFS referral, you must ensure that you do not specify the fully qualified domain name of the domain controller in the file explorer to browse the SYSVOL folder. For instance, for a domain named dsfw.com that has multiple domain controllers nmfadc.dsfw.com and nmfrd.dsfw.com, you must specify \\dsfw.com\sysvol in the file explorer for setting the DFS referral as shown in the figure below.
You must not specify the fully qualified domain name of the domain controller in the file explorer as shown in the following figure.
For more information about Group Policy Object settings, refer to Microsoft’s online Group Policy documentation. For more information about NMAS and Universal Password settings, refer to the Novell eDirectory documentation.