13.13 Renaming a Clustered NSS Volume
When an NSS volume is in a cluster-enabled pool, special steps must be followed to rename it. Renaming the volume automatically changes the Volume object name, updates the volume information for the pool, and updates the volume name in the scripts for the pool cluster resource. Custom mount options are preserved in the ncpcon mount command. After the volume is renamed, the default mount point changes from /media/nss/<old_volume_name> to /media/nss/<new_volume_name>.
Because renaming requires that information is modified in eDirectory, you should rename the volume from the master node. NSS management tools require that the shared pool and volume are active locally on a cluster node that has its NCP Server object in the same context as the Pool object and Volume object of the volume you want to rename. The server must also be in the resource’s list to migrate to it. To view or modify the list, see Section 11.10, Configuring Preferred Nodes and Node Failover Order for a Resource.
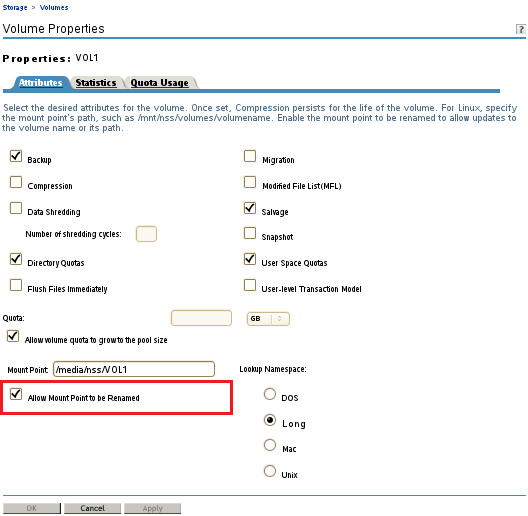
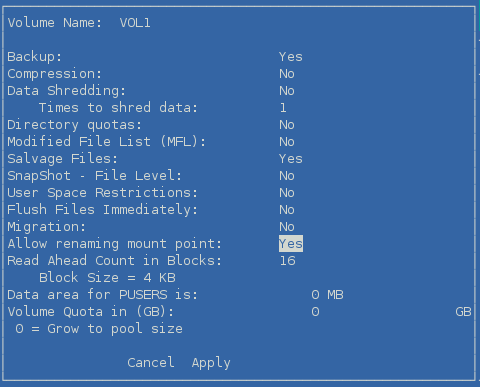
Before you rename the volume, check the volume properties to ensure that the attribute has been enabled. If the attribute is disabled, the volume name will be modified, and the mount point path is unchanged on the initial remount, making it appear that you have retained the old mount point path. However, for the shared volume, the default mount path of /media/nss/<volume_name> is enforced with the new name on subsequent mounts. If your intent is to use a custom mount point path for a shared NSS volume, see Section 13.14, Renaming the Mount Point Path for a Shared NSS Volume (Using a Custom Mount Point for a Shared NSS Volume).
If the pool cluster resource manages multiple volumes, we recommend that you rename only one volume at a time. Verify that the renamed volume and pool cluster resource are working as expected before you attempt to rename another volume in the shared pool.
The NCP Server, Novell AFP, and Novell CIFS services are integrated with NSS and Cluster Services. The NCP, AFP, and CIFS file access continues to work after the volume is renamed. However, you must ensure that your users have the proper path information for the volume after it is renamed. If you have other protocols and services configured for the volume, you might need to re-configure them to work with the new volume name.
After you rename the NSS volume, you must manually edit some lines in the resource scripts if you use a custom mount point path for the NSS volume. For more information, see Section 13.14, Renaming the Mount Point Path for a Shared NSS Volume (Using a Custom Mount Point for a Shared NSS Volume).
If the volume is used as the primary volume or secondary volume in a Dynamic Storage Technology resource script, special steps are required to remove references to the old names as a shadow volume pair. Some information must be removed manually on each node before you bring the modified resource online.
You can use the procedures in the following sections to rename shared volumes:
13.13.1 Renaming a Shared NSS Volume with iManager
-
Ensure that the pool cluster resource is running on the master node.
If you need to migrate the resource:
-
In iManager, select > , then select the cluster that you want to manage.
-
On the Cluster Manager page, select the check box next to the pool cluster resource, then click .
-
Select the master node, then click .
Wait for the resource to report a state before you continue.
-
-
Take the pool cluster resource offline. On the Cluster Manager page, select the check box next to the pool cluster resource, then click .
Wait for the resource to report an state before you continue.
-
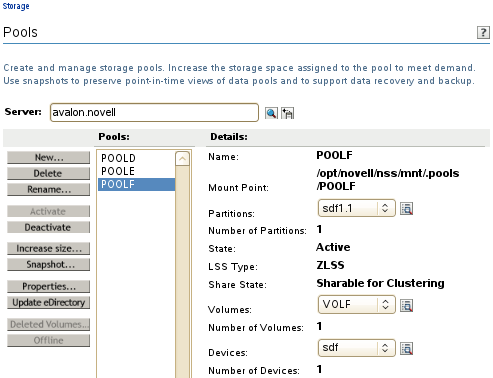
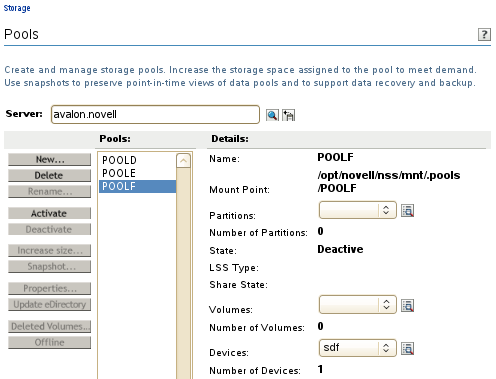
Activate the pool locally on the master node:
-
In iManager, select > .
-
Browse to select the server where you want to activate the pool.
-
In the list, select the shared pool that contains the volume, then click .
-
-
Mount the volume locally on the master node:
-
In iManager, select > .
The server field is automatically populated with the server you chose in the previous step.
-
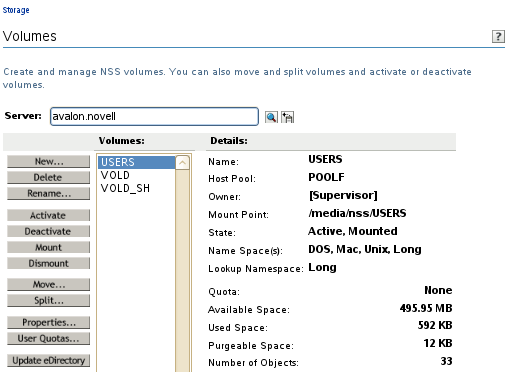
In the list, select the volume, then click .
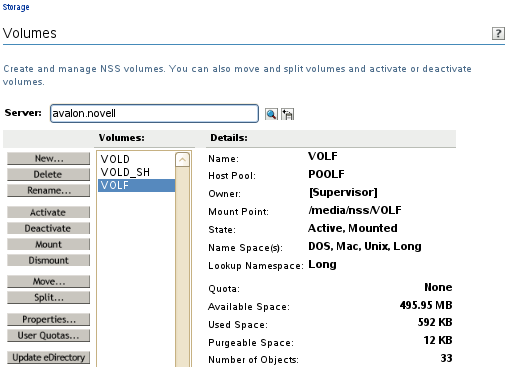
-
-
View the volume properties to ensure that the attribute has been enabled. If it is disabled, select it, then click .
-
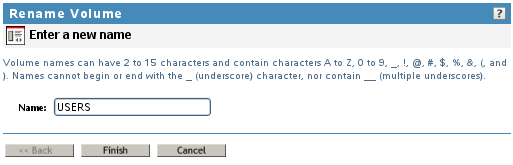
Rename the volume:
-
In the list, select the volume, then click .
-
In the dialog box, specify the new name, then click .
-
Wait for the volume to be automatically dismounted and remounted. When the page refreshes, the volume is mounted in the default mount point path /media/nss/<new_volume_name>.
If you try to force the page to refresh before the eDirectory changes have been synchronized, you might get an Error 601 eDirectory error. The error condition is temporary and should not prevent the transaction from completing successfully.

-
-
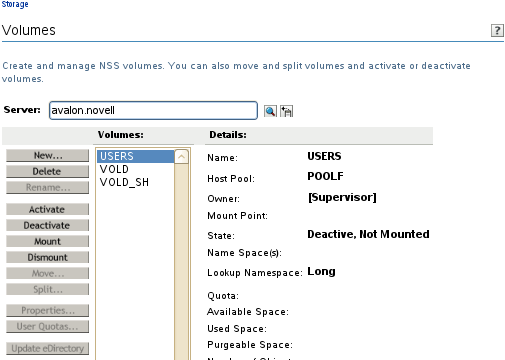
Dismount the volume:
-
In the list, select the volume, then click .
-
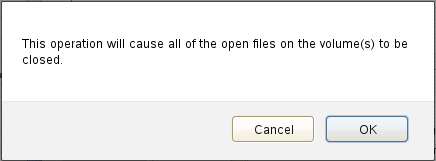
Read the warning message that open files will be closed by the action, then click to confirm the dismount.
-
Wait for the volume state to change to , then continue.
-
-
Deactivate the pool:
-
In iManager, select > .
-
In the list, select the pool, then click .
-
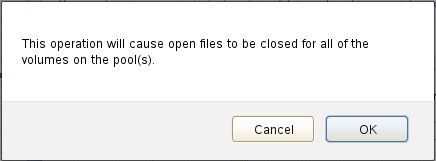
Read the warning message that the pool’s volumes will be dismounted, then click to continue.
-
When the page refreshes, verify that the pool state is .
-
-
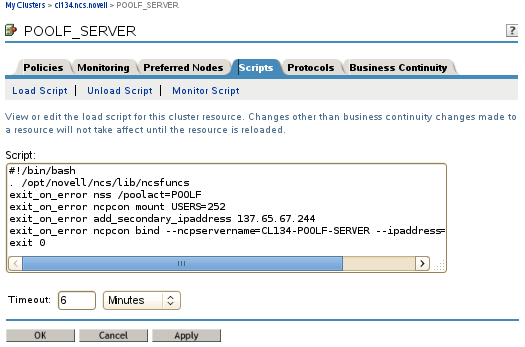
Verify that the volume name was updated in the scripts for its pool cluster resource:
-
In iManager, select > , then select the cluster that you want to manage.
-
On the Cluster Manager page or Cluster Options page, click the name of the pool cluster resource to open the resource properties.
-
Click the tab.
-
On the Load Script page, verify that the volume name was changed in the ncpcon mount command. Also check any custom commands where the volume name appears. If you modify the load script, click .
exit_on_error ncpcon mount <new_volume_name>=<volume_id>
For example:
exit_on_error ncpcon mount USERS=252
-
Click , then check any custom commands where the volume name appears. If you modify the unload script, click .
The unload script does not contain any default volume commands.
-
Click , then verify that the volume name was changed in the ncpcon volume command. Also check any custom commands where the volume name appears. If you modify the monitor script, click .
exit_on_error ncpcon volume <new_volume_name>For example:
exit_on_error ncpcon volume USERS
-
Click to return to the Cluster Manager page, or click to apply any changes you made in the scripts.
-
-
Bring the pool cluster resource online:
-
In iManager, select > , then select the cluster that you want to manage.
-
On the Cluster Manager page, select the check box next to the pool cluster resource, then click .
The resource is brought online on a node in its list, according to availability. Wait for the resource to report a Running state before you continue.
-
13.13.2 Renaming a Shared NSS Volume with NSSMU
-
Log in to the master node as the root user, then launch a terminal console.
-
Ensure that the pool cluster resource is running on the master node. Enter
cluster status
If you need to migrate the resource, enter the following at the command prompt:
cluster migrate <resource_name> <master_node_name>
-
Take the pool cluster resource offline. At the command prompt, enter
cluster offline <resource_name>You can verify the offline state by entering
cluster status
-
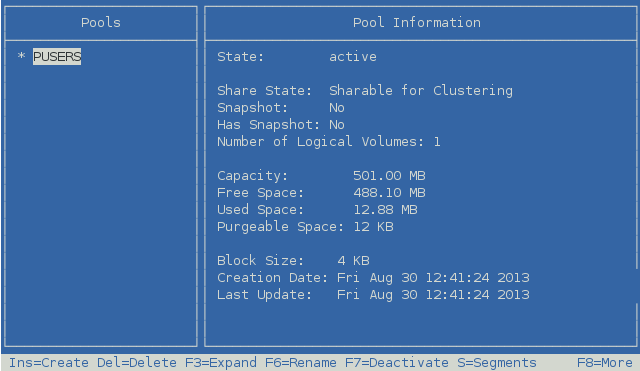
Activate the pool locally on the master node:
-
At the command prompt, enter
nssmu
-
On the NSSMU , select , then press Enter.
-
On the Pools page, select the pool, then press F7 .
-
Press Esc to return to the NSSMU .
-
-
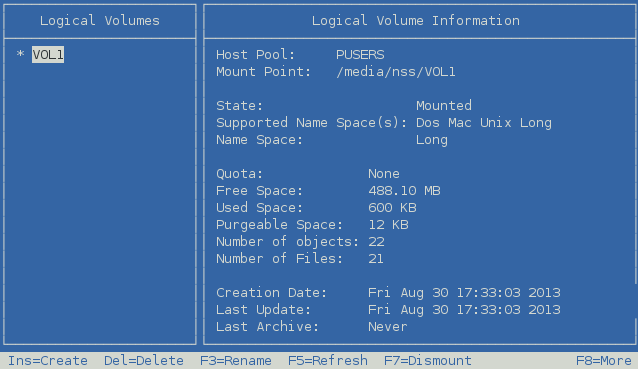
Mount the volume locally on the master node:
-
On the NSSMU , select , then press Enter.
-
On the Volumes page, select the volume, then press F7 .
-
-
On the Volumes page, view the volume properties to ensure that the attribute has been enabled. If it is disabled, select the attribute value, press y (Yes) to enable it, then select and press Enter.
-
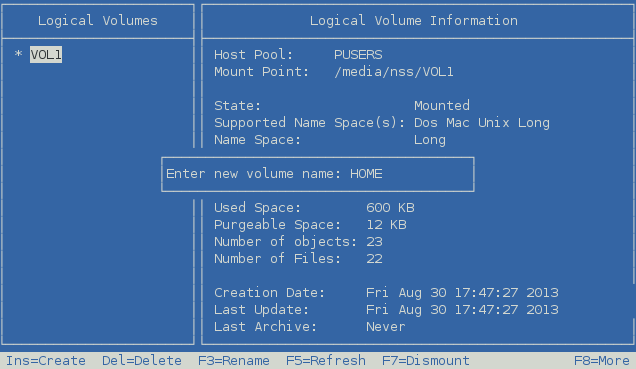
Rename the volume:
-
On the Volumes page, select the mounted NSS volume that you want to rename.
-
Press F3 , specify the new name, then press Enter.
-
Wait for the volume to be automatically dismounted and remounted. When the page refreshes, the volume is mounted in the default mount point path /media/nss/<new_volume_name>.
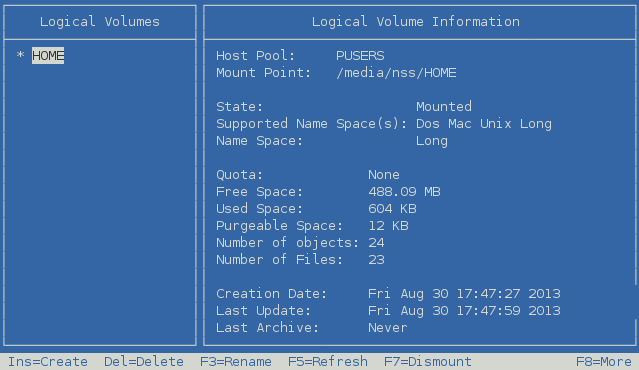
If you try to force the page to refresh before the eDirectory changes have been synchronized, you might get an eDirectory error. The error condition is temporary and should not prevent the transaction from completing successfully.
-
-
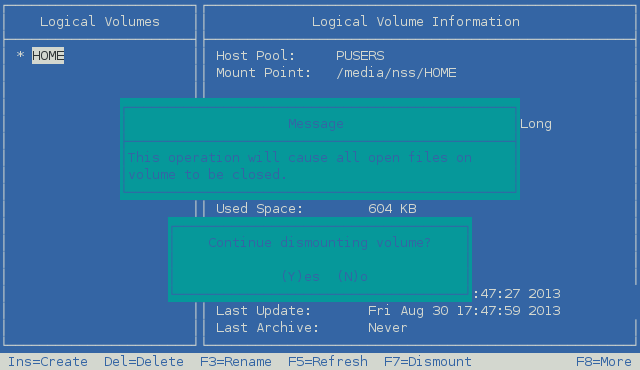
Dismount the volume:
-
On the NSSMU Volumes page, select the volume, press F7 .
-
Read the warning message that open files will be closed by the action, then press y (Yes) to confirm the dismount.
-
Press Esc to return to the NSSMU .
-
-
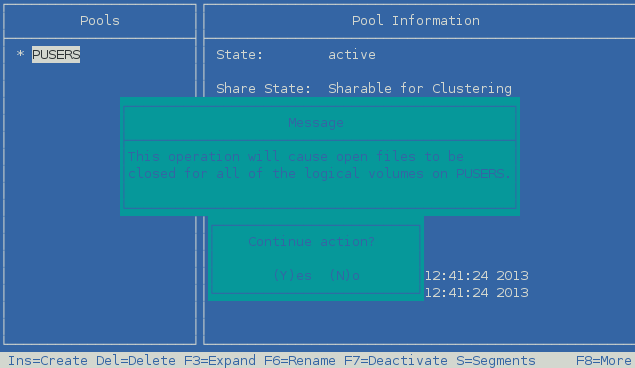
Deactivate the pool on the cluster node:
-
On the NSSMU , select , then press Enter.
-
On the Pools page, select the pool, then press F7 .
-
Read the warning message that the pool’s volumes will be dismounted, then press y (Yes) to confirm the deactivation.
-
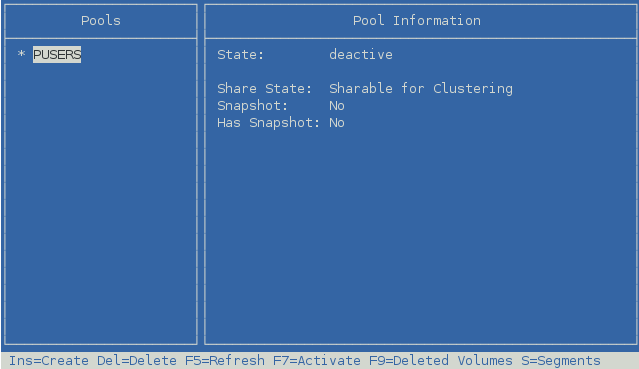
When the page refreshes, verify that the pool state is .
-
Press Esc twice to exit NSSMU.
-
-
Verify that the volume name was updated in the scripts for its pool cluster resource:
-
In iManager, select > , then select the cluster that you want to manage.
-
On the Cluster Manager page or Cluster Options page, click the name of the pool cluster resource to open the resource properties.
-
Click the tab.
-
On the Load Script page, verify that the volume name was changed in the ncpcon mount command. Also check any custom commands where the volume name appears. If you modify the load script, click .
exit_on_error ncpcon mount <new_volume_name>=<volume_id>
For example:
exit_on_error ncpcon mount USERS=252
-
Click , then check any custom commands where the volume name appears. If you modify the unload script, click .
The unload script does not contain any default volume commands.
-
Click , then verify that the volume name was changed in the ncpcon volume command. Also check any custom commands where the volume name appears. If you modify the monitor script, click .
exit_on_error ncpcon volume <new_volume_name>For example:
exit_on_error ncpcon volume USERS
-
Click to return to the Cluster Manager page, or click to apply any changes you made in the scripts.
-
-
Bring the pool cluster resource online. At the command prompt, enter
cluster online <resource_name>You can verify the online state by entering
cluster status