5.6 Samba Configuration

5.6.1 Preparing the Cluster Servers

  1. If you have not already done so, install and configure the Novell Samba pattern on each cluster server that will share the Samba resource.

    Ensure that the Base Context for Samba Users is set to the container where you plan to create your Samba users, or to a container above that in the eDirectory tree.

    For more information on installing and configuring Novell Samba, see Section 3.0, Installing Novell Samba for OES.

  2. Enter the following command on all preferred nodes in the cluster that are assigned to the Samba resource:

    chkconfig smb off

    This command ensures that Samba is not started until it is required for a resource migration or failover.

  3. Continue with Section 5.6.2, Creating a Samba Share.

5.6.2 Creating a Samba Share

In OES, you can use the new Samba management plug-in for iManager to create a new Samba share, instead of manually adding a share definition in the /etc/samba/smb.conf file.
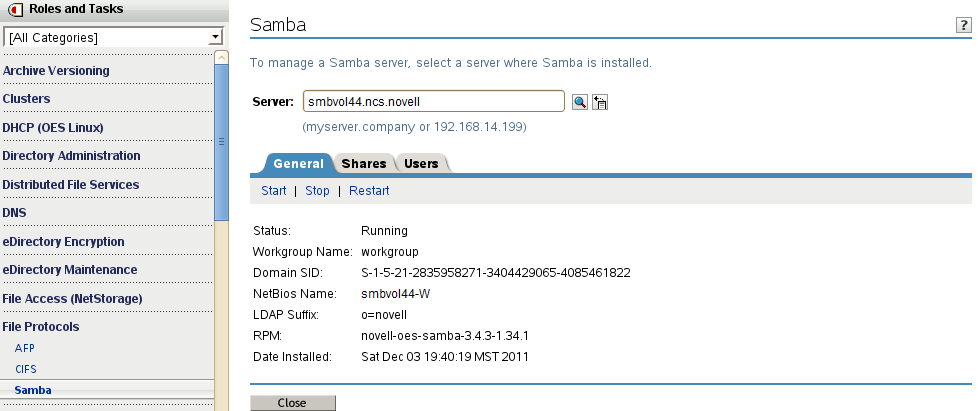
  1. In iManager’s Roles and Tasks, select File Protocols > Samba.

  2. In the Server field, browse and select the server where the Samba resource is currently online.

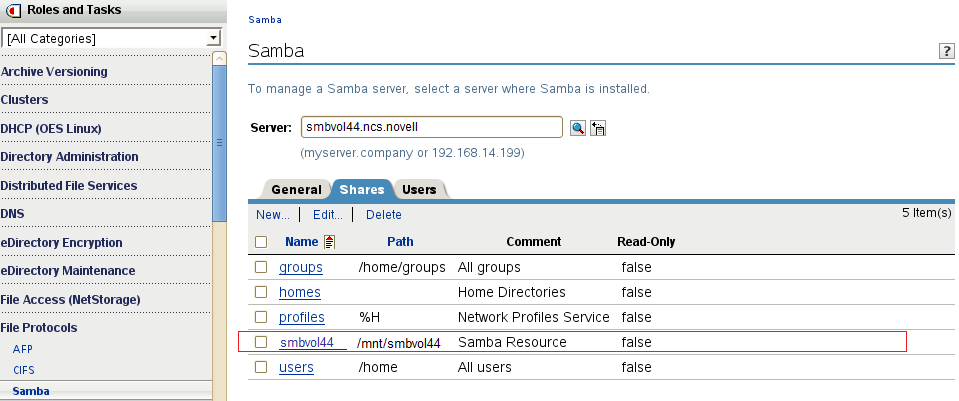
  3. Wait for the general Samba information to be displayed, then click the Shares tab.

  4. Click New and follow the on-screen prompts to create a share that maps to the mount point you defined for the Samba cluster resource.

    • Share Name: Specify the share name, such as smbvol44.

    • Path: Specify the path of the mount path you defined for the Samba resource, such as /mnt/smbvol44.

    • Comment: Specify a brief description about the purpose of this share, such as Samba Resource.

    • Inherit ACLs: Select this option.

  5. Click OK to save and apply the settings.

  6. Continue with Section 5.6.3, Editing the Samba Resource Configuration File.

5.6.3 Editing the Samba Resource Configuration File

  1. While the shared volume is mounted at the mount point, copy the smb.conf file from the /etc/samba directory on the primary cluster server to the mount point directory /mnt/smbvol44 that you created in Step 2.

  2. On the shared volume location, rename the copied smb.conf file to match the name specified for the CONFIG_FILE variable in the Samba cluster resource load and unload scripts.

    For example, if you keep the default name, you rename the file as SambaResource-smb.conf. This file is used by the load, unload, and monitor scripts to manage this clustered instance of Samba.

  3. Open the SambaResource-smb.conf file in a text editor, then modify the file as follows:

    1. In the Entries made by OES install section, locate the following line:

      passdb backend = NDS_ldapsam:ldaps//xxx.xxx.xxx.xxx:636 
      

      Verify that xxx.xxx.xxx.xxx is the IP address of the master LDAP server for your eDirectory tree.

    2. Add the following lines to the [global] section:

      bind interfaces only = yes
      
      interfaces = resource_ipaddress
      
      pid directory = $MOUNT_POINT/share/locks
      

      Replace resource_ipaddress with the IP address you plan to assign to the Samba cluster resource.

    3. In the line netbios name = %h-W, change %h-W to something unique, such as the name you will give the Samba virtual server.

      netbios name = smbvol44-W
      
  4. (Conditional) If you have other instances of Samba running locally on servers in your cluster, modify the local /etc/samba/smb.conf file on each server where a local Samba instance is running:

    1. Log in to the node as the root user.

    2. In a text editor, open the local copy of the /etc/samba/smb.conf file.

    3. Add the following lines to the [global] section:

      bind interfaces only = yes
      
      interfaces = server_ipaddress
      

      Replace server_ipaddress with the IP address of the individual server where the instance of Samba is running.

      Adding these lines to the server’s local smb.conf file eliminates conflicts caused by running multiple instances of Samba on that server (that is, running a local instance and one or more shared instances).

    4. Remove (or comment out) the section that defines the instance of the share you created.

      The share should be active only in the shared SambaResource-smb.conf file on the cluster resource.

    5. Save your changes.

  5. Continue with Section 5.6.4, Modifying and Bringing the Samba Cluster Resource Online.

5.6.4 Modifying and Bringing the Samba Cluster Resource Online

You are now ready to modify the Samba resource load, unload, and monitor scripts to uncomment the lines you commented out in Section 5.5.5, Configuring Samba Load, Unload, and Monitor Scripts, and bring the Samba cluster resource online.

  1. At a terminal console prompt, enter the following command to take the Samba cluster resource offline:

    cluster offline resource_name
    

    For example, enter

    cluster offline smbvol44
      Status for Resource: smbvol44
      Unloading on <servername> Lives: 1
      Revision: 1
    
  2. Enter the following command on all cluster nodes to stop Samba:

    rcsmb stop

  3. In iManager, uncomment the Samba configuration lines you previously commented out in the resource load, unload, and monitor scripts in Section 5.5.5, Configuring Samba Load, Unload, and Monitor Scripts.

    To find the scripts, select Clusters > Cluster Options, select the Samba resource’s name link, then select the Scripts tab. Click the Load, Unload, and Monitor script links to view and modify each script.

  4. Bring the Samba cluster resource online. Select Clusters > Cluster Manager, select the check box next to the Samba resource, then click Online. The resource is brought online on a preferred node.

    You can also enter the following command at a terminal console prompt to specify a node.

    cluster online cluster_name node_name
    
  5. Continue with Section 5.6.5, Creating Samba Users and a Group for Cluster Access.

5.6.5 Creating Samba Users and a Group for Cluster Access

The procedure for creating Samba users to access the shared Samba cluster resource is similar to the procedure for creating Samba users in a non-clustered environment. However, because you want to use only one group to provide access for all of the Samba servers in the cluster, you cannot use the default Samba users groups that are created automatically on each Samba server. Instead, you must create a single LUM-enabled group for the cluster and make your Samba users members of that group.

NOTE:The instructions below assume that you have not yet created the Samba user accounts in eDirectory. If you have existing users that you want to access the Samba cluster resource, you must individually assign them a Universal Password.

  1. In iManager, select Directory Administration > Create Object and create a new Organizational Unit container for the Samba cluster users.

  2. Select Passwords > Password Policies and assign the Samba Default Password Policy to the new container.

  3. Select Users > Create User and create accounts for the Samba cluster users in the new container.

  4. Select Groups > Create Group and create a new group for your Samba cluster users.

  5. Select Linux User Management > Enable Groups for Linux and LUM-enable the group. Associate the group with the UNIX Workstation objects for all of the cluster servers.

  6. Select Groups > Modify Group and add the Samba cluster users as members of the group.

  7. Select File Protocols > Samba and select the primary cluster server as the Samba server to configure.

  8. Click the Users tab, select Add, and add all of the Samba cluster users.

  9. At the terminal prompt, enter the following commands to grant the necessary access rights to the shared Samba resource:

    chmod 775 path
    
    chgrp group_name path
    

    Replace path with the mount point of the shared Samba file system (in our example, /mnt/smbvol44) and group_name with the name of the LUM-enabled group you created for Samba cluster access.

    The Samba cluster users gain access rights to the shared resource because of their membership in the specified group.

You should now be able to log in as one of the Samba cluster users at a Windows workstation (without the Novell Client installed on it) and access files on the shared Samba resource. Access to this resource should continue uninterrupted when the cluster resource is migrated between preferred nodes or if there is an unexpected server failure.