12.4 Installing Virtualized NetWare
This section provides the instructions for installing NetWare 6.5 SP8 as a guest OS.
12.4.2 Creating a Xen Virtual Machine and Installing a NetWare VM Guest Server
-
Open YaST, then click > .

-
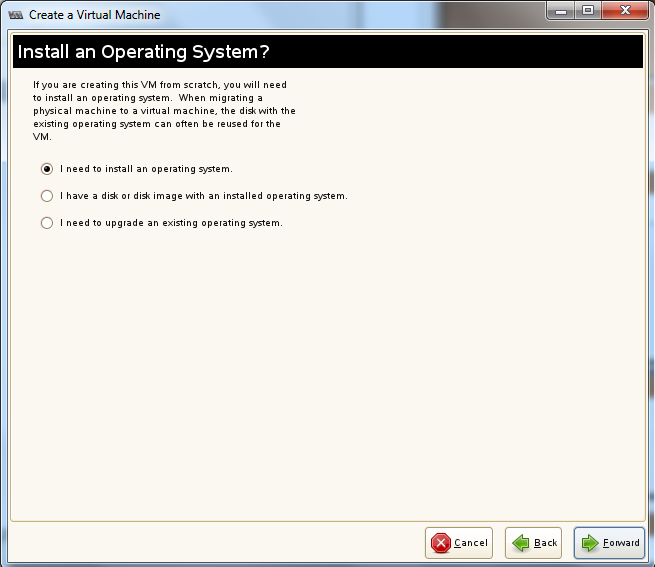
Read the Create a Virtual Machine welcome page, then click .
-
Select , then click .
-
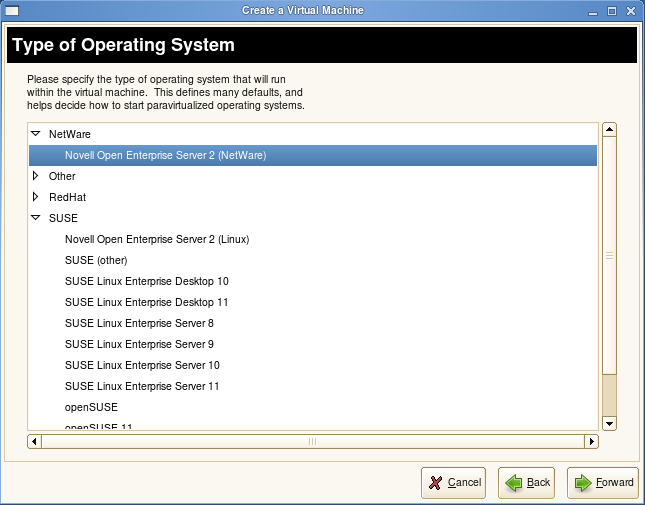
Click the triangle next to , select , then click .
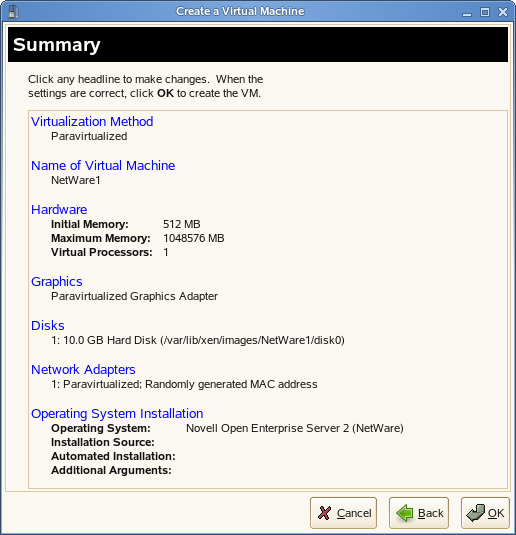
The Summary page appears, showing the settings to be used for the virtual machine.
-
Click .
Specify the name that you want displayed for this virtual machine in the Virtual Machine Manager.
For example, you might specify hostname_vm, where hostname is the host name of the server you are installing.
-
Click .
Change the initial memory setting to at least 1024 MB and the maximum setting to as much as 8 GB, depending on the RAM available on your host server.
Add additional virtual processors if desired.
-
Click .
The Virtual Disks dialog box lets you create one or more virtual disks that the NetWare VM guest has access to. If you are installing from a DVD on the host server or from an ISO image file copied to the host server’s storage devices, these are also listed as virtual disks.
Initially, a 10 GB file is specified for the partitions/volumes on the virtual server. The default location of the file is /var/lib/xen/images.
By default, this is a sparse file, meaning that although 10 GB is allocated, the size of the file on the disk is only as large as the actual data it contains. Sparse files conserve disk space, but they have a negative impact on performance.
The NetWare install allocates 500 MB for a DOS partition and 4 GB for the sys: volume. The default disk size of 10 GB leaves about 5.5 GB for other partitions.
-
Specify the hard disk space you want to be available to the virtual machine.
-
Click .
-
To create additional virtual disks, click the Harddisk icon in the Disks wizard.
-
-
If you want to change the location of the NetWare VM’s first virtual hard drive, select the default and click . Then modify the path in the field to where you want the virtual disk located.
Make sure that you specify enough physical disk space on the host server’s hard drive and partition to accommodate the maximum size of the virtual disk.
-
If you want optimal performance, deselect the sparse file option. This creates a blank file of the selected size when you start the virtual machine installation.
-
Click .
-
If you are installing from a mounted DVD, click , browse to /dev/cdrom or /dev/dvd, then click > > .
or
If you are installing from a downloaded ISO image file, browse to the image file, then click > > .
-
If you want multiple virtual network adapters, click .
Create virtual network adapters for the server.
The default setting is a single paravirtualized network adapter.
-
When you have the virtual machine settings the way you want them, click to proceed with the creation of the virtual machine and the installation of the virtual NetWare server.
A VNC viewer window appears, displaying the progress of the NetWare install program.

-
Do the following:
-
Click inside the installation window to set the mouse pointer.
The mouse is not used on the first few screens, but you must set it now. Otherwise, the mouse and the keyboard might not work as expected when the GUI pages appear.
-
Enter all of the installation information as you would for a physical NetWare installation.
-
IMPORTANT:Do not close the VNC viewer window while the NetWare install program is running. Doing so prevents the installation from finishing properly.