4.5 AutoYaST Control File

An AutoYaST control file is in XML format. It can contain just a few or up to hundreds of instructions that determine the details of the system being installed.

In theory, a control file can be created manually with an editor. Because this approach is very error-prone, it is not recommended.

The easiest way to obtain a control file is to use the /root/autoinst.xml file as a template, if this file has been saved at the end of a manual installation by selecting the appropriate option.

This method should be used with great care, because the resulting XML file contains many settings that are specific for the machine where it was generated.

Control files can also be created via YaST (YaST/YaST2 > Miscellaneous > Autoinstallation,) as illustrated in the following figures. The autoyast2 and autoyast2-installation packages must be installed for this functionality to be available in YaST.

Figure 4-4 Invoking YaST > Miscellaneous > Autoinstallation

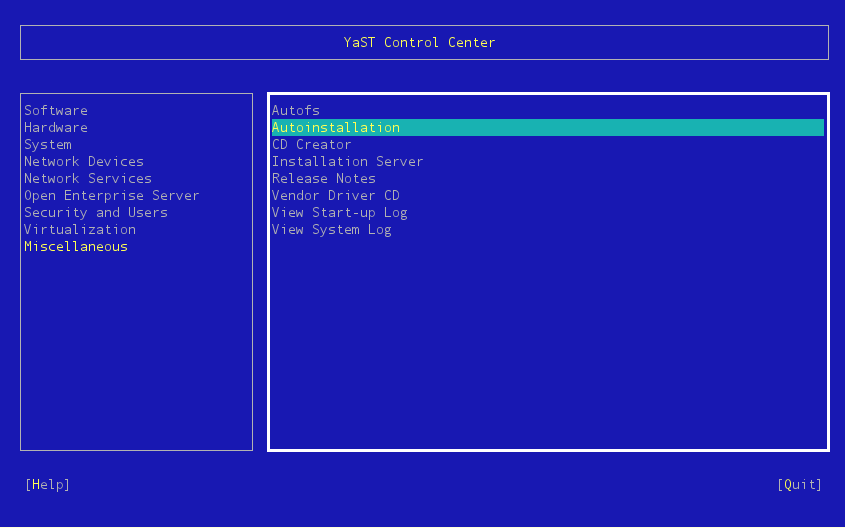
Figure 4-5 Autoinstallation > Configuration Items

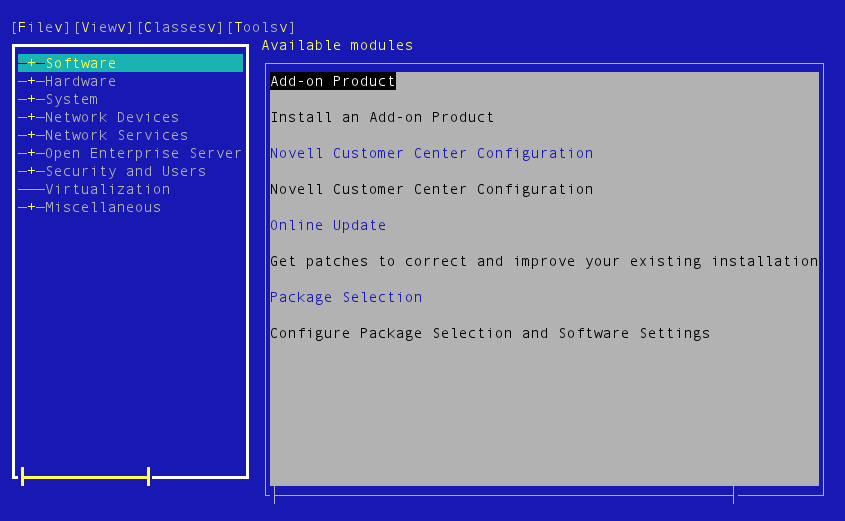
With the YaST Autoinstallation plug-in, complete control files can be created by specifying all necessary configuration aspects or by cloning the device where YaST is being executed (YaST > Miscellaneous > Autoinstallation > Tools > Create Reference Profile). Furthermore, single class files also can be created if you are interested only in the configuration aspects of a particular module.

4.5.1 Control File Structure

An AutoYaST control file must be written in valid XML syntax. It is organized in various sections that are responsible for different aspects of the installation. The following sections could be part of an AutoYaST file that drives a SLES 11 installation:

  • add-on

  • boot loader

  • CA management

  • general

  • host

  • networking

  • partitioning

  • users

The example below shows an XML snippet to configure the YaST Certificate Authority section for SLES 11:

<?xml version="1.0"?>
<!DOCTYPE profile>
<profile xmlns="http://www.suse.com/1.0/yast2ns" xmlns:config="http://www.suse.com/1.0/configns">
<ca_mgm>
   <CAName>YaST_Default_CA</CAName>
   <ca_commonName>my-company.us</ca_commonName>
   <country>US</country>
   <importCertificate config:type="boolean">false</importCertificate>
   <locality>Provo</locality>
   <organisation>IT</organisation>
   <organisationUnit>Servermanagement</organisationUnit>
   <password>secret</password>
   <server_email>jclarc@novell.com</server_email>
   <state>UTAH</state>
   <takeLocalServerName config:type="boolean">true</takeLocalServerName>
 </ca_mgm>
</profile>

AutoYaST does not need to know every configuration detail. If configuration items are omitted from the control file, AutoYaST configures the system by using meaningful default values for the configuration items of the affected section. This works for most sections but can lead to unexpected settings in some circumstances. Therefore, Novell Consulting recommends that you create the appropriate configuration tags for every section where the target settings deviate from defaults.

Only a few instructions within a control file are specific for a given server. Most of them can be re-used. To support this, AutoYaST offers the possibility to divide sections into external class files. This procedure is also referred to as class-based AutoYaST installation.

A class file must also be in valid XML syntax and can contain only a single or multiple sections of the complete AutoYaST control file.

Classes have a few advantages in contrast to monolithic AutoYaST control files:

  • Code is easier to maintain because class files contain only parts of the whole

  • Classes can be reused for different installation scenarios; for example the NTP class can be used for the installation of different versions of SLES and OES

When you use this technique, it is possible to start with a minimal control file containing only class directives (see the control file default in Retrieving a Control File). The real configuration information is then provided by the class files.

A class within a control file must be specified by a class directive. This directive has attributes that define the location of the external class file. When a class configuration tag is found during control file processing, the corresponding external class file is loaded from the specified location and merged into the main control file temporarily stored in /tmp/profile/autoinst.xml on the system being installed. This control file is parsed in the same manner as a monolithic control file when using the non-class based approach.

For using classes, some preparations must be made at the AutoYaST repository:

  • All class files must be located in a directory named classes immediately underneath the URL that was given as AutoYaST URL at the boot prompt.For example, if the AutoYaST URL has been specified as http://10.10.10.221/xml/autoinst.xml, the class files must be located in the http://10.10.10.221/xml/classes directory.

  • A class directive always contains a class_name tag and a configuration tag:

    <class>
      <class_name>general</class_name>
      <configuration>general.xml</configuration>
    </class>
    
  • A class_name tag represents a directory underneath the classes directory. For example, if general is used as the class_name tag, the following directory must exist:

    http://10.10.10.221/xml/classes/general
    
  • A configuration tag specifies the name of the XML file in the directory defined by the class_name tag. In the above example, the general.xml class file would be accessed through the following URL:

    http://10.10.10.221/xml/classes/general/general.xml
    

A complete set of class files used in various customer projects by Novell Consulting is part of the Novell Cool Solutions. See The Novell Consulting Installation Framework—AutoYaST.

4.5.2 Control File Repository

An AutoYaST file can be located on the installation medium itself, on local devices, or at various network locations similar to installation repositories as described in Installation Repositories.

4.5.3 Retrieving a Control File

The URL for a control file must be specified by one of the following syntaxes:

autoyast=<protocol>://<IP Address|DNS-Name>/<path to control file or directory/>,

For example:

autoyast=http://10.10.10.221/xml/mycontrolfile

or

autoyast=http://10.10.10.221/xml/

The first example points directly to a control file at the repository server. This locates, downloads, and processes the AutoYaST mycontrolfile control file.

The second example points to a directory, resulting in the following retrieval process:

  1. A file whose name is equivalent to the hexadecimal value of the IP address of the system to be installed is searched in the specified directory. For example:

    192.168.2.91 -> http://10.10.10.221/xml/C0A8025B
    
  2. If this file does not exist, the last character of the hexadecimal value is removed and the system searches for the resulting file name. For example:

    http://10.10.10.221/xml/C0A8025
    
  3. If the file does not exist, the process is repeated until the file name has been truncated to one character. For example:

    http://10.10.10.221/xml/C0A802
    http://10.10.10.221/xml/C0A80
    http://10.10.10.221/xml/C0A8
    http://10.10.10.221/xml/C0A
    http://10.10.10.221/xml/C0
    http://10.10.10.221/xml/C
    
  4. If a file with a name matching the name derived by this process can be located, the unattended installation starts. If no file can be found, the process continues.

  5. The system tries to retrieve a file with a name matching the MAC address of the network adapter from which the connection to the Web server has been initiated.

    Two attempts are made: First, it looks for a file name with characters in all uppercase is looked for. If it is not found, a file name with characters in all lowercase is searched for. For example:

    http://10.10.10.221/xml/0080C8F6484C
    http://10.10.10.221/xml/0080c8f6484c
    
  6. Finally, if this still does not deliver a control file, the process looks for a file named default in the directory that has been specified with the autoyast= parameter. For example:

    http://10.10.10.221/xml/default
    
  7. If the default file is found, it is evaluated and its instructions are used for the installation process. No further control file is searched for.

    If the installation engine has not located a control file at this point, the installation process terminates and informs the administrator that the URL for the AutoYaST file is invalid.

Because the directory method provides more flexibility than specifying a file name, Novell Consulting has chosen this variant for all customer projects.

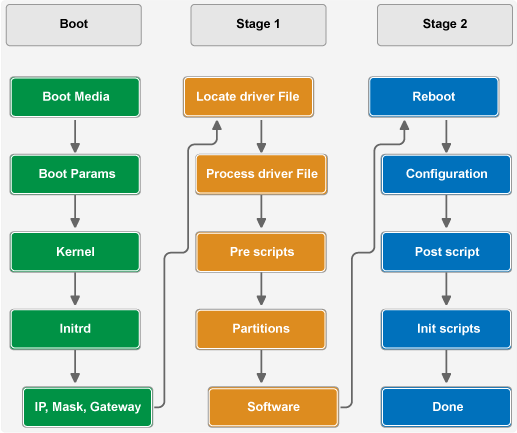
The following illustration summarizes the components and steps of a server installation using AutoYaST.

Figure 4-6 AutoYaST Process Overview

4.5.4 Summary

This section outlined the basic principals and components for the Novell Consulting Installation Framework. It is characterized by the following properties:

  • Remote installation repositories are provided via an Apache 2 Web server

  • Class-based implementation of the AutoYaST control file is used on the same Apache 2 server

  • Customized boot media with predefined boot parameters and nested menus are used to initiate the installation process

  • The AutoYaST URL specifies a directory where the initial control file default points to particular class files

The rest of the sections in this book describe how these components need to be set up and configured in detail.