12.2 Bundle Deployment to SLES/OES Devices
The frozen patch level created in the previous section can now be assigned and deployed to all relevant machines. However, a SLES/OES server usually needs additional bundles assigned. The assignment and deployment of standard patch items needed in all SLES/OES environments is described in the following sections.
12.2.1 Bundle Assignment
Novell Consulting recommends that you perform all bundle assignments tasks for Linux devices to device groups instead of single devices or device folders. This makes addition and removal of assignments easier, and the central concepts of simplicity and clarity within ZENworks Configuration Management administration are ensured.
Configuration bundles are collected in bundle groups that are assigned to device groups with identical configuration requirements (see The BUNDLE-GROUPS Folder).
Each Update bundle is a member of a bundle group that is assigned to all device groups whose members are on the same product, version, and support pack, such as all OES 11 SP1 servers (see Section 11.3.2, Server Group Objects in the Device Menu).
Because Pool bundles and Core bundles required for dependency resolution never change, there is no benefit in assigning them through bundle groups and these bundles are directly assigned to the same device groups as the corresponding update bundle groups.
The following bundles and bundle groups need to be assigned to each SLES 11 SP2 device in the production environment:
-
The bundle group SLES11-SP1-Updates-PROD
-
The Pool bundle for SLES 11 SP1
-
The bundle group SLES11-SP2-Updates-PROD
-
The Core bundle for SLES 11 SP2
In addition, each production OES 11 SP1 device requires the following assignments:
-
The bundle group OES11-SP1-Updates-PROD
-
The Pool bundle for OES 11 SP1
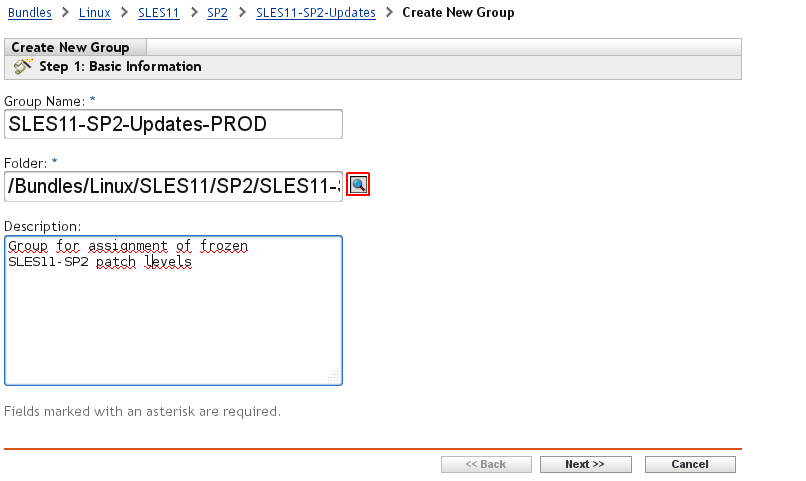
For an OES 11 SP1 device in production, you first need to create three bundle groups, one for each of the three update bundles listed above.
Assign the new bundle group a name adhering to the suggested naming standard and provide a description.
Figure 12-9 Creating a Bundle Group for SLES 11 SP 2 Devices - Basic Information
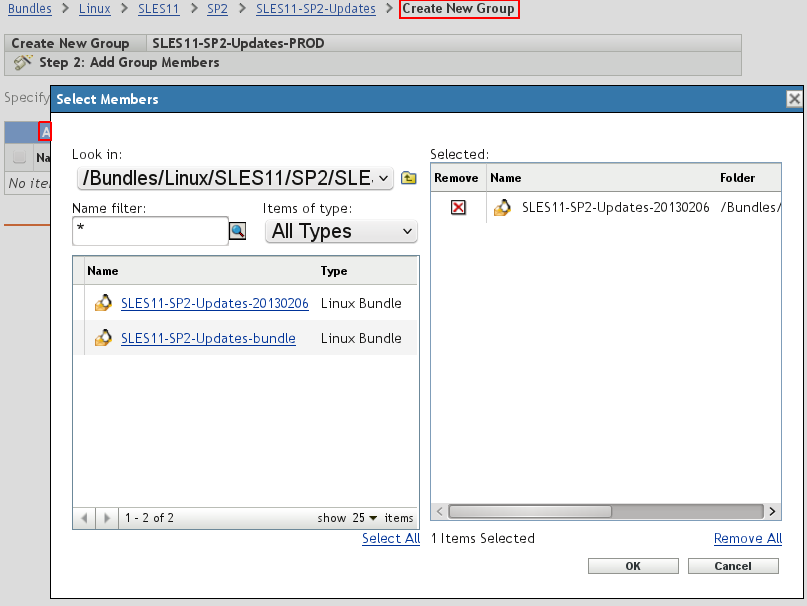
In the next dialog window, select the appropriate group member (SLES 11 SP2 update bundle) by clicking .
Figure 12-10 Creating a Bundle Group Needed by SLES 11 SP 2 Devices - Select Members
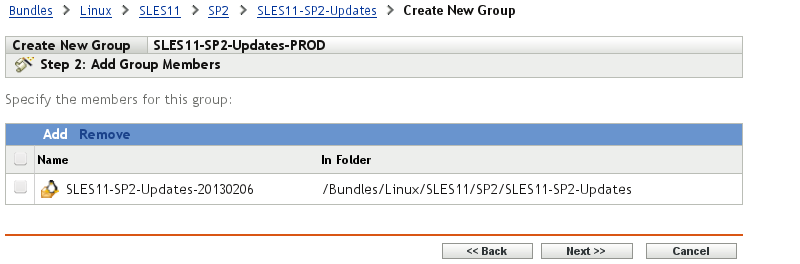
The update bundle created on February 6, 2013 has been added to the group in this example:
Figure 12-11 Summary of All Bundle Group Members
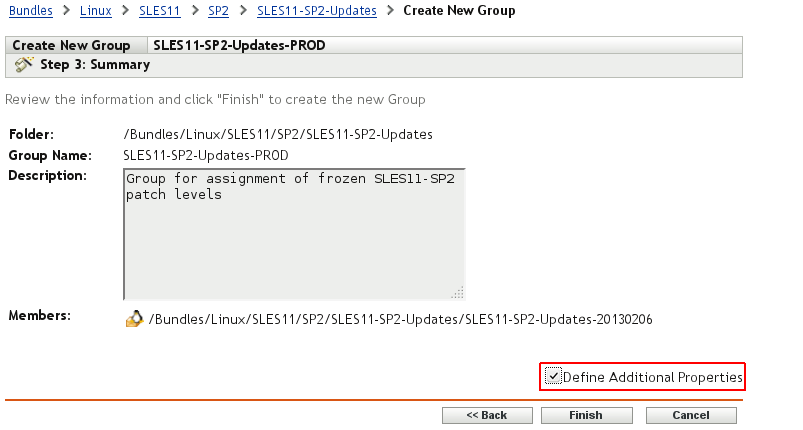
A final summary screen is presented. If the check box was selected, you can now execute the assignment step.
Figure 12-12 Summary of Bundle Group Creation
Click on the bundle group summary page to select the desired device groups. For this example, the PROD_OES11SP1 and the PROD_SLES11SP2 device groups have been selected.
Figure 12-13 Device Group Assignment To a Bundle Group - Device Group Selection
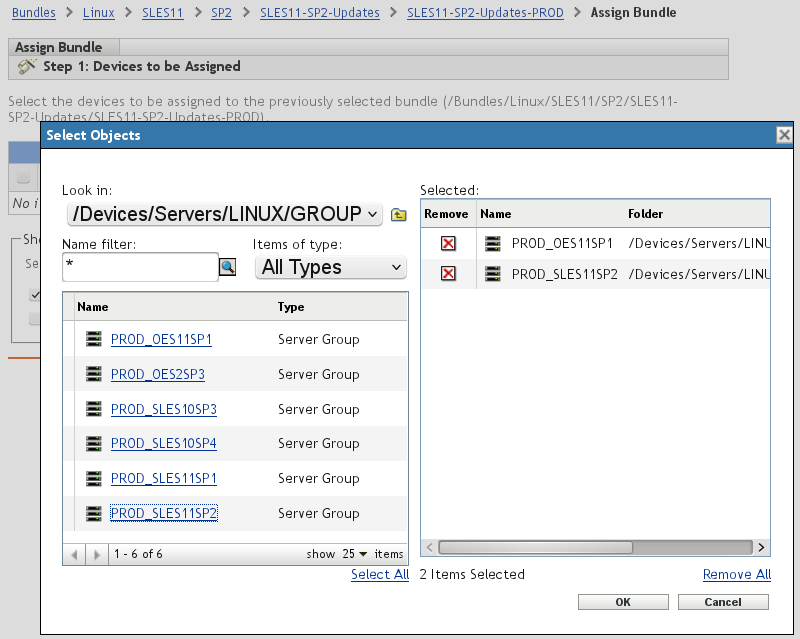
The advantage of a clear folder structure is obvious in this figure. The folder contains only production device groups to update. No single device objects or irrelevant test or configuration groups are interfering with object selection.
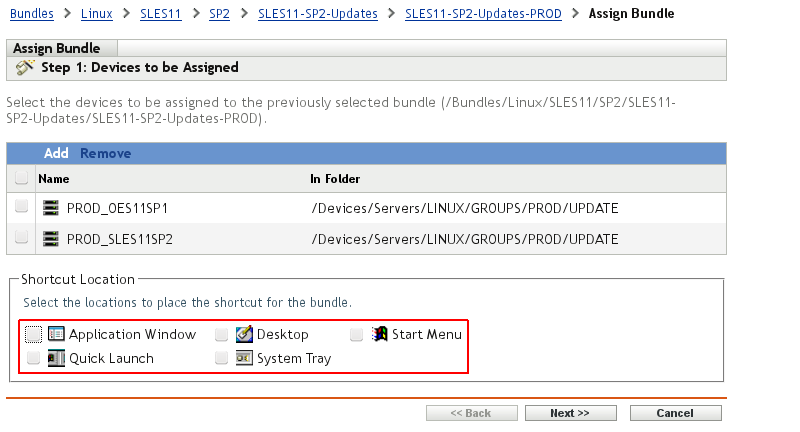
The shortcut locations displayed in the next figure are not of any interest for Linux servers. Enabling or disabling them has no effect on the target devices. Novell Consulting recommends that you deselect all check boxes on this page.
Figure 12-14 Device Group Assignment To a Bundle Group - Shortcut Locations Deselected
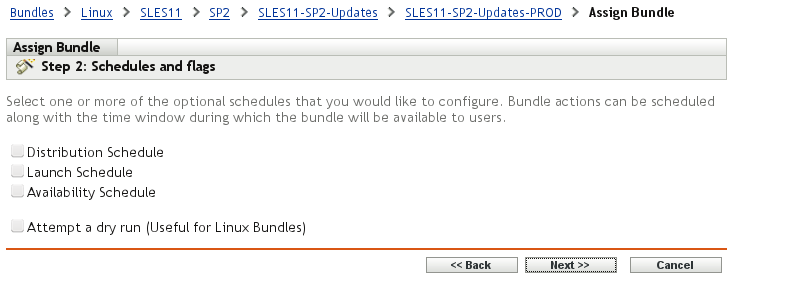
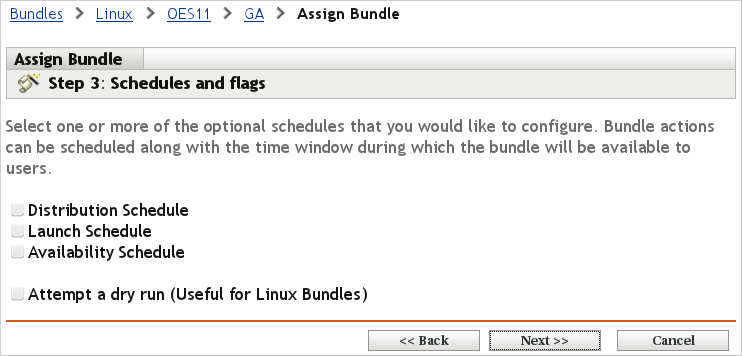
The next page is important when the distribution or installation of bundles must be scheduled. Three different scheduling types are available. Only the Distribution Schedule and the Availability Schedule are of interest for Linux devices.
With a Distribution Schedule, you can pre-distribute software bundles to remote devices. For example, assume that you have a large amount of data that must be transported via a slow WAN link. In this case, the Distribution Schedule ensures that the data is delivered to remote devices within the desired time, such as one week. It can then be installed manually or automatically.
The Availability Schedule is a task where device agents are informed at a predefined point in time that new ZENworks Configuration Management bundle objects have been assigned and are ready to be installed. Both scheduling tasks can be modified later.
Figure 12-15 Device Group Assignment To a Bundle Group - Schedule Configuration
Clicking summarizes the bundle details before the assignment can be completed.
Figure 12-16 Device Group Assignment To a Bundle Group - Selection Overview
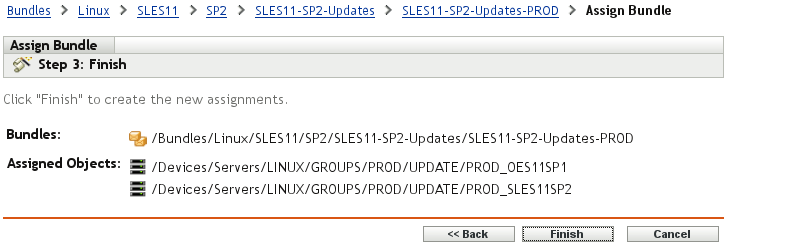
The bundle group assigning the SLES 11 SP2 frozen patch level to all SLES 11 SP2 devices and OES 11 SP1 devices in production has been created successfully.
Figure 12-17 Device Group Assignment To a Bundle Group - Success
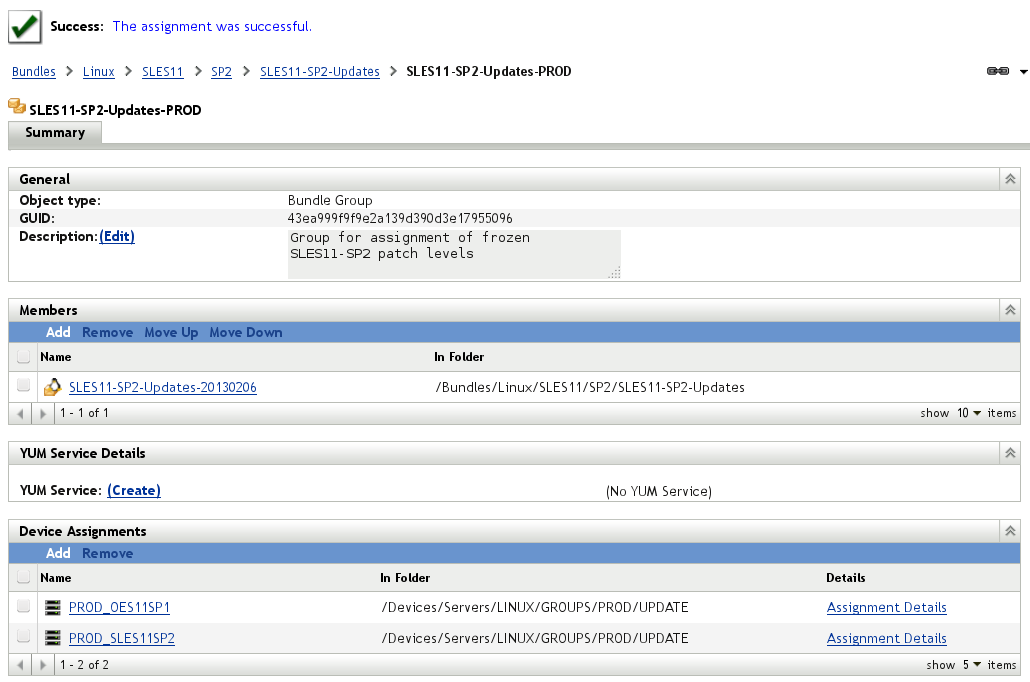
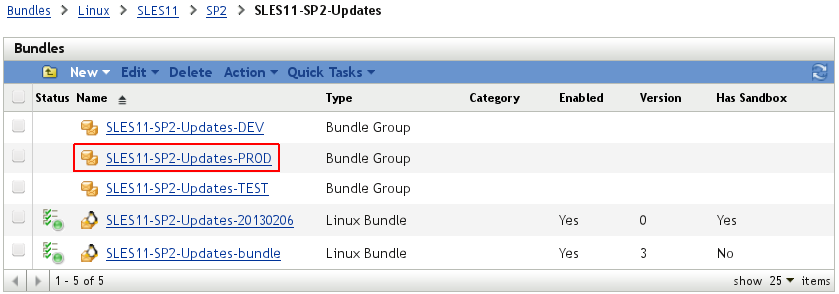
The new bundle group object can be seen in the following figure:
Figure 12-18 Final Bundle Group Object View
The assignment process now needs to be replicated for the SLES 11 SP1 updates as well as for the OES 11 SP1 updates. In addition, the core and pool bundles also need to be assigned to the same device croups as the SLES11-SP2-Updates-PROD bundle group.
Whenever you need to assign multiple objects to a device or device group, it is more efficient to start the process from the tab of the device / device group object then from the different objects you need to assign to the devices. The following figures illustrate this approach for the assignment of the outstanding bundles and bundle groups to the PROD_OES11SP1 device group.
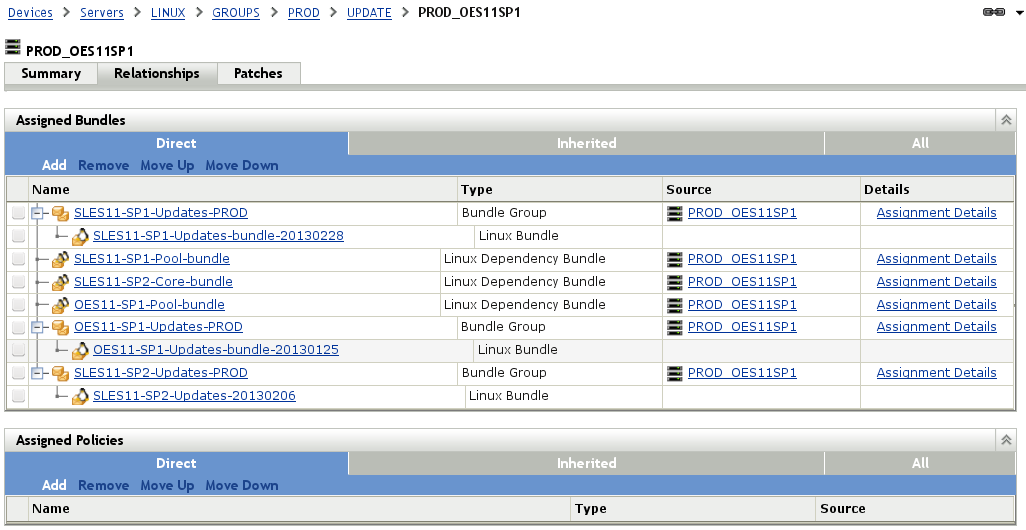
Select the tab of the PROD_OES11SP1 device group in the /Devices/Servers/Linux/GROUPS/PROD/UPDATE folder and then select to add the missing bundles and bundle groups to the PROD_OES11SP1 device group.
Figure 12-19 Bundle Assignment To a Device Group
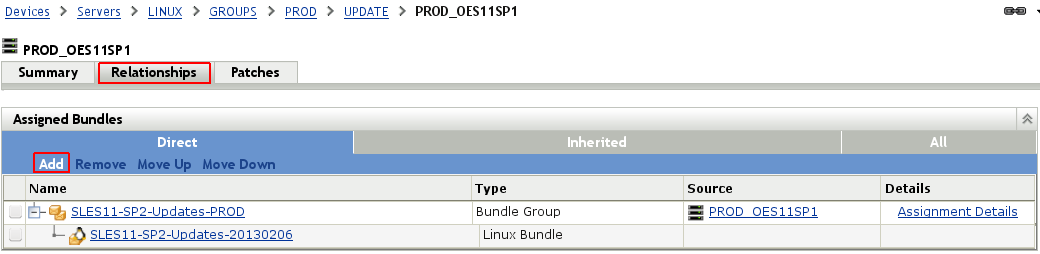
Figure 12-20 Bundle Assignment To a Device Group - Selecting Bundles And Bundle Groups
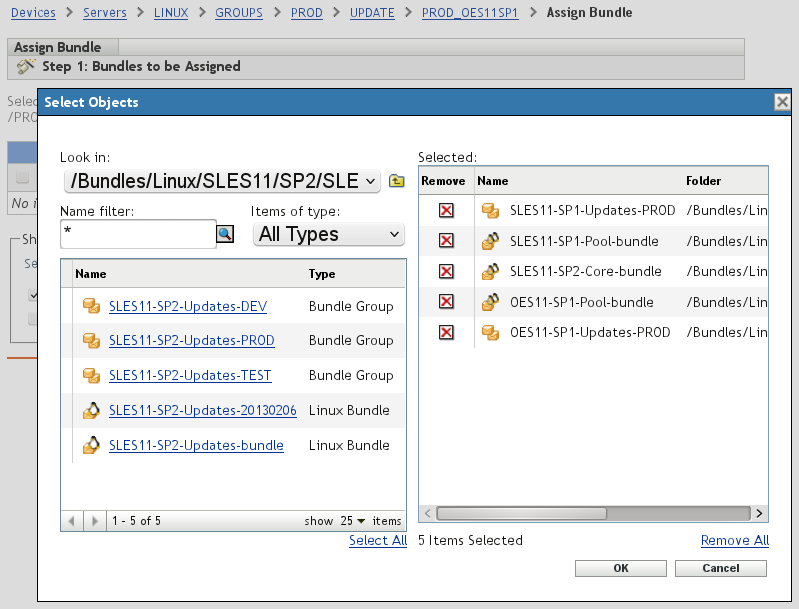
The following figures provides and overview of the six bundles that have been assigned to this device group, either directly or through bundle groups for the update bundles.
Figure 12-21 Bundle Assignment To a Device Group - Overview of Assigned Bundles
Typically a new frozen patch level is first assigned to development devices through the corresponding bundle groups.
After successful initial testing, the next step is to replace the current update bundle in the bundle groups for the test environment with the new frozen patch level.
Finally, after additional testing has not revealed any issues, the new frozen patch level will also be added to the bundle groups for the production.
New frozen patch levels can be created in parallel at any time and the whole cycle can be repeated. Old frozen patch bundles that are no longer a member of any bundle group should be kept for a while, so that the corresponding patch levels can be re-activated if the need should arise.
12.2.2 Manual Bundle Deployment
Deployment of the bundles assigned in Section 12.2.1, Bundle Assignment can be achieved in several ways. The simplest form is an assignment without scheduling:
Figure 12-22 Simple Assignment without Scheduling
This method of assignment is recommended by Novell Consulting if no more than 20–30 devices must be managed by ZENworks Configuration Management. The patching process itself must be initiated manually on each device by an administrator.
First, look at an example of how a ZENworks Configuration Management agent displays an assignment of a newly created bundle group. To have an up-to-date agent view, you need to execute the following command at the device:
zac ref
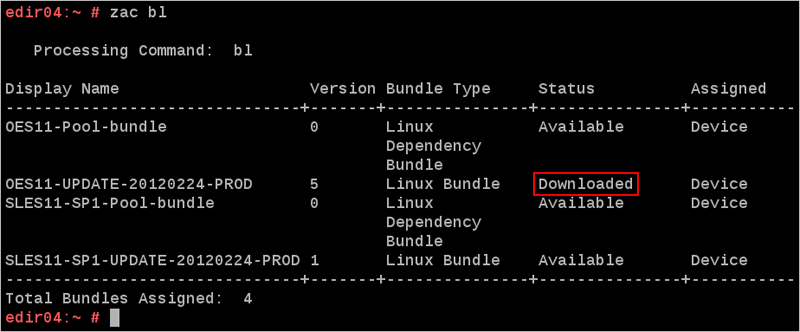
The zac bl (bundle list) command lists all assigned bundles and their states. The bundle groups are not displayed:
Figure 12-23 Agent View of the Bundle Group Assignment
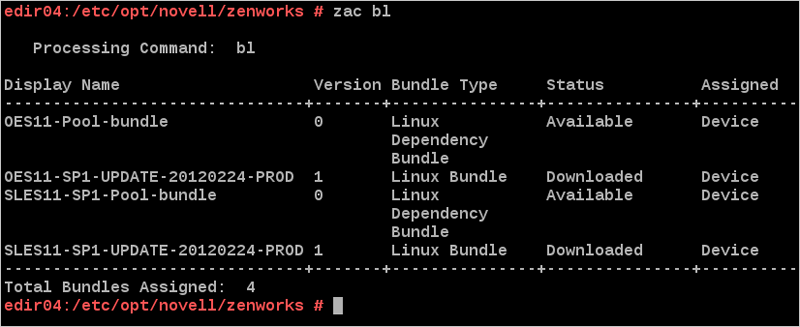
There are two different states displayed in the fourth column in Figure 12-23. A status of Available means the bundle is installed. The status for dependency bundles is always Available, even if a package has not been installed to the device from these bundles. This explains why this status is displayed immediately after the first agent refresh after the dependency bundle has been assigned.
The term Downloaded does not mean that the bundle content is already present on the target device. It means that all metadata, such as package lists and dependencies, is known to the agent.
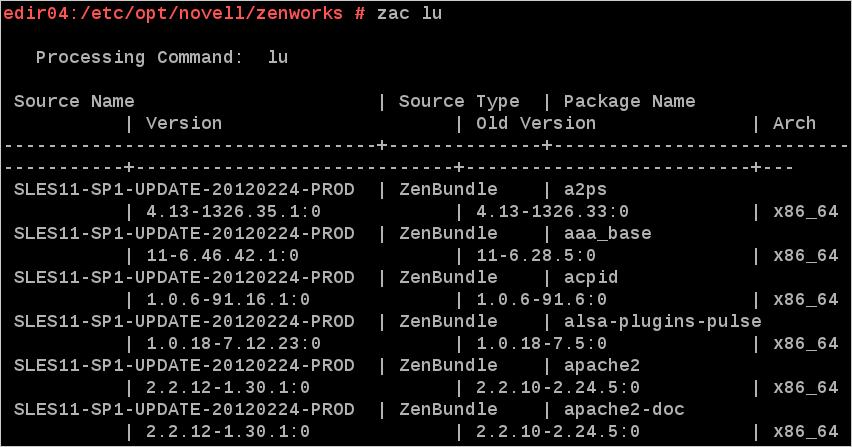
Available updates are listed by executing the following command:
zac lu (list updates)
Figure 12-24 Listing Updates through zac lu
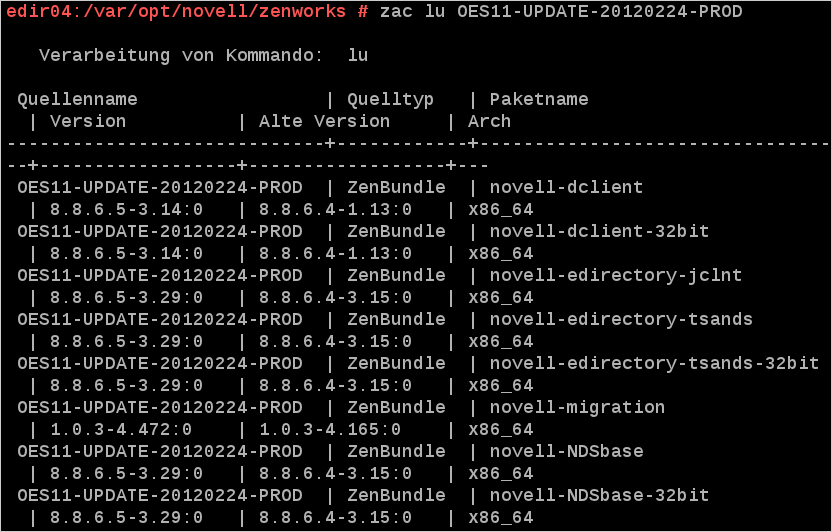
Updates from a particular bundle are displayed by using the following command:
zac lu <bundle name>
The output is shown in the following figure:
Figure 12-25 Updates for a Particular Frozen Patch Bundle
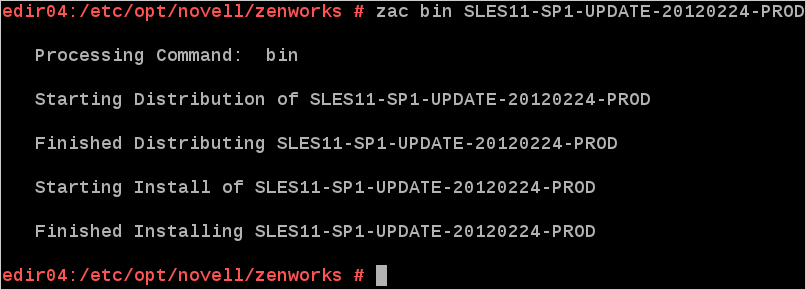
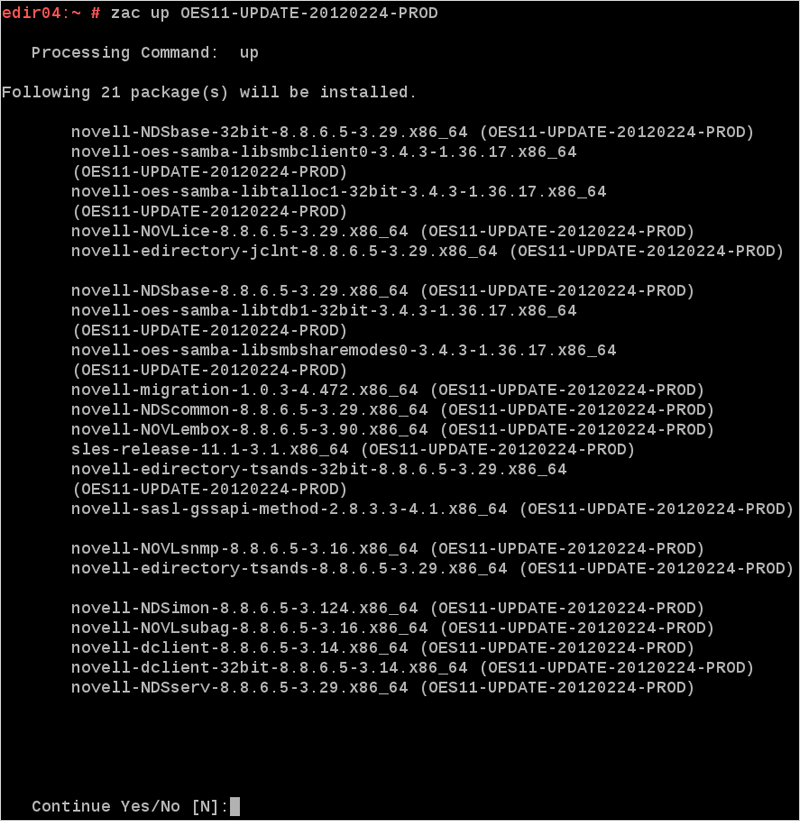
Novell Consulting recommends that you initiate a particular update by executing the zac bundle-install (zac bin) command:
zac bin <bundle_name>
Although a server update can be achieved by executing zac update (zac up), using zac bin gives a better overview of whether a particular bundle has been installed.
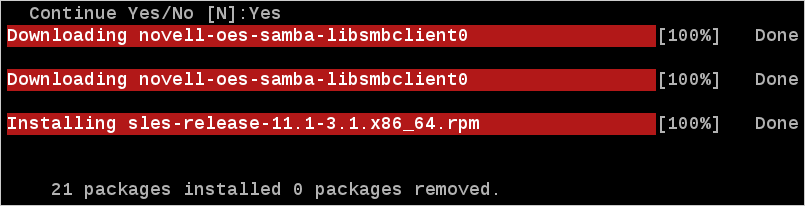
The following figure illustrates the different stages in the patch process. In the first stage, the patches are distributed from the ZCM server to the device. The installation takes place in the second stage.
Figure 12-26 Example Installation of a Frozen Patch Bundle with zac bin
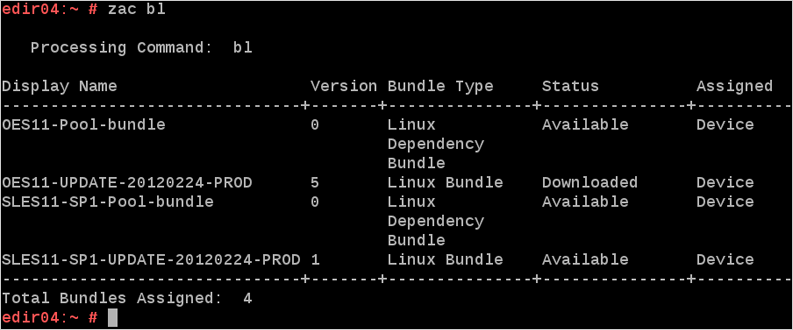
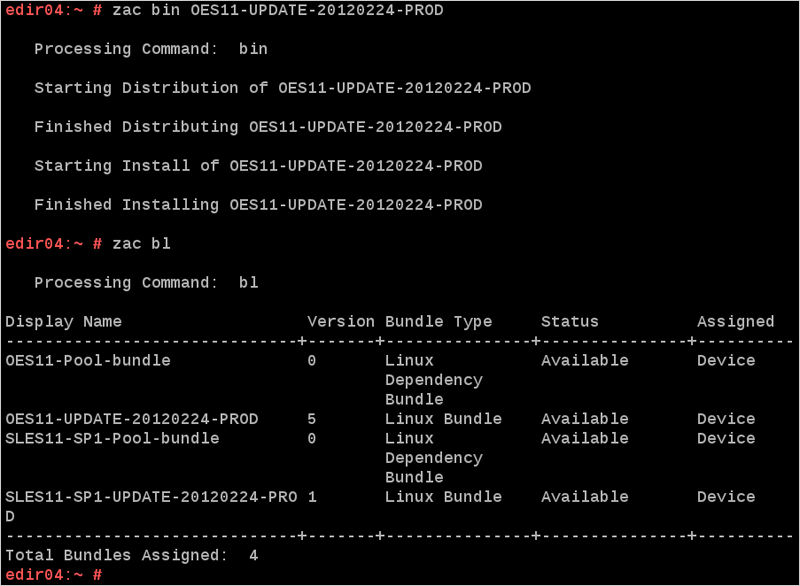
The new bundle view is seen in the following figure, where zac bl has been executed again after installation of the SLES11-SP1-UPDATE-20120224-PROD bundle. All installed bundles are now flagged as Available. The OES11-UPDATE-20120224-PROD bundle still remains in the Downloaded state.
Figure 12-27 Bundle View after Installation of a Frozen Bundle
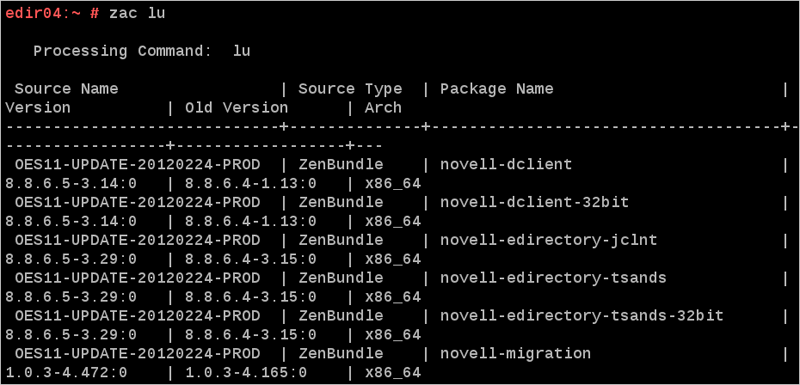
You can also use zac up for installing patches from a frozen bundle. The example in this section uses the frozen OES 11 update bundle.
You can use the zac list-updates (zac lu) command to verify if there are still patches that have not yet been applied to the device. In the following example, there are still uninstalled patches because the previous patch update did not include the OES 11 patches:
Figure 12-28 Updates Listed after Applying SLES 11 SP1 Patches
The zac update (zac up) command also allows you to optionally specify one or more bundles to be processed, as shown in the next figure:
Figure 12-29 Patching by Using zac up (1)
In contrast to zac bin, using zac up does display the individual patch RPMs being processed:
Figure 12-30 Patching by Using zac up (2)
However, the bundle listing still shows that the bundle is not installed. Although all packages that have been installed are part of the frozen OES 11 patch bundle, it still remains in the Downloaded state.
Figure 12-31 Bundle View after zac up OES11-SP1-UPDATE-20120224-PROD
For this reason, Novell Consulting strongly recommends using zac bin as shown in the following figure. The commands displayed there have been executed after zac up to obtain the correct state of the bundle view.
Figure 12-32 After Correcting the Frozen OES 11 Patch Bundle
No real action happens, so no software is installed at the device. However, the state of the bundle changes from the agent point of view and is updated from Downloaded to Available.
12.2.3 Scheduled Bundle Deployment
Manual patch deployments are not suitable if large numbers of devices must be managed via ZENworks Configuration Management. For such environments, bundle assignments can be scheduled either for a particular date and time, a random time, after the next device refresh, or a time relative to the next device refresh.
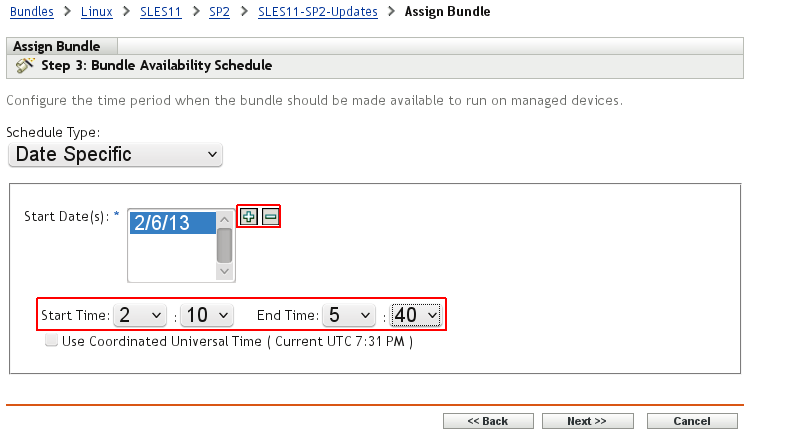
The following two figures illustrate the use of an Availability Schedule for automatic bundle deployment. At the scheduled time, the agent retrieves and installs all assigned bundles.:
Figure 12-33 Schedules and Flags
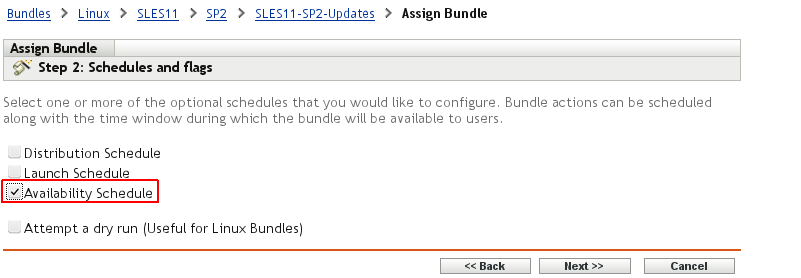
Figure 12-34 Bundle Availability Schedule
Another schedule type for automatic patch deployments is the distribution schedule. This schedule type is primarily intended to predistribute larger bundles to the target devices; for example, if a slow WAN link prevents a direct installation. The bundle content is preloaded to the devices and installed from a local cache directory:
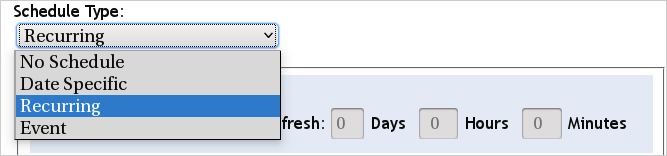
There are many possibilities for specifying a particular point in time when the distribution should be started. The Recurring type has been chosen for the following example:
Figure 12-35 Schedule Types for Distribution Schedules
The option to start this distribution immediately after the next device refresh is also selected:
Figure 12-36 Distribution Schedule
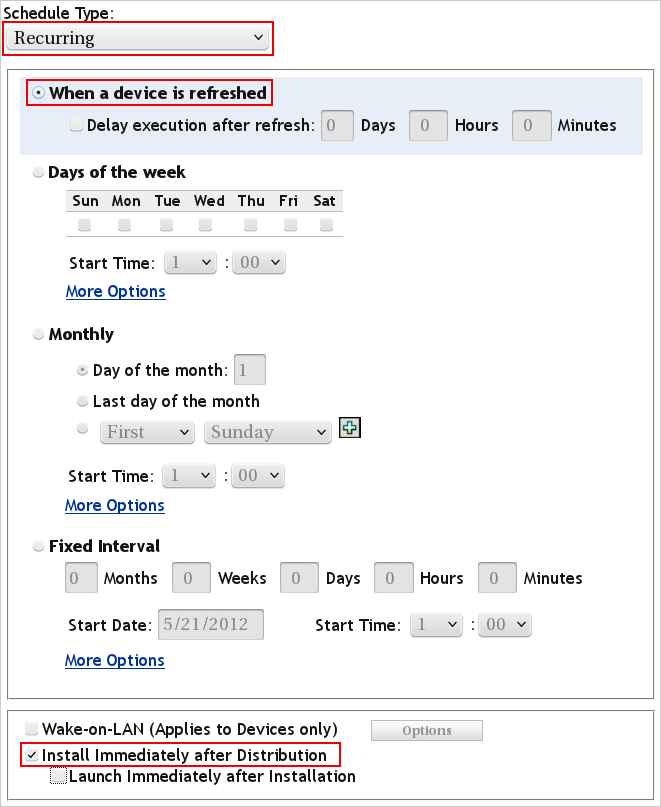
Automatic bundle installation can be achieved by selecting the check box as shown in the figure above. The installation starts immediately after the particular bundles are distributed to the device.